
Christmas Cards Made 2016


Wednesday, 25 December 2013
Monday, 23 December 2013
Buddy the Elf is an artist too.
Buddy is the little Elf that lives at my Grandchildren's house during the Christmas season. He is a pretty good Elf all round...not very naughty at all!
He seems to do a lot of fun things at night while people are sleeping. My grandkids were trying to explain him to me and asked if I had seen the movie Night at the Museum. When they heard I had not, they advised that I should go see it cuz then I would understand that Buddy is real!
Apparently, Buddy finished flying school last week.

And just before we actually had any snowfall here, he managed to produce his own snow and build a Elf sized snow family. Here he sits, admiring his handiwork.
Yes Siree...Buddy is quite enterprising! I think Buddy may have been sampling the rum and eggnog as he seems about to slide off that Lego chair!
He seems to do a lot of fun things at night while people are sleeping. My grandkids were trying to explain him to me and asked if I had seen the movie Night at the Museum. When they heard I had not, they advised that I should go see it cuz then I would understand that Buddy is real!
Apparently, Buddy finished flying school last week.
And just before we actually had any snowfall here, he managed to produce his own snow and build a Elf sized snow family. Here he sits, admiring his handiwork.
Yes Siree...Buddy is quite enterprising! I think Buddy may have been sampling the rum and eggnog as he seems about to slide off that Lego chair!
Sunday, 22 December 2013
Rudoff the Red Nosed Reindog
Ho ho ho ho ho
I am still laughing!!! The grandkids came over to help decorate the tree and stay for a sleepover.
They also wanted to make cards for their teachers and wrap up the chocolates I bought for them to give.
The doorbell rang and I could hear excited voices outside as I walked to answer the door. In burst Little Mr P, and he ran straight to the tree without taking off his boots (a no-no in Canadian houses). He carefully hung something on the tree as high as he could reach and worked hard to adjust it just so. Well, truth be told, as carefully as a person can be when they are wearing a snow jacket with the zipper undone and big velcro cuffs at the wrists. As my daughter was scolding him for not taking off his boots first, he proudly turned around and with the happiest face ever, announced...I made this for your tree!!!

Little Miss C and my daughter instantly asked if this was the Christmas dog from the Grinch. No, he says crossly, the smile fading a bit...this is a reindeer! They seemed a wee bit shocked and tried to make a quick recovery muttering something about how much this looked like that dog. You guys are silly, he said, see.....first of all it has a red nose AND it says right here on the back that it is RUDOFF and Rudoff is a reindeer!!!
The funniest bit was after he left today, I took this photo and realized that he had originally spelled it correctly, and then carefully changed it. I think he is very arty, for a little boy still in kindergarten.

My daughter was trying not to laugh as she still thought it looked like a dog and because she thinks I am too particular about how I decorate the tree. I use certain colours and try hard to get a balanced look to the various ornaments. Well, she must have forgot that I only started that style long after she had left home to start her own life. I had my years of hanging everything up that she and her sister made in school. And....I loved it too.
I love my little Rudoff and shall treasure my little reindog...errr...reindeer, forever.
I am taking this little paper decoration over to the Pixies Crafty Workshop (not for the prize, thanks). Just to share that Little Mr P has also been working hard to use up his snippets. This is such a busy time of year and we can sometimes get caught up in the To Do list. We all need a little smile each day and this was mine.
Friday, 20 December 2013
Deck the Halls
It is looking festive in the Scrappymo household.
Nativity - check

Tree - check

Front porch and door decorations - check I usually do a much nicer job with different fresh evergreen boughs but there were not any windstorms helping us out. Usually we find the boughs freshly dropped from the treed edges of the farm roads just below us. Wish I had not hung the keys across from each other on the door...but...it is checked off the list and that is how it is staying!
 Still want to weave some loopy bit of the jute (hessian) around the bench...but perhaps I am running out of time...I had grandious plans to loop the hessian there and all around the door...DH says I am dreaming and just to leave it...maybe fairies will come in the night and do it for me!

Christmas Village - check

Mantle - check

Dining table centerpieces - check
 Tried something new this year with some rhinestone press on letters. And managed to work in the angel that we never seem to have a place for. Can you spot them... Let me help you...
 Various Christmas decor - check


 Gifts wrapped - check

Shortbread cookies - check
 Cards mailed - check

Front Garden Lights - check
The tacky DH Light Up Santa - sigh...check
Could stop now if I wanted to but would still like to bake some Mincemeat Tarts and some Walnut Snowballs this weekend. Also need to check the liquor cupboard and make sure we have wine and liquors in for Christmas dinner. Glad to see the to do list is shorter than the finished list! Yay!
How are you all doing...are you ready for the big day...Hope some of you post your Christmas decor too...it is always so fun and relaxing to sit and visit round the blogs at this time of year.
I will close with my best setting the scene Christmas photo...we woke up to it this morning...SNOW!!!

Sadly, we are overlooked...so much more so at this time of year as the leaves that help to screen out the neighbours have dropped! But it is still my view and I so love to see the snow at Christmas, especially on my little Victorian garden shed!
Merry Christmas!
Nativity - check
Tree - check
Front porch and door decorations - check I usually do a much nicer job with different fresh evergreen boughs but there were not any windstorms helping us out. Usually we find the boughs freshly dropped from the treed edges of the farm roads just below us. Wish I had not hung the keys across from each other on the door...but...it is checked off the list and that is how it is staying!
Christmas Village - check
Mantle - check
Dining table centerpieces - check
Shortbread cookies - check


Front Garden Lights - check
The tacky DH Light Up Santa - sigh...check
Could stop now if I wanted to but would still like to bake some Mincemeat Tarts and some Walnut Snowballs this weekend. Also need to check the liquor cupboard and make sure we have wine and liquors in for Christmas dinner. Glad to see the to do list is shorter than the finished list! Yay!
How are you all doing...are you ready for the big day...Hope some of you post your Christmas decor too...it is always so fun and relaxing to sit and visit round the blogs at this time of year.
I will close with my best setting the scene Christmas photo...we woke up to it this morning...SNOW!!!
Sadly, we are overlooked...so much more so at this time of year as the leaves that help to screen out the neighbours have dropped! But it is still my view and I so love to see the snow at Christmas, especially on my little Victorian garden shed!
Merry Christmas!
Wednesday, 18 December 2013
Grandma's Sliced Shortbread Cookies
My English Grandma always made sliced shortbreads. There were no other kind of shortbreads at her house. She emigrated to Canada after the First World War. She was from a tiny village in Cumbria that was fondly called Little Ireland. The locals have a bit of an Irish lilt to their speech.
I hope you will enjoy her recipe!
Cream 2 cups butter (I use salted butter)
Add 1 1/4 cups of powdered icing sugar and cream well again
Add 1/2 cup powdered cornstarch and cream again
Add 2 teaspoons pure vanilla extract and cream in again
Add 3 1/2 cups of flour (one cup at a time and mix together well). Batter will be a bit stiff.
Divide mixture into 4 or 5 balls and place in a bowl with a teatowel over top.

Take out one ball and place it on a piece or tin foil or plastic wrap and roll it slowly back and forth with your hands,until it forms a log shape. I made mine about the size of a Canadian quarter this year. Other years I have gone a wide as a Loonie.

I use tin foil as my girls are into recycling and are against additives and chemicals etc, so they would not want the plastic wrap on their food! Once you have the log shape even enough to suit yourself, then smooth the tinfoil slightly around it and place on a cookie sheet. Continue with each of the remaining balls till you have 4 or 5 tinfoil covered logs on your cookie sheet. You can see I have 2 logs rolled already and in the first photo above, there were 3 balls left to roll)

Place in the fridge for about an hour or longer. Once firmed up in the fridge, remove a log at a time and slice them into cookies. I like to slice all at once as I get a rhythm going and I am more likely to get them fairly close to the same size. I was not as fussy today as usual as I am still over tired.

Once sliced, you will notice that there are some little edges that look a bit ragged where the knife may not have slid through cleanly. You can see them in the photo above...If that happens, I take that cookie slice and roll it slightly as if I was rolling a quarter across the cutting board. Just a soft roll about half an inch forward and back...now all the raggedy edges would be hidden...except now the top is a bit mishapen...so very lightly pounce it on the board to flatten the top even.
I did warn you that these cookies were longer to make than the Melting Moments on my earlier post!
You are almost done! Place them one by one on a cookie sheet. I got 35 on my cookie sheet on my last batch...they are in the oven as we speak!
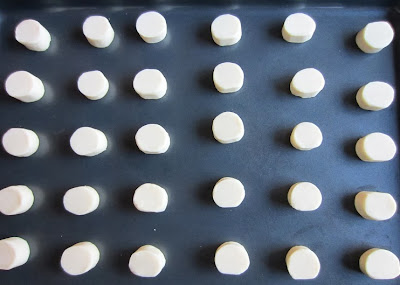
Take a luncheon sized fork and lightly press the tines into your cookie tops. This will prevent them from cracking.

Bake 300 to 325 degrees for 10 to 15 minutes.
Here are the finished cookies...after all that work I did to get them even, the tops reverted back to raised edges from rolling them like a quarter!!! They don't usually do that but que sera, sera!

Auntie Lil's Melting Moments (Whipped Shortbread Cookies)
I promised my readers that I would post my shortbread recipes. I will leave you to decide which you like better. If you try to bake them, I promise you will not be disappointed! I will start with the directions for the easiest and fastest to make.
Auntie Lil's Melting Moments
Whip 2 cups Butter (I use salted butter)
Add 1 cup icing sugar and whip again
Add 1/2 cup powdered cornstarch and whip again
 Add 1 teaspoon pure vanilla extract...whip again
Finally add 3 cups of flour ( 1 cup at a time and whip in between each)

You whip the final result till it "breaks". The best way I can describe this is when all the ingredients are whipped in, you continue whipping till the resulting batter sort of stands in peaks when you lift the beaters up from the bowl. You will sort of notice it breaking on its own in the bowl as you are mixing it and then you are done! It is already starting to break in the photo above but I needed to beat in the vanilla...here is the finished photo...you can see that the colour is now even and the peaks are holding their own shape.

Drop by teaspoon full onto cookie sheets. See how they are still "peaked"...some people shape them but to Auntie Lil, the beauty of these was how quick and easy there were to make...I am in total agreement with her on that front!!!

I have air injected teflon pans so do not use parchment papers underneath the cookies. Bake at 300 degrees for 12 to 15 minutes. The bottoms should just be very lightly golden coloured. I have a slow oven and I live near the sea...so it takes about 16 minutes for me. If you are not sure, lift one and check if the bottom is lightly golden.
They are in the oven baking so no photo of the finished cookies. I will update this post later with some finished cookie pictures.
Mmmm...Mmmmmm...good!
Auntie Lil's Melting Moments
Whip 2 cups Butter (I use salted butter)
Add 1 cup icing sugar and whip again
Add 1/2 cup powdered cornstarch and whip again
Finally add 3 cups of flour ( 1 cup at a time and whip in between each)
You whip the final result till it "breaks". The best way I can describe this is when all the ingredients are whipped in, you continue whipping till the resulting batter sort of stands in peaks when you lift the beaters up from the bowl. You will sort of notice it breaking on its own in the bowl as you are mixing it and then you are done! It is already starting to break in the photo above but I needed to beat in the vanilla...here is the finished photo...you can see that the colour is now even and the peaks are holding their own shape.
Drop by teaspoon full onto cookie sheets. See how they are still "peaked"...some people shape them but to Auntie Lil, the beauty of these was how quick and easy there were to make...I am in total agreement with her on that front!!!
I have air injected teflon pans so do not use parchment papers underneath the cookies. Bake at 300 degrees for 12 to 15 minutes. The bottoms should just be very lightly golden coloured. I have a slow oven and I live near the sea...so it takes about 16 minutes for me. If you are not sure, lift one and check if the bottom is lightly golden.
They are in the oven baking so no photo of the finished cookies. I will update this post later with some finished cookie pictures.
Tuesday, 17 December 2013
Christmas Club Card - Get Your Skates On
I am little late...but better late than never! Our theme for the Christmas Card Club was chosen by the lovely Sue of Planet Susie.
I should have posted this card on Sunday but woke up feeling poorly with this darned cold/cough. Why is it that coughs always get worse as soon as your head hits the pillow? lol
My friend Gloria hosted a fabulous crop on Saturday evening. I made a few cards for a little card exchange there and then got completely stumped with this card. The ladies tried to help me but I just couldn't get my head around the design I wanted. I set it aside to finish at home and finally got to work on it tonight. I was trying to use a lot of silver and the skates just seemed lost on it. Everything just looked the same to me. This skates die cut is very large and working with something that large takes some getting used to. Thank goodness I bought the glitter card bases on my last trip to Michael's in America. They were the only precut cards I had that were large enough to carry that die cut!
I usually know who I am gong to give a card to and that influences how I make it...When I worked on it tonight, I realized that I still had to make a purple Christmas card for a special friend. Purple is her favourite colour and she has her Christmas tree and decorations all tied in to this colour! Once I pulled out the purple card stock, I liked the look of the skates on it. Whew...problem solved! My card actually went together quite smoothly after that.

Recipe
Card base and Envelope - Michael's
Card stock - from my stash, snippets of 2 shades of purple card stock and 1 piece of grey textured card that has a sort of satin sheen
Dies - Tim Holtz Skates and Spellbinders Decorative Labels Eight
Very fine silver metallic string - from my stash
Chalk - Stampin' Up chalked around the edges of the skates
Bling - teensy clear diamonds from my stash
Sentiment - prestamped set from my LSS
I am entering this card in the following challenges:
1. Pixies Crafty Workshop - must use snippets
2. CHNC Extra - must be Christmas
3. CHNC - Whatever is urgent to make #155
4. Christmas Card Club - Get Your Skates On
I should have posted this card on Sunday but woke up feeling poorly with this darned cold/cough. Why is it that coughs always get worse as soon as your head hits the pillow? lol
My friend Gloria hosted a fabulous crop on Saturday evening. I made a few cards for a little card exchange there and then got completely stumped with this card. The ladies tried to help me but I just couldn't get my head around the design I wanted. I set it aside to finish at home and finally got to work on it tonight. I was trying to use a lot of silver and the skates just seemed lost on it. Everything just looked the same to me. This skates die cut is very large and working with something that large takes some getting used to. Thank goodness I bought the glitter card bases on my last trip to Michael's in America. They were the only precut cards I had that were large enough to carry that die cut!
I usually know who I am gong to give a card to and that influences how I make it...When I worked on it tonight, I realized that I still had to make a purple Christmas card for a special friend. Purple is her favourite colour and she has her Christmas tree and decorations all tied in to this colour! Once I pulled out the purple card stock, I liked the look of the skates on it. Whew...problem solved! My card actually went together quite smoothly after that.
Recipe
Card base and Envelope - Michael's
Card stock - from my stash, snippets of 2 shades of purple card stock and 1 piece of grey textured card that has a sort of satin sheen
Dies - Tim Holtz Skates and Spellbinders Decorative Labels Eight
Very fine silver metallic string - from my stash
Chalk - Stampin' Up chalked around the edges of the skates
Bling - teensy clear diamonds from my stash
Sentiment - prestamped set from my LSS
I am entering this card in the following challenges:
1. Pixies Crafty Workshop - must use snippets
2. CHNC Extra - must be Christmas
3. CHNC - Whatever is urgent to make #155
4. Christmas Card Club - Get Your Skates On
Thursday, 12 December 2013
The last of my Falling into Fall cards
I hope you are not too tired of when I mention using up VOS (very old supplies)...because I have another VOS card. When I was packing for that recent crop, I found all sorts of things I had forgotten. One of them was a tag from maybe 10 or even 15 years ago.
I think the tag came from some kind of make and take...it is so old that I can't remember anymore. I think that is funny as some of you know that I have a brain injury from a car accident about 5 years ago. Starting this blog was part of my recovery as I have problems with my memory "in the moment". Usually I can remember things from the past quite clearly...it is in the daily aspects of life that I still have memory problems with. That is why I often write on blog comments that I am going to try their particular technique, or their particular style of folded card.....and then I promptly forget!!!
Sorry about the waffling,,,now...on with my card. The glue had dried up on this tag and the elements had fallen off. There were 2 or 3 punched leaves with bits of dried up glue in the bottom of the envelope with the tag, and that was that.
I remembered that I had a fall quote (also VOS) and some DP of a fall leaves line, so I dug that out and fussy cut some leaves from it. I needed to place them exactly where they were before as I was stuck with the sort of discoloured marks from old dried up glue...and needed to cover them up. 'Nough said!
I cut and matted some of the design papers and roughed up the edges with the blade of my scissors.
The tag had already set the colour scheme so I went with matching colours. Hopefully the DP is strong enough so that the card does not look too boring.

As part of my commitment to use up some of my ribbon collection, I left the top of the tag a bit free from the card so I could tie some ribbon through the loop. I tried several ribbons. A couple of different shades of velvet, a rust organza, and finally some jute. They all looked odd on the tag.
I think it is because the tag is so big and the distance from the hole to the edge of the tag is quite large. In the end, I decided to glue a twine bow into the hole at the top of the tag...probably a good idea as this card is going overseas and I want it to go for standard postage.
Although I did pop some of the leaves forward, I think (hope) it is still flat enough to fit through the tester slot.
Recipe - All items are from my stash
Card base and envelope - 5 1/2 inch square textured white card
DP - Forever in Time; Autumn Art
Card Stock - snippets of rust card
Quote - My Minds Eye; Autumn Tiny Tales Frames, this quote is also VOS
Twine - fine coloured jute type twine
Tag - VOS
I am entering this card in the following challenges
1. Pixies Crafty Workshop - must use snippets
I think the tag came from some kind of make and take...it is so old that I can't remember anymore. I think that is funny as some of you know that I have a brain injury from a car accident about 5 years ago. Starting this blog was part of my recovery as I have problems with my memory "in the moment". Usually I can remember things from the past quite clearly...it is in the daily aspects of life that I still have memory problems with. That is why I often write on blog comments that I am going to try their particular technique, or their particular style of folded card.....and then I promptly forget!!!
I remembered that I had a fall quote (also VOS) and some DP of a fall leaves line, so I dug that out and fussy cut some leaves from it. I needed to place them exactly where they were before as I was stuck with the sort of discoloured marks from old dried up glue...and needed to cover them up. 'Nough said!
I cut and matted some of the design papers and roughed up the edges with the blade of my scissors.
The tag had already set the colour scheme so I went with matching colours. Hopefully the DP is strong enough so that the card does not look too boring.

As part of my commitment to use up some of my ribbon collection, I left the top of the tag a bit free from the card so I could tie some ribbon through the loop. I tried several ribbons. A couple of different shades of velvet, a rust organza, and finally some jute. They all looked odd on the tag.
I think it is because the tag is so big and the distance from the hole to the edge of the tag is quite large. In the end, I decided to glue a twine bow into the hole at the top of the tag...probably a good idea as this card is going overseas and I want it to go for standard postage.
Although I did pop some of the leaves forward, I think (hope) it is still flat enough to fit through the tester slot.
Recipe - All items are from my stash
Card base and envelope - 5 1/2 inch square textured white card
DP - Forever in Time; Autumn Art
Card Stock - snippets of rust card
Quote - My Minds Eye; Autumn Tiny Tales Frames, this quote is also VOS
Twine - fine coloured jute type twine
Tag - VOS
I am entering this card in the following challenges
1. Pixies Crafty Workshop - must use snippets
Thursday, 5 December 2013
Crafty Ribbons Christmas Advent Event
Just a quick post to let my followers know about the Crafty Ribbons Christmas Advent Event.
They are featuring a different craft company or shop each day, with the design team showing projects from their products There are lovely daily prizes from each highlighted company.
Day 1 is LOTV...I so love their stamps!
Entries for prizes ends Dec 26th and the prize draws will be made on Jan 2, 2014.
Tuesday, 3 December 2013
Recognizing limitations
My DH will be so proud of me. He always tells me that I need to recognize my limitations if I am sore and sometimes need to alter plans or even cancel them if they are beyond my grasp.
Many of you know how much I look forward to Black Friday shopping. It is a tradition in our house and the shopping trip itself is planned and honed with precision. We usually manage to get all the doorbusters on our list! Not by shoving and pushing. but by merging our shopping lists and each of us searching for everyone else. We meet up before going thru the till, and sort if we have extras. Generally someone takes them anyway!
Black Friday starts on Thursday...crazy I know...but it starts as early as around 3pm Thursday. Each store has doorbuster specials at different times on Thursday, Friday and even Saturday. You have to line up to get them, so it does take planning. We usually stay at till Saturday but the friend booking the rooms had to drop out this year...and forgot to do the booking!!! My back and neck were still really sore from that fall and poor DD had a migraine, so we cancelled the room that we did manage to get for one night. We scaled our list down, and drove home to our own comfy beds. We were home just after midnite. The hotel had a wait list for the room so they were really nice about the cancellation.
I managed to get an Ipad mini for $199. and three sets of king size and queen size 700 thread count sheets for $24.99 each A king sized quilt, a little mini crock pot for keeping hot dips warm when you entertain for $4.50 and two 12 x 12 double sided page scrapbook paper pads for $5.00, door buster gifts for the kids next door and much more. I treated myself to two Christmas stamps that were BOGO...I know I will get a lot of use from them!
DH is in Vegas celebrating his 60th with his pals from elementary school! They have stayed friends all these years. He left me money to buy any scrappy purchases that caught my eye...boy, oh boy, did things catch my eye!
DD even had me chose one of my Christmas presents...it is a hanging embellishment cupboard that matches my craft room furniture. I have wanted it for about a year but it had been discontinued. It was $109.00 in Canada when they had it and she got it for $29.00 on clearance. She needed to show me as she needed to be sure that I had a wall that it could go on...needless to say, I am a very happy crafter. She will get me other surprises as well, so I did not mind choosing it. I will post a photo after Xmas when I have it hung up and filled with stash!!! Got lot of other stuff but don't want to bore you too, too much!

Here is the last one from the series of fall themed thank you cards I was working on this week. They all use the same basic selection of papers, just the way I combined the elements differs slightly with each.
I was happy with the look of the woodland branches on my Thanksgiving card so decided to use some of those die cuts again. This time I decided to tie the branches together in a bundle. I had just the right colour of fine jute twine, so pressed that into service! Kept it fairly flat again, as this card will be posted overseas.
I am entering this card into the following challenges:
1. Pixies Crafty Workshop - must use snippets.
2. Word Art Wednesday - uplifting words
3. Simon Says Stamp Wednesday Challenge - Anything goes
Many of you know how much I look forward to Black Friday shopping. It is a tradition in our house and the shopping trip itself is planned and honed with precision. We usually manage to get all the doorbusters on our list! Not by shoving and pushing. but by merging our shopping lists and each of us searching for everyone else. We meet up before going thru the till, and sort if we have extras. Generally someone takes them anyway!
Black Friday starts on Thursday...crazy I know...but it starts as early as around 3pm Thursday. Each store has doorbuster specials at different times on Thursday, Friday and even Saturday. You have to line up to get them, so it does take planning. We usually stay at till Saturday but the friend booking the rooms had to drop out this year...and forgot to do the booking!!! My back and neck were still really sore from that fall and poor DD had a migraine, so we cancelled the room that we did manage to get for one night. We scaled our list down, and drove home to our own comfy beds. We were home just after midnite. The hotel had a wait list for the room so they were really nice about the cancellation.
I managed to get an Ipad mini for $199. and three sets of king size and queen size 700 thread count sheets for $24.99 each A king sized quilt, a little mini crock pot for keeping hot dips warm when you entertain for $4.50 and two 12 x 12 double sided page scrapbook paper pads for $5.00, door buster gifts for the kids next door and much more. I treated myself to two Christmas stamps that were BOGO...I know I will get a lot of use from them!
DH is in Vegas celebrating his 60th with his pals from elementary school! They have stayed friends all these years. He left me money to buy any scrappy purchases that caught my eye...boy, oh boy, did things catch my eye!
DD even had me chose one of my Christmas presents...it is a hanging embellishment cupboard that matches my craft room furniture. I have wanted it for about a year but it had been discontinued. It was $109.00 in Canada when they had it and she got it for $29.00 on clearance. She needed to show me as she needed to be sure that I had a wall that it could go on...needless to say, I am a very happy crafter. She will get me other surprises as well, so I did not mind choosing it. I will post a photo after Xmas when I have it hung up and filled with stash!!! Got lot of other stuff but don't want to bore you too, too much!
Here is the last one from the series of fall themed thank you cards I was working on this week. They all use the same basic selection of papers, just the way I combined the elements differs slightly with each.
I was happy with the look of the woodland branches on my Thanksgiving card so decided to use some of those die cuts again. This time I decided to tie the branches together in a bundle. I had just the right colour of fine jute twine, so pressed that into service! Kept it fairly flat again, as this card will be posted overseas.
I am entering this card into the following challenges:
1. Pixies Crafty Workshop - must use snippets.
2. Word Art Wednesday - uplifting words
3. Simon Says Stamp Wednesday Challenge - Anything goes
Sunday, 1 December 2013
Christmas Card Club - Oh Christmas Tree
The lovely Dawn chose the theme of Oh Christmas Tree for our challenge this fortnight. It was a great theme...I do not have a single tree stamp so this theme encouraged me to ink and colour a stamp I have never used before.
I have been trying hard this year to finally create with some of my never before used stash (NBUS) and it was a good feeling to get this inked up and put to use. After pawing through my Christmas stamps, I realized that I seem to own a lot of getting the tree images! lol
I am in full standard postage mode now...all my hand delivered cards are made and I am now making my cards for overseas. I checked this one through my new mail width tester and it fits! This was a gift and I am so very grateful for it. It is so nice to make a card and test it as you are creating...it is so easy to adjust your design with this special gadget. It was a gift from a special friend...you know who you are, and I just wanted to say thank you so much again!
There is no official recipe tonight as DH turned 60 today and we have been out for a lovely supper and celebrations. I am a wee bit sleepy now!
 I started with a square textured card and envelope, and added two snippets of dotted MME design papers. The image is a bit on the large side so in order to fit the largish corner dies on my card, I did not mat the image. I think it is the first time that I have not matted one and I must say it felt weird. I inked the edges quite liberally with an Ingvild Bolme red chalk ink to try to mimic a mat. I love this product! It has the cutest handle built in and the ink dries immediately...no smudges on your fingers!
I added a Martha Stewart border strip...for those of you that know my name, this border is quite appropriate for me! I added the two Spellbinder Parisian corner dies and a cluster of Impression Obsession Snowflakes. Placed a few aqua tiny diamonds here and there to tie in that pretty blue from the MS border. Not sure about the sentiment...might be Stampin Up...will check it tomorrow.
I can not decide if I should stickle the snowflakes and the edge of the image. I usually do as it is Christmas after all, but something about this image felt a bit rustic. What do you think...let me know if you think I should go back and add it...
 I am entering this card in the following challenges:
1. Pixies Crafty Workshop - must use snippets; Everything on this card is a snippet
2. CHNC Extra - Anything Goes, must be Christmas
3. MFP Speedy TV Christmas Card Challenge - must be Christmas
4. Christmas Card Club - Oh Christmas Tree
I have been trying hard this year to finally create with some of my never before used stash (NBUS) and it was a good feeling to get this inked up and put to use. After pawing through my Christmas stamps, I realized that I seem to own a lot of getting the tree images! lol
I am in full standard postage mode now...all my hand delivered cards are made and I am now making my cards for overseas. I checked this one through my new mail width tester and it fits! This was a gift and I am so very grateful for it. It is so nice to make a card and test it as you are creating...it is so easy to adjust your design with this special gadget. It was a gift from a special friend...you know who you are, and I just wanted to say thank you so much again!
There is no official recipe tonight as DH turned 60 today and we have been out for a lovely supper and celebrations. I am a wee bit sleepy now!

I added a Martha Stewart border strip...for those of you that know my name, this border is quite appropriate for me! I added the two Spellbinder Parisian corner dies and a cluster of Impression Obsession Snowflakes. Placed a few aqua tiny diamonds here and there to tie in that pretty blue from the MS border. Not sure about the sentiment...might be Stampin Up...will check it tomorrow.
I can not decide if I should stickle the snowflakes and the edge of the image. I usually do as it is Christmas after all, but something about this image felt a bit rustic. What do you think...let me know if you think I should go back and add it...

1. Pixies Crafty Workshop - must use snippets; Everything on this card is a snippet
2. CHNC Extra - Anything Goes, must be Christmas
3. MFP Speedy TV Christmas Card Challenge - must be Christmas
4. Christmas Card Club - Oh Christmas Tree
Thursday, 28 November 2013
Let's Talk Turkey
Happy Thanksgiving to all my American blogging friends. Hope this day finds you eating lots of yummy turkey, surrounded by family and celebrating the occasion!
Seemed only fitting to make a Thanksgiving card to join in on the festivities. We had Canadian Thanksgiving in October so I already had a lovely assortment of fall and Tday papers and embellies out on my desk. Since I still had snippets of Forever In Time, Autumn Art on my worktop, I decided to use up some more of that line. I have three different papers from this collection and managed to use pieces from all of them. I did not have to cut into any new papers at all, as I even used snippets of leftover 12x12 scrapbooking card stock.

I used a kraft corrugated card base and boy oh boy, do I love those corrugated bases. The enture outside of the kraft card is corrugated, so even though the DP covers most of the front, there is still the lovely side edge and back exposed. These are the cards that are quite thick. They have a double fold so you can comfortably fit a chocolate bar or small gift inside. It goes without saying that they are best suited to hand delivery!!!
The sentiment sticker is by Bo Bunny and I was worried that it was a bit small for this card. I stuck it to another snippet of card stock and fussy cut that into a mat. I wanted the scarecrows to show up so didn't want to use a Spellbinder die as it would obscure too much of the background.

Once I got the snippet of jute tied round the top layer, I felt like it needed something more. I cut a couple of Memory Box Woodland and Grove branches from a bit darker card stock, and tucked them under the jute. Then I thought they looked a little too bare, so I fussy cut some leaves out of one of the Autumn Art papers and glued them down at random, around the bottom of the branches. Not too fond of the dark one that sort of slid to the bottom of the card...but I am stuck with it there as the glossy accents had dried by the time I noticed it!!!
Recipe:
Card base and envelope - from my stash (Michael's Recollections corrugated kraft square card pack)
DP - Forever In Time, Autumn Art, and a snippet of wood grain MME
Cardstock - from my stash, snippets of rust, terracotta and brown card
Sentiment - Bo Bunny Sticker
Dies - Memory Box Woodland Branch and Grove Branch
Punches - Martha Stewart border punch
Jute - snippet from my stash
Glue - Glossy accents to adhere the branches to the card
I am entering this card in the following challenges:
1. Pixies Crafty Workshop - must use snippets
2. Simon says Stamp Wednesday Challenge - Anything Goes
3. Oozak Challenge - #26 Holidays and Anything Goes
4. Ribbon Carousel Challenge - Holidays and Celebrations
5. Craft Your Passion Challenges - # 190 Thanksgiving/Give Thanks
6. Make it Monday with Kraft Outlet - #148 So Thankful
7. The Paper Girls Challenge - #44 Time to Give Thanks
8. Word Art Wednesday - # 108 Anything goes with an uplifting sentiment
Tuesday, 26 November 2013
A Little Bit Sketchy
This week the Simon Says Stamp Wednesday Challenge is to use Heather's sketch .
I had a bit of a fall today...the leg of my daughters dining room chair buckled...the screws were stripped:( SIL had glued that leg but the glue was not set . They forgot to tell me not to sit there yet. ...eight chairs and I picked the wrong one!
I am stiff and sore...I hit the island on my way down, so have a sore neck and back as well as shoulders...ugggh...
My first thoughts...This better not affect my Black Friday shopping!!! lol
Second thoughts? Oh no...It is Di's 100 week celebration over at Pixies Crafty Workshop...lol
Had to get cracking on with my cards as there are some wonderful prizes this week and Di is hoping to get over 60 entries.
So with my Mojo clouded a bit by painkillers and anti inflammatories, I decided to use a sketch to simplify my crafting. I recently made a Thanksgiving card, so I still had my Fall themes drawer out on my desk. Beside it was my snippets of autumn papers...
I remembered seeing the great sketch this week on Simon Says Stamp, so decided to only use whatever was on my desk to create some fall themed thank you cards. This was partly to save time as I already had autumn papers, ribbon, twine, embellies hauled out and partly because it saved me all the bending and lifting I would have to do to put all that away and pull out new products!!! See, there was a method to my madness...and my back thanked me:)

Not only did I vow to only use what was out...I also vowed to make a few cards all at once. Not mass produced mind...just make a few with the same products. This is a goal I have wanted to try for quite some time. It can get tedious to pull everything out for one card and then spend as much time filing it all away. This way, I get to enjoy the products a little longer. The owl cards were the first "series" that I tried this idea on and these fall cards will be the next!
I decided to use prefolded cards for these thank you notes. I have 10 boxes of these babies. They are the size that Canadian card makers often use, but are a bit too thin for regular cards. They are perfect for notecards! Luckily, some were fall colours.
Recipe
Card base - from my stash; notecards and envelopes from Michael's (I think)
DP - BoBunny, Back to Basics Fall foliage and Forever in Time, Autumn Art glitter card
DP - from my stash; a snippet of unknown DP that is VOS (used for the mat behind the scalloped circle)
Card Stock - From my stash; snippets of gold card for the diecuts and kraft a
Ribbon - from my stash; snippet of rust and cream striped ribbon
Twine - rust coloured fine jute twine
Image - from my stash; it is a leaf from the Autumn art glittered DP, punched out and matted
Dies - Spellbinders Scalloped circle
Punches - Stampin' Up Word Window and Modern Label
Bling - from my stash; gold diamonds
Ink - Versa Mark brown chalk ink to ink the edges
I am entering this card in the following challenges:
1. Pixies Crafty Workshop- must use snippets
2. Simon Says Stamp Wednesday Challenge - Use Heather's Sketch
3. Make it Monday with Kraft Outlet - # 148 So thankful
4. Crafting from the Heart - # 1 Anything Goes
Sunday, 24 November 2013
November Rudolph Day - Owl have another!
Another Owl Christmas Card, that is! Hope you are not too tired of them this month!
This is another fairly flat card...hopefully it will meet the criteria for standard postage. To this light, I have not used any pop dots at all...even the red diamonds are the smallest size I own. Usually this size bling makes it through the mail test slot.
Remember my Michael's 90% off bargains? One of the things I bought that day was a box of black glittered belly bands. I found them in the wedding department. They are beautifully glittered...that kind of fine glitter that does not fall off...thank goodness! The belly band has a beautiful scalloped part in the center that will work out great for certain cards...but my red mat has hidden that aspect of it. What does show is the lovely glittered black band...not sure if you can see it on my card but it is very sparkly IRL.
I also used some more of my VOS (very old stash) red suede card stock. I so love this paper. It is so old, from many, many years ago, when I first started scrapbooking. It has a gorgeous sheen like velveteen. Sadly, I just have a couple of teensy pieces left now.
I kept the design fairly simple as the red, green and white striped design paper is heavily glittered as well. Two layered Impression Obsession snowflakes, the Spellbinders mat and some Quickuts corner pieces and that was that!
 I am taking this card over to Sarn at Stamping for Pleasure. On the 25th of each month she runs her Rudolph Day Challenge. This is a great challenge to help get your Christmas cards done for the year.
Sarn is lovely, pop on over for a peek and leave her some bloggy praise! I have met some wonderful bloggy friends through her challenge...it is a lot of fun and something I look forward to joining in with each month!
Since I used snippets for the snowflakes and precious snippets of the red suede, I am also taking this card over to Di at Pixies Crafty Workshop. Di has a wonderful challenge for cards or projects made with snippets! Di is so much fun and I guarantee you will enjoy this challenge.
Recipe
Card Base and envelope - from my stash (Michael's, Recollections brand square white card set.
DP - snippets of 12 x 12 Making Memories, Twinkle
Card stock - from my stash , snippets of green and white card and snippets of red suede card
Belly Band - from my stash, Michael's wedding department
Dies - Spellbinders Megabillities Parisian Motif for the Owls's mat; Quickuts for the corners, and Impression Obsession for the snowflakes
Bling - from my stash, my smallest red diamonds
Stamp - Stampendous Owl
I am entering this card in the following challenges
1. Pixies Crafty Workshop - must use snippets
2. Stamping For Pleasure - Rudolph Days - must be Christmas
3. CHNC Extra - Must be Christmas
4. MFP Speedy TV Christmas Card Challenge - must be Christmas
This is another fairly flat card...hopefully it will meet the criteria for standard postage. To this light, I have not used any pop dots at all...even the red diamonds are the smallest size I own. Usually this size bling makes it through the mail test slot.
Remember my Michael's 90% off bargains? One of the things I bought that day was a box of black glittered belly bands. I found them in the wedding department. They are beautifully glittered...that kind of fine glitter that does not fall off...thank goodness! The belly band has a beautiful scalloped part in the center that will work out great for certain cards...but my red mat has hidden that aspect of it. What does show is the lovely glittered black band...not sure if you can see it on my card but it is very sparkly IRL.
I also used some more of my VOS (very old stash) red suede card stock. I so love this paper. It is so old, from many, many years ago, when I first started scrapbooking. It has a gorgeous sheen like velveteen. Sadly, I just have a couple of teensy pieces left now.
I kept the design fairly simple as the red, green and white striped design paper is heavily glittered as well. Two layered Impression Obsession snowflakes, the Spellbinders mat and some Quickuts corner pieces and that was that!

Sarn is lovely, pop on over for a peek and leave her some bloggy praise! I have met some wonderful bloggy friends through her challenge...it is a lot of fun and something I look forward to joining in with each month!
Since I used snippets for the snowflakes and precious snippets of the red suede, I am also taking this card over to Di at Pixies Crafty Workshop. Di has a wonderful challenge for cards or projects made with snippets! Di is so much fun and I guarantee you will enjoy this challenge.
Recipe
Card Base and envelope - from my stash (Michael's, Recollections brand square white card set.
DP - snippets of 12 x 12 Making Memories, Twinkle
Card stock - from my stash , snippets of green and white card and snippets of red suede card
Belly Band - from my stash, Michael's wedding department
Dies - Spellbinders Megabillities Parisian Motif for the Owls's mat; Quickuts for the corners, and Impression Obsession for the snowflakes
Bling - from my stash, my smallest red diamonds
Stamp - Stampendous Owl
I am entering this card in the following challenges
1. Pixies Crafty Workshop - must use snippets
2. Stamping For Pleasure - Rudolph Days - must be Christmas
3. CHNC Extra - Must be Christmas
4. MFP Speedy TV Christmas Card Challenge - must be Christmas
Tuesday, 19 November 2013
Christmas Baking
I know it is a bit early to start my Christmas baking, but thought I would share photos of the decorated tins I will packing full of shortbread cookies for my Mum. The tins are from Dollarama...my fave Dollar Store! They bring them out in different colours at various times during the year.
You can also use one quart pain tins (purchased empty and new from your local paint store)...but they are about twice the price and then still need spray painted outside!!! For very hungry friends and families you could use the brand new, one gallon tins from your local paint store.
The first tin is very easy. It is just a red paint can with white foam snowflakes from the same Dollar Store stuck randomly all over it. There are various sizes of snowflakes, so it does not end up looking too even. I saved one large snowflake for the lid, and then tied a variety of Christmas coloured ribbon to the wire handle.
 The second is a little fancier looking but I can assure you it is nearly as easy! The script "Merry Christmas" is a scrapbook page topper from the Dollar Store. It has been mounted on a strip of green cardstock and then matted with a strip of striped paper. I then glued it to the tin with red glue lines and then stuck a chipboard Santa to the lid. The wire handle has once again been tied with some snippets of ribbon.
 Here is a view of the word Merry...you will have to take my word that the whole thing spells Merry Christmas as it is impossible to get the whole word in the photos. lol
 This project is proof of the power of saving snippets of all sorts. I make tins like this at Halloween, Easter, etc. My appropriate ribbon snippets collected during the year, are saved in tins like this. Easter colours into a pastel tin along with any "orphaned" embellies or stickers , Christmas colours into a green, red or blue one! Leftover snowflakes, etc are thrown in them too...When I have a need to make up a new tin, I have the "ingredients" ready. Luckily, this size of tin fits on top of the tall cupboards in my scrapbook room.
I will try to remember to post a picture just before I mail it...when they are both full of yummy shortbread cookies. I make whipped shortbread and also a sliced version. The sliced are rolled like a refrigerator cookie, set in the fridge to firm for an hour or so and then sliced and pricked with a fork. They were a recipe from my English Grandma and it would not be Christmas without them! They are the same ingredients as a traditional shortbread and have the same texture.
Did you notice my photos are crisper again? I finally got out to a camera shop and had it corrected and cleaned. There was a smear of something dirtying my lens in the center. They would not take any payment and so I wondered about afterwards, checking out their camera and printers. The newer version of my camera now has a wifi version. I think I know what I will want when this one finally packs it in! They also had the Selphy photo printer...they are very popular with crafters who do December Daily or Project Life as you can print direct from your phone or your camera...I will have to check and see if they work with Windows 8 as well.
Off to go retake some of the really out of focus photos on my posts in the past couple of weeks, and then reload them to my blog!!! It is such a good feeling to have the camera problem resolved. Now if I could just learn to take good photos...lol
I am entering the Merry Christmas tin into the following challenges:
1. Pixies Crafty Workshop - must use snippets...the striped DP and the green card were snippets.
2. Ribbon Carousel Challenge - Holidays and Celebrations, must use spooled item
3. Craft my Life All Crafts Challenge - Anything but a card
4. Allsorts Challenge - Make a Gift
5. Really Reasonable Ribbon Challenge - Gift Packaging and Ribbon
You can also use one quart pain tins (purchased empty and new from your local paint store)...but they are about twice the price and then still need spray painted outside!!! For very hungry friends and families you could use the brand new, one gallon tins from your local paint store.
The first tin is very easy. It is just a red paint can with white foam snowflakes from the same Dollar Store stuck randomly all over it. There are various sizes of snowflakes, so it does not end up looking too even. I saved one large snowflake for the lid, and then tied a variety of Christmas coloured ribbon to the wire handle.


I will try to remember to post a picture just before I mail it...when they are both full of yummy shortbread cookies. I make whipped shortbread and also a sliced version. The sliced are rolled like a refrigerator cookie, set in the fridge to firm for an hour or so and then sliced and pricked with a fork. They were a recipe from my English Grandma and it would not be Christmas without them! They are the same ingredients as a traditional shortbread and have the same texture.
Did you notice my photos are crisper again? I finally got out to a camera shop and had it corrected and cleaned. There was a smear of something dirtying my lens in the center. They would not take any payment and so I wondered about afterwards, checking out their camera and printers. The newer version of my camera now has a wifi version. I think I know what I will want when this one finally packs it in! They also had the Selphy photo printer...they are very popular with crafters who do December Daily or Project Life as you can print direct from your phone or your camera...I will have to check and see if they work with Windows 8 as well.
Off to go retake some of the really out of focus photos on my posts in the past couple of weeks, and then reload them to my blog!!! It is such a good feeling to have the camera problem resolved. Now if I could just learn to take good photos...lol
I am entering the Merry Christmas tin into the following challenges:
1. Pixies Crafty Workshop - must use snippets...the striped DP and the green card were snippets.
2. Ribbon Carousel Challenge - Holidays and Celebrations, must use spooled item
3. Craft my Life All Crafts Challenge - Anything but a card
4. Allsorts Challenge - Make a Gift
5. Really Reasonable Ribbon Challenge - Gift Packaging and Ribbon
Saturday, 16 November 2013
Christmas Card Club - Pretty in Pink
In keeping with the spirit of horses established on my last post, I decided to make a Christmas card with a horse theme! You all know that I come from a very horsey family, so there will be no lack of takers for this type of card. lol I often wonder how I escaped the horsey gene...
 You will have to forgive the fuzziness of my photo...I have somehow managed to get my camera settings out of order and I can not seem to get them back to snuff...I need to take my camera in to have it checked and restored to what I am used to! In the past couple of weeks all the photos on my blog are not "crisp" for want of a better word.
Here is a bit of a closeup...not sure if you can see the Spica pen sparkling on the black fur trim of the sleigh, and the Stardust Stickles on the ladies hand muff. The snowflakes are a silver glitter Martha Stewart snowflake layered on top of an Impression Obsession Pink glitter one. This photo is a little "crisper' but the camera was only a couple of inches away from the card.

The fabulous horse drawn sleigh caught my eye on this Stampendous stamp. My Dad and sister always did up a vintage Santa sitting in an antique horse drawn sleigh at Christmastime. It sat in the front garden of the farm, welcoming the visitors. When my sister got married, Dad took her to the church in a horse drawn carriage. You can see why I was instantly draw to this image.
I knew I had to have this stamp as soon as I laid eyes on it. Lucky for me, that LSS has a 40% off coupon almost every week. It is one of the places on my errands lists on my walking days! lol
This fortnight, the lovely Carol from CM Design chose the Christmas card theme of Pretty in Pink. As this stamp so easily suits pretty colours and dies, I knew right away what card I would make. I coloured the image with copics and then die cut and matted it using Spellbinders
Recipe:
Card base and envelope - from my stash
Cardstock - snippets of pink, and white from my stash
Glitter paper - from my stash Best Creations Glitter paper in pink and in silver
Bling - mini clear diamonds from my stash
Punch - Martha Stewart snowflake
Dies - Spellbinders Radiant Rectangles (I think)
Stamp - Stampendous Sleigh Bells
I am entering this card in the following challenges:
1. Pixies Crafty Workshop - must use snippets
2. Marks Finest Papers Speedy TV Christmas Card Challenge - must be Christmas
3. Christmas Card Club - Pretty in Pink
4. CHNC Extra - Always Anything Christmas Goes
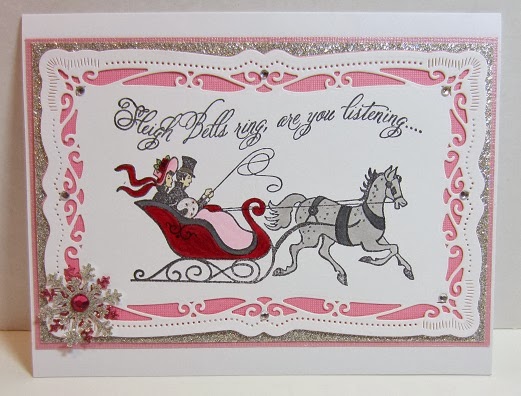
Thursday, 14 November 2013
Seven!
The Pony Girl aka Little Miss C turned 7 in October. My how those 7 years have flown by! It does not seem like 7 years since we saw the pumpkin on their porch carved into "It's a girl".
She had a science themed party for all the girls in her class and some of her close friends from outside of school. This Grandma was kept busy making a rainbow Happy Birthday banner and was so happy to be doing it!
Once again, she chose to accept no presents from her friends and instead raised funds for the Bird Sanctuary. She raised $215.00 and was really happy with that. Instead of the birds that came to the party last year, there was a fellow who brought rescued hampsters, gerbils, guinea pigs, hedgies etc. He does not raise funds, just brings the animals and teaches the children and adults about how to care for them properly. His is just an educational display.
Friday night was the family party. Their family tradition is to have the birthday child chose their favourite restaurant and we all meet there for supper. She did receive presents from her Mum and Dad (a guitar) and also presents from both sets of Grandparents, so she was not totally without any gifts.
Here is the card I made her. I searched high and low for an image of three horses. While I have plenty of horse stamps, I could not find any with an image of 3 horses. Finally, I looked through my 12 x 12 paper that I used to scrapbook my daughters Pony Club days. Luckily, I found a paper that would work. It had several horses and I carefully cut out the three I needed.

Why three horses? Well, my present to her was a riding lesson for three people. She has a secret horse club with two of her childhood friends. I do not know the name as it is a secret! lol She has been wanting to have a riding lesson for just the 3 of them and now she can! It seemed to be a hit so that made us happy.
The background DP is a pattern of horseshoes. I roughed up the edges of the papers I used to compliment the tattered look of the horseshoe paper. I just dragged the edges of all the papers with the back of my scissors.
I had a few sticker embellishments in my horse themed scrapbook files. I cut down a girth strap sticker for the bottom left of the card, and placed the boots and hat on it. Just managed to fit the Stampin' Up word window punched sentiment on it!
I used the same sticker set for the horse and rider on the inside of this card. Punched it out with Spellbinders Petite Circles and matted that with a snippet of brown card that was cut with a S/B Petite scalloped circle.

Are you wondering just what my card is leaning on? It is a cornucopia of autumn silk flowers that my eldest daughter picked up at Michaels last year for 90% off. She picked up two of them, rather beat up and skimpy with flowers...a few flowers missing or 3/4 falling out. Recently, the autumn flowers and sprays were 80% off and I picked up a few and reworked the cornucopia. It looks so much better now...here is full on picture...

Recipe
Card base and envelope - from my stash
DP - Around The Block, Running Horses is the horseshoe paper. The three horses are unknown as they are very, very VOS
Cardstock - snippets of rust and brown from my stash
Stickers - Sandy Lion, Horseback Riding for the boots, hat, and image inside the card.
Stickers - Girth strap sticker is unknown as it is very, very, VOS
Punches - Stampin' Up, Word Window
Dies - Spellbinders Petite circles and Petite scalloped circles.
Sentiment - Front sentiment is StampCraft Happy Birthday and Inside sentiment is Hero Arts Happy Birthday Circle
I am entering this card in the following challenges:
1. Pixies Crafty Workshop - must use snippets
2. Sister Act Challenge - Always Anything Goes
Sunday, 10 November 2013
Twelve Days Of Christmas - Day 2 - Faux Stained Glass
This is my second to last challenge to complete the Marks Finest Papers, Twelve Days Of Christmas.
I was not looking forward to this one...I did not have extra red rubber trimmings (that were used in the tutorial) to make the block with which to stamp the versamark ink. I used makeup sponges...those sort of triangular ones that you buy in a big bag at the dollar store.
Since I had to improvise on the tutorial directions, and was not sure if my idea would even work, I decided to keep the faux finish treatment to the DP only. I cut a piece of VOS (very old supplies) Basic Grey DP. I chose it as thought it had the boldness of pattern that would perhaps suit the stained glass look.
I pushed the long triangle end into the ink and stamped it onto my paper. over and over. It was hard to see where I had stamped and where not! I heat embossed with clear embossing powder and could see I had huge unstamped areas that were going to look like big black blobs once I inked it up...so I repeated the process...restamped it wwith the versamark ink and re-embossed it.
Once cool, I rubbed black memento ink all over it and then wiped off the excess. The ink stayed in the areas that were not covered by the versamark and embossing treatment. Just as I had worried, the ink filled into large "patches", rather than the sort of fine lines you would see on a stained glass window.
Looking through the other entries, I can see that others had this same problem. Even on the designers samples, some have very thick lines of dark ink so perhaps this technique is supposed to have wide inked lines...
All in all, I was a bit disappointed in my glass making skills and just wanted to let you know that you can breathe a sigh of relief that I will not be persuing any new career as a stained glass artist! lol


I decided not to add any other embellishments as I do not want to cover up the stained glass requiement of the challenge.
I am entering this card in the following challenges:
1. Marks Finest Papers Twelve Days of Christmas Day 2 - Faux Stained
2. Pixies Crafty Workplace - must use snippets
I was not looking forward to this one...I did not have extra red rubber trimmings (that were used in the tutorial) to make the block with which to stamp the versamark ink. I used makeup sponges...those sort of triangular ones that you buy in a big bag at the dollar store.
Since I had to improvise on the tutorial directions, and was not sure if my idea would even work, I decided to keep the faux finish treatment to the DP only. I cut a piece of VOS (very old supplies) Basic Grey DP. I chose it as thought it had the boldness of pattern that would perhaps suit the stained glass look.
I pushed the long triangle end into the ink and stamped it onto my paper. over and over. It was hard to see where I had stamped and where not! I heat embossed with clear embossing powder and could see I had huge unstamped areas that were going to look like big black blobs once I inked it up...so I repeated the process...restamped it wwith the versamark ink and re-embossed it.
Once cool, I rubbed black memento ink all over it and then wiped off the excess. The ink stayed in the areas that were not covered by the versamark and embossing treatment. Just as I had worried, the ink filled into large "patches", rather than the sort of fine lines you would see on a stained glass window.
Looking through the other entries, I can see that others had this same problem. Even on the designers samples, some have very thick lines of dark ink so perhaps this technique is supposed to have wide inked lines...
All in all, I was a bit disappointed in my glass making skills and just wanted to let you know that you can breathe a sigh of relief that I will not be persuing any new career as a stained glass artist! lol

I had a stamped Joy sentiment and image that I had inked up, coloured, stickled and already die cut and filed away. I decided I would like the crisp look of the white against the dark look of the inked up DP. I
matted it with a snippet of red card and placed a K&Co poinsettia in the left corner. I did have to ink the edges with some red ink, as I managed to get a bit of the black ink smeared on the mat! With the red ink added, you can barely see it...at least that is what I am telling myself.
Here is a closeup showing the embossed and inked DP and the shimmer on the stamped holly leaves.
I decided not to add any other embellishments as I do not want to cover up the stained glass requiement of the challenge.
I am entering this card in the following challenges:
1. Marks Finest Papers Twelve Days of Christmas Day 2 - Faux Stained
2. Pixies Crafty Workplace - must use snippets
Subscribe to:
Posts (Atom)