Showing posts with label cards masculine. Show all posts

Tuesday, 23 May 2017

Birthday Card For A Fisherman, or in this case, a Fisherboy

I  am making up some birthday cards for a Thank you gift. Three boy, and three girl themed cards
 I will show the rest of these cards over the next couple of weeks. Here is the first.

The tied fly hook is an image I picked up at the thrift shop. I cut it out with a Lawn Fawn stitched square die and matted with a snippet of Bazzill heavy weight card, cut with the larger stitched die. I pop dotted the image off the mat for some depth to the card.


I covered the white card base with some snippets of DP from my stash.  The party hat DP is a snippet of Crate Paper, Party Day. The bottom piece looks like cork strips and was the perfect colour to go with the snippet of birthday party hats. I think it is another Crate Paper selection...this time, Party Time.

The HAPPY banner was left over from a set of cards shown in a previous post. I pop dotted it forward too. The BIRTHDAY word sentiment  was left over from that same set of cards. It is stamped on a Stampin' Up  word punch.

My NBUS item today is the tied fly image.

I am entering this card in the following challenges:

1. Allsorts Challenge Blog - Birthday theme

Friday, 12 September 2014

Birthday Wishes Round II Card 20

This is another card made up at the lake. This little Penny Black image seemed so staid...I think it is the colours I used.  I decided that it needed a few brighter papers to liven it up and so set off on a mission to rescue it.

I coloured the hedgie image with my copics. Luckily, I had already  used  my Spellbinders Hexagon die to cut this image and mat, before we left home.  Managed to break my mitchy matchy habit and chose an acidy green for the mat. I can surprise myself sometimes! lol


I found the DP's in my snippets envelope. Don't gasp with shock...I did say envelope. I keep my snippets in 4 clear card sleeves and just group them loosely,  based on colours...very basic and very sparse! The two I found were just a fraction too short and did not meet on the card. I added a slice of blue dotted DP...it tied in the blues on the present and the bit of blue on the trees.

Diecuts are rolled off at home and stored in little photo albums from the dollar store. I bring those albums with me and only have what is in them to use up! Can be frustrating at times and I have wrestled with purchasing a Big Shot to leave up here. Space to store it though,  is the issue!

My card base is corrugated Kraft, so I used orange corners with green enamel dots, to brighten it up. It was an easy decision as when supplies are dwindling, it cuts down on the decision I need to make. lol   Found a white Wish diecut sentiment that I coloured up with a green copic marker. One last snippet of orange card to mount it on, a couple more enamel dots,  and my card was done.

My goodness the Wish looks so out of focus on my photo...here is a little close up of the sentiment  so you can see this really is a sweet die cut!


Recipe
Card Base and envelope - corrugated 5 1/2 x 5 1/2 card with matching kraft envelope, from my stash
DP - stripey one is Line Twist. trees and blue dots snippets are unknown from my stash
Card Stock - snippets of lime green orange and kraft from my stash. Cut with dies before leaving home
Image - Penny Black Critter Party (I think)
Dies - Tattered Lace Words - Wish


I am entering this card in the following challenges:
1. Pixies Crafty Workshop - must use snippets
2. Crafty Hazelnut's Patterned Paper Challenge - must cover card with paper

Tuesday, 3 June 2014

What...Window screens??? Card 22

Well, it is back to the cogs...This time I inked them with a variety of chalk inks in blue, green, purple, silver and black. I then wiped them with silver coloured Viva Gold. I like the overall look of this technique as the cogs look like old oxidized metal.

This time I combined the "oxidized metal"cogs with some plain black cogs. I used pop dots to raise some of them forward. I was happier with how the cogs turned out on this card. Third time lucky!
I chose a denim looking woodgrain paper for the bottom half of my background...cuz it reminded me of blue jeans. Wish I had thought to look in my mending basket and cut off a hunk of blue jeans to make a bow or a ribbon strip to run horizontally, overtop of the screen...oh well...next time, I guess!

While organizing my room, I found some hunks of window screening. I uses this on my scrapbook layouts about 15 years ago.  I remember I thought it was so cutting edge...hahahahaha

I moved it into my masculine cards drawer and you will see it resurface now and again till it is all used up.  My scraps campaign is paying off as I am noticing a small dent in my bits and bobs, and also see a slight reduction in the number of card bases and envelopes I have on hand. I have been making an effort to make both 5 1/2 inch square and 4 1/4 x 5 1/2 inch rectangle cards. I seem to have hundreds of the latter so may have to start making many, many more of those type.

****************This is card #22 of 50. I am on a consumables spending freeze until I have made 50 cards (Sook Wang tape and heavy weight card stock are exempt).***************

Recipe
Card base and envelope -  from my stash
DP - snippet of Forever in Time black clock paper, snippet of 12x12 blue woodgrain  from my stash
Card Stock - snippets of white and black card stock for the die cuts
Dies - Spell binders Sprightly Sprockets and also S/B Petite Circles
Stamp - PSX  (the date on this stamp is 1999)
Screen - a snippet of window screen from my stash
Viva Gold - silver paste from my stash

I am entering this card in the following challenges
1. Pixies Crafty Workshop - must use snippets
2. Crafty Hazelnut's Patterned Paper Challenge - must cover card with paper
3. The Cheerful Stamp Pad - #87 Sentiment
4. Moving Along with the Times - No image
5. A Song In Your He(ART) - Gift of Wings (I think that exploring things that are creative and move, leads to a sense of wonder)
6. Paper Issues - The World is a Circle

Tuesday, 20 May 2014

Handyman Card - Card 18

Do you have a handyman in your family? Seems every extended family has at least one.  Found this stamp in my recent tidy up of my craft room and decided to put it to ink.

I inked a lot of the dies this time as they wrinkled and tore so badly on my inky last card. This worked out so much better on the big frame around the image. That was the bit I had the most trouble with last time. Not getting it damp seemed to be the answer.


I am planing to do a few more of these cards. I will use watercolour paper for the dies next time. That should solve the paper problems I encounterted.  I don't think I would use the script Happy birthday with these again. Now that I see it blown up for the computer, I think it looks too girly!!! Not to mention, slightly crooked! lol

I am also going to try the image embossed with black EP next time. I think that will help it pop off the card a bit as it seems to blend in  too much on this card.

I will finish the inside of all the cards I have made both at Mum's and while up at the lake, once I am home again. I just did not have enough room to bring verse style stamps and do not have access to a printer here to do computer generated verses.

****************This is card #18 of 50. I am on a consumables spending freeze until I have made 50 cards (Sook Wang tape and heavy weight card stock are exempt).***************


Recipe:
Card base - Kraft corrugated card and envelope from my stash (originally from Michael's)
DP - snippets of Scrabble tile paper from my stash. Will have to update the name of the measuring tape paper once I am home, as I did not jot it down.
Card Stock - Snippets of cream for the dies cuts
Jute - from my stash (given to me by my friend)
Dies -Spellbinders Cogs and Elizabeth Happy Bithday
Stamp - Stampin' Up
Enamel dots - black dots from my stash

I am entering this card in the following challenges:
1. Pixies Crafty Workshop - must use snippets
2. Crafty hazelnut's Patterned Paper Challenge - must cover card with paper

Thursday, 15 May 2014

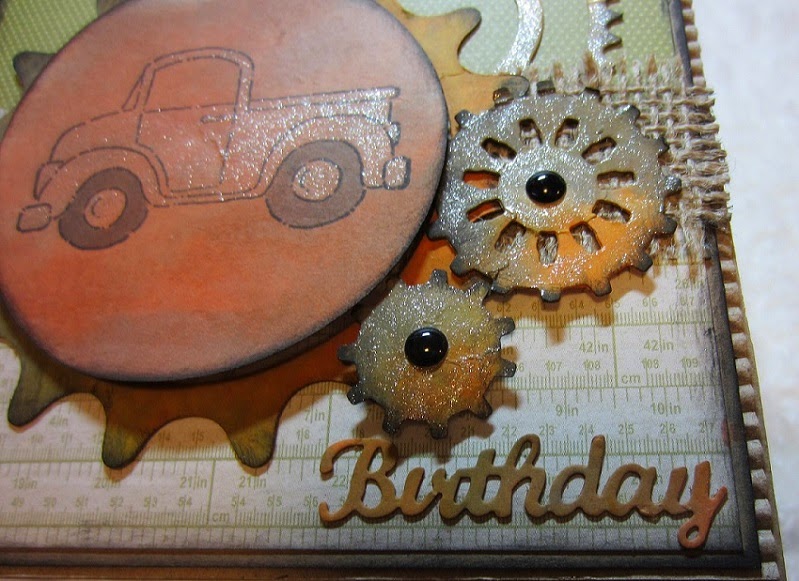
Guys and Trucks - Card 15

I made a couple of masculine cards for my girlfriend. Remember that gift set of purple cards I showed you a couple of posts ago? Well, these are the masculine cards I made for her as well.  I made the purple cards for the feminine cards, as that is her favourite colour; and rusty metal cogs and wheels for the guy cards, as she works in an Auto Parts store.

Some of her auto parts come wrapped in new burlap bags, so I used a bit of the burlap she has kindly given me.
I ran a Spellbinders cog die through my Big Shot and then smooshed the paper through the TH stains on my craft mat. I think I did something wrong as the paper seemed to get soaking wet and lose it's crispness. Perhaps I should have used the watercolour paper...I will try that next time. When I dried the cogs with the heat gun, the paper seemed ready to tear and actually did on the pointy frame around the image. Probably would have been better to just let it dry...but wanted to get them finished to take up to her when I am at my Mum's on Monday.

I used my old Stampin Up truck this time, but will check out the internet for some images of old antique trucks for the next card. Yes, there will be a next card...batch baking I think! On the next ones I think I will drag half sheets of the paper through the stain and let it dry thoroughly....and then cut it with the dies. Should prevent tearing, methinks! If it still tears, then it will have to be back to the watercolour paper, I guess.

I kept the inside fairly simple. Just the sentiment verse with a cog tucked in behind! Forgot to take a photo of it. Drat...Here is a photo to show the look of the Wink of Stella |Pen. I used it on the truck body, and the dies. You can see from this closeup how the paper kind of lost it's crisp look and got tattered looking...

****************This is card #15 of 50. I am on a consumables spending freeze until I have made 50 cards (Sook Wang tape and heavy weight card stock are exempt).***************


Recipe
Card Base - corrugated Kraft square card from my stash
Design Paper - don't have my book handy that I record the deets in...will update this when I am home
Card Stock - snippet of Kraft card, snippets of cream heavy weight card for the cogs and sentiment
Dies - Spellbinders Cogs; Elizabeth Crafts, Happy Birthday
Stains - Tim Holtz Frayed Burlap, Spiced Marmalade, Bundled Sage
Burlap - from my stash (given by my friend)
Ink - Ingvild Bolme black chalk ink
Stamp - Stampin Up Truck
Enamel dots - from my stash. I got these for 80% off, after Halloween

I am entering this card in the following challenges:

1. Pixies Crafty Workshop - must use snippets

Thursday, 9 May 2013

Limited Edition

My neighbour came over tonight for our weekly card making evening.
It was my turn to design the card and have 2 card kits ready for us to make up. I chose a classic car stamp that I inked up for the first time a while back and luckily I stamped several images that day. I coloured them all up on another one of our craft evenings and so I now had the makings of a focal point!

I added a couple of Spellbinders sprocket looking dies and an old button from my stash.  I was going to computer generate "You're a classic" but chose to go with the slightly more generic "Limited Edition" sentiment. I have left the inside blank for now...I think would suit a Birthday card or even Fathers Day.

I think it is a worlds first for me that I actually remembered the blue card stock was the self adhesive variety. I proudly peeled the backing paper off and stuck it down! Sadly, it didn't seem to stick with a vengeance...It just sort of sticks like repositionable tape.  I threw some additional adhesive on the back and finally got a good contact!
Not sure if this will go in my finished cards basket or in with the cards I make for my daughter...

Recipe:
Card base and envelope - from my stash (Michael's)
Design paper - Creative Imaginations Art Warehouse danelle johnston Neutral;
                        Momenta Story of Us (snippet from wedding pages)
Cardstock - from my stash (snippets of self adhesive card stock)
Dies - Spellbinders Sprightly sprockets; Spellbinders round petites; Spellbinders Nested Pennants
Stamp - wooden stamp with no name written on the side!
Sentiment - computer  generated
Button - from my stash

I am submitting this card for the following challenges:
1. Pixies Crafty Workshop - must use snippets
2. Sister Act - Anything goes
3. The House That Stamps Built - Masculine card
4. Clear it out - Use Stash and 2 or more patterned papers ( I used 3)
5. Crafty Sentiments - use a sentiment
6. Flourishes Timeless Tuesday - use black accents

Monday, 24 September 2012

No poinsettias for me!

During the Christmas season, I can admire the poinsettias at the garden centers or in other peoples houses. I can appreciate their unique beauty and it is always interesting to look at the different colours and hybrids that are available.

But that is exactly where I like to see them...at places other than my own!

I don't like owning one. They look so warm and inviting and healthy when they arrive. Sometimes they have a shot of glimmer dust and are all sparkly and inviting. Well, at my house that first blush of beauty soon fades!  Mine start wrinkling up their leaves shortly after arriving...let me tell you it is not a pretty site.

Quite quickly, they begin dropping their leaves. It then becomes a fight to keep them alive and frankly, I enjoy all the beauty of Christmas too much to spend it nursing something sickly. Nursing is probably a poor choice of words...you see mine never revive...I am the Nurse Rachet of poinsettias!!!

I purchase them to give as gifts to those that love them, treasure and let them live...holding them for those few moments from the store until we deliver them, is enough for me.

Invariably, someone gives us one at Christmas, some years we have been given 3!  Usually the giver announces with a beaming smile "I got you a poinsettia, I know how you LOVE them".    ahahahahaha

I like to keep my poinsettias to cards and those found in silk flower arrangements. In that spirit, here is my lastest Christmas card creation.  My poinsettia is a new tricoloured hybrid, all glimmery in kraft, taupe and ivory. I used one of the shiny card bases that I mentioned in my last post. I don't mind this box of bases as the sheen is sort of embossed over the kraft and is not too offensive.

Here's the card assembled...
I decided that it was a bit too plain looking...it is for Christmas after all...so I pulled out the stickles and some pearl bling and gave it a little more pizzaz!
Card base - Michaels Recollections Kraft cards and envelopes
Ivory, taupe and kraft shimmery cardstock - Dollar Giant 6 inch paper packs (a couple of years ago)
Sentiment - TP Studio Christmas Greetings from Dollars and Sense ( I just used the word Peace from Peace On Earth) I turned the shimmery paper over as the sentiment would not stamp clearly on the textured shimmer side.

I am submitting this card to the following challenges:

1. Pixie's Crafty Workshop - use up your snippets http://pixiescraftyworkshop.blogspot.ca/
The snippets of shimmery cardstock were so small for this card that I had to cut each layer individually as the scraps of paper were only big enough for one of the layers each. Hence the tri-coloured flower. teehee
2. Rudolph Day http://stampingforpleasure.blogspot.co.uk/
3. Crafty Calender Challenge -  browns and creams http://craftycalendarchallenge.blogspot.ca/
4. Holly Jolly Christmas - Sentiment only  http://hollyjollychristmaschallenge.blogspot.ca/
5. Sparkles Christmas Challenge - sparkle and bling (I used stickles and pearl bling on this card)   http://sparklesforumchristmaschallenge.blogspot.ca/
6. Going Buggy - non traditional Christmas colours http://going-buggy.blogspot.co.uk/2012/09/september-challenge.html

Friday, 21 September 2012

Another guy card for the stash

I'm on a roll with guy cards! Two in a row! Wow, so not like me.

I have been on a stash busting crusade for quite some time. My room is simply chock-a-block full of supplies. Now, don't get me wrong. It is not full to the gills with the latest and greatest...but it is full never the less. I figure once upon a time I loved these supplies enough to bring them home...so I'm on a mission to use them up.

While I have been reorganizing my room, I have pulled several 3D elements to use for what I call "quickie cards".  I bought a little portable file complete with hanging file folders at the scrapbook garage sale. Best dollar purchase I made there.
When I find an embellishment that I think would make a good card candidate, I throw it into one of the file folders. As I have continued to sort my room, I have thrown into that same folder any other bits and bobs that I think would go with. I threw in the piece of jute, the ship and the lighthouse first off. When I tidied up my paper bits, I threw in the blue and the kraft card stock snippets. I always have a supply of little, teensy baggies on hand. They were great to throw in a few brads and the charm.

When it came time to make this card, I just had to cut a wee piece of cheesecloth for the "net" by the anchor and choose a card base.

Now...I have a little secret to share...I have 4 shoe boxes full of card bases and I don't like most of them!!!  They were on clearance and I bought them in the heat of the moment. One whole box are lovely colours and patterns but are not a heavy enough weight to make a layered card. Two more boxes seemed to be a nice heavy weight yet once I got them home I was disappointed to find out that they are sort of shiny on the outside.

Embracing the spirit of frugality, I have been trying to use them up. Sometimes I cover the heavy weight ones completely with patterned paper on the outside and then start to build my card. Other times, I opt to place my card mat just in from the edges...thereby showing as little of the shiny sheen as possible. Depending on the base cards pattern, sometimes this works.
Another option is gluing the lightweight cards right over the heavyweight ones...thereby creating one card...no trimming required.

Today I was trying to decide which shiny card to use and spied this chevron patterned card base. I remembered that someone has a challenge posted today that calls for a chevron pattern somewhere on your card....so....Chevron base card it is today!
Down plopped my card mat and then...oh dear...now you can't see the chevron design anymore. Well, I think it still looks sort of right with this sea themed card. I have not added a sentiment yet as I want to wait until I know who it is going to. We have several friends with boats...a couple have even retired to the seaside...it will definitely go to one of them!

Here is a little close up of the 3D elements. The ship has 3 layers and the sails alternate between one and
three layers as well.

I am entering this card in the following challenges:
1. Pixies Crafty Workshop - use snippets  http://pixiescraftyworkshop.blogspot.ca All the bits from my card are snippets. The lighthouse and the ship are left over from a sheet of 3D images from the dollar store
2.Oldie But A Goodie - show us your ribbons, use stash at least 6 mo old http://oldiebutagoodiechallenge.blogspot.ca/ (Everything on this card with the exception of the card base is over a year old.. The ribbon is the sea wave blue banner strip...it is the first time I have used it)
3. Hooked on Crafts - Cards for men http://hookedoncraftchallenges.blogspot.ca/
4.By The Cute And Girly - Boys/Men inspiration http://bythecuteandgirly.blogspot.ca/
5. Crafty Creations - Around The World #188  (my ship is sailing around the world) http://craftycreationschallenges.blogspot.ca/2012/09/challenge-188-around-world.html
6. For Fun Challenge - Guiding Lighthouse http://forfunchallenges.blogspot.ca/
7. Sisterhood Of Crafters - No stamps http://thesisterhoodofcrafters.blogspot.ca/
8. Bunny Zoe's Crafts Challenge - Distressing (The blue card base is sanded, nicked with scissors and inked/the kraft elements are heavily inked)                                                     http://bunnyzoescrafts.blogspot.co.uk/2012/09/challenge-28-distressing.html   
9. Catered Crop - use a knot http://cateredcrop.com/ I knotted the anchor onto the fish netting with bakers twine...I also have 2 more hidden knots... I hand sewed the burlap onto the card base and tied a knot to start and finish that sewing.

Wednesday, 19 September 2012

Birthday card!

Here's another birthday card for the stash drawer.  I think it will make a good  masculine card. I never have enough guy cards in my drawer. My girls will come to raid my stash with a list of all the birthdays they have coming up that month!  Married daughter (Domestic Diva)  has a huge circle of couples friends...of course they all have families now too. They do group get togethers for all the birthdays. That is a lot of cards and gifts so if I can provide a card from my stash it helps out!
I like the bit of a grungy look this card has going. It was fun to ink the over the embossed portions of the card. I had to use a stamp finger stick as you had to rub to get the ink into the low bits.

I took one semester of typing when I was in high school so this old typewriter stamp was fun to use. Brought back memories let me tell you!

Off to make a card for Glamour Girl. She is off in Southern France, studying French language...and visiting a special fellow in Monaco! She was away on a trip around the world for 5 months, home for less then 2 months and now off to France for 2 months again. Her life is so exciting! She teaches at University and will benefit from having a second language, especially Canada's official second language.
Now to search for my Eiffel Tower stamp...

I am entering this birthday card in the following challenges:

1. Creative Card Challenges - Anything Goes  http://creativecraftchallenges2.blogspot.ca/
2. Scrap Creations - Embossing  http://scrap-creations1.blogspot.ca/
3. Shopping Our Stash - Emboss It #69  http://shoppingourstash.blogspot.ca/
4. Through The Craftroom Door - Anything Goes #36  http://www.craftdoormagazine.com/
5. Bunny Zoe's Crafts - Distressing  http://bunnyzoescrafts.blogspot.co.uk/2012/09/challenge-28-distressing.htmlb
6. By the cute and girly - boys/ men  http://www.bythecuteandgirly.blogspot.co.uk/2012/09/boysmen-september-challenge-over-at-by.html
7. Ladybug Crafts - Anything Goes  http://ladybugcrafts.blogspot.ca/2012/09/first-challenge-anything-goes-o.html
8. Hooked on Crafts - Cards for Men  http://hookedoncraftchallenges.blogspot.ca/