Saturday 2 December 2017

Christmas Card Club - Mixed Media Theme

Mary at Carolina cards chose the theme of Mixed Media for this fortnights Christmas Card Club.
To see what the other members made for this challenge, just click on their hyperlinks on my right sideboard. It will be well worth the initial clicks!

I must admit I struggled with this theme.  I finally decided on using acrylic paint for my "media" as well as using a discarded electrical tape container as my base for a Christmas ornament. I am busy trying to change up my formerly silver/red and white glittery Christmas decor theme into one that incorporates a country farmhouse look. Hopefully this ornament will help.

I started out with the gift of 6 lidded frosted plastic electrical tape containers. The bottom of the first container is my NBUS item for this project. My daughter got them from the electricians at her work. The lids slide on and off so the top edges of the base and of the lid are smooth. It is fun to create something from an item that would have landed in the garbage! Recycle garbage...but still garbage.

I took off the lid and saved it for a future project. I covered the inside of the base with a die cut circle of white glitter paper and the outside edge with glitter washi tape.


Using snippets of additional white glitter paper, I created hills with my Stitched Lawn Fawn Hill die.
I then created a scene with snippets of inked up green card for my Sue Wilson Winter trees dies, and inked up kraft snippets with my NBUS Impression Obsession Deer die as well as a NBUS Recollections die. I used white acrylic paint to create snow on the trees and added some glitter to make a little sparkle. Then used the same paint for the white dots on the deer.

Punched two holes in the top edge and ran a fine silver ribbon through and tied it off in a bow. Now I have something to place a tree bauble hook through!


Made a frame by cutting out the inner circle of a Spellbinders scalloped die and slid an overhead projector clear sheet behind the frame to keep out dust. I threw in some small pearl beads to make this into a shaker ornament but will not do that again as they get stuck in the corners and in between the layers and I do not like the look of that.


Next time, I would do a few other things differently as well. It took way too much time to measure and cut the white glitter paper paper to fit the cylinder. In fact, the bottom circle of the scene does not quite fit. It is a smidgen too small,  hence the trapped pearl beads!

Next time, I would spray glue the cylinder disc inside and out and sprinkle glitter over it. That alone would save about 40 minutes of fiddling back and forth! I have plans for different designs to create  more of these recycled tree baubles, so will implement these new methods on those. Will post them soon as i finish creating! All crafty plans are now on hold till the tree is up and the outdoor lights get flung onto the shrubs...

I am entering this card in the following challenges:

1. Christmas Card Club - mixed Media Theme
2. Pixies Crafty Workshop - must use snippets

Friday 1 December 2017

Surprise Challenge for those who have entered the Rudolph Days Challenge Jan - Nov 2017

In every challenge, there are those who never miss a month. It was brought to my attention by a faithful follower that she has never missed a challenge, yet sadly never won.

I am hosting a special surprise challenge this month for all those who have entered the Rudolph Days Challenge every month, Jan - Nov 2017. Hopefully, there are people who qualify.

I am allowing my designers to enter also, if they entered cards for the alternate months that they do not design for.

I kept this a surprise for this year, but will do this challenge every year now, as a special thank you for the Rudolph Days Faithful.  Do if you do not qualify for this year, you have ample notice for next year!

So check your blogs to see ifyou posted a card for those months. If so, then use Mr Linky below, to enter!

The prize will be a choice of one of the following stamps:
Stampendous, Cling Snowy Postcard


or this My Minds Eye,  Winter Wonderland stamp

if you prefer dies, you have a choice of this
Cottage Cutz,  Reindeer with Scarf


or this Memory Box Magnificent Merry die


November Rudolph Days Challenge Winner

Wow! 61 entries. I am so thrilled and amazed at your support.

Your cards were beautiful to view and very inspiring! I am glad so many of you now have finished cards in your Christmas card stash. Takes a bit of the pressure off this month.

Once again I have used random Org to chose the winner. #53 Bonnie is our lucky lady.
Bonnie, please send me an email with your address, and let me know which two prizes to send.


Now for the December surprise.

One of my regular entries once posted that she had never missed entering and had yet to win a prize.
I decided that those who have faithfully entered all year Jan - November 2017, shall be entered in a special prize draw. 

So check your blog and if you qualify, then watch for my post later today. The rules and the Mr Linky will be up sometime today or tonight. I will continue this special challenge each year. Always to be posted in Dec. The Winner will be drawn at the last day of the month. That gives posters ample time to hear about this extra challenge and to check their blogs.

Sunday 26 November 2017

November Rudolph Days Challenge

I have not been well, so must apologize to you all for the lateness of this month's challenge. I did not have my post prepared ahead, and have had nasty dental problems that through me for a loop this week. Finally got in at the dentist and had a crown done, as well as found out that the extra pain I was suffering with was from Oral Shingles! I have had the Shingles vaccine but it just reduces the chance of  contracting shingles.

This is our last monthly challenge of 2017 but I am pleased to tell you that I have something planned for December. Watch this blog in early December for further details.

Here are the rules for your perusal:

 1. The Rudolph Days Challenge will start each month on the 25th, and will close at midnight PST, on the last day of that month.
2. The theme is always Anything Goes, as long as it is Christmas.
3. One entry per person and you just need to enter one Christmas card or Christmas project.
4. You may combine your entry with other challenges (maximum of 10 in total).
5. Your card (or Christmas project) should not have been previously posted to your blog. It should be posted to your blog during the current months Rudolph Days Challenge, (between the 25th and last day of the current month)
6. Please link back to or at least mention, the Rudolph Days Challenge.
7. Please leave a comment on the challenge post.
8.   The winner will be selected by random draw and announced on the first day of the following month. Prizes will be mailed anywhere in the world.


Our designer, Jenny at Cardsarus blog  has made a lovely wreath and I am delighted to share it with you. As our rules state, all Xmas projects are welcome at the Rudolph Days Challenge. Cards, tags, handmade Christmas crafts etc. are all welcome here.

This wreath has great traditional colours and I like the red "berries" on the wreath. The smaller dangling wreath is so sweet with the wee Santa in the center. I hope you will get a chance to pop over to visit Jenny's blog!


My card is a Hunky Dory Fancy Folded card. It is from a kit that I picked up at my local craft store, during their Christmas Open House sale. They had so many doorbuster specials that day and I must confess that I went a little bit overboard! The card kit is my NBUS item today.

Here is the front look of the card...


As you open the card, it starts to pop open on it's own...


Until it looks like this...

Finally, there is a belly band to help hold it flat for mailing. Whoops...I see I did not check to see it was on straight before I took the photo.


Sam at Whisper's Cards has made us two cards this month!
The first is this adorable "workout" penguin card.  I really like the non traditional colours and DP that Sam used here. the design papers really compliment each other!


Her second card is so pretty. A great circular shape and pretty papers around that sweet image. Hope you will get a chance to pop by her blog and leave her some comments.


Now...on to the prizes.
The winner will be drawn by random Org and will have a choice of any Two of the following prizes.
(Yes I said any Two!  I am adding an extra prize to make up for being so late posting the challenge this month.)

1. Inkadinkado Evergreen Holiday Stamp


2. Kaisercraft Christmas Wishes Stamp


3. Memory Box Peace Script Die


4. Memory Box Desiree Ornament


Sunday 12 November 2017

Christmas Card Club - Shimmer and Sparkle

This fortnight, Lorraine at Rainy's Craft Room chose the theme of Shimmer And Sparkle for our Christmas Card Challenge. I knew right away which NBus item I would use. I had just purchased a set of crystal owls and thought they would be perfect for Christmas cards.

If you would like to check out the other entries, the hyperlinks to the other members blogs are on my right sidebar. It is worth taking a peak as there are some very talented ladies there and they make fabulous cards!

Card 1. The DP for this card is all from my stash...Doodlebug, Here Comes Santa Claus, 6x6 paper pad.  The NBUS owl, as well as the pearl and diamond bling, are from Forever In Time.

I used a second  NBUS item here...a Nouvo clear crystal glaze paint pen. It is very much like clear Wink of Stella, but the effect is much more pronounced. I used it on the white branch as well as on the aqua embossed snowflake panel.really like the effect and have added some of the other coloured Nouvo pens to my Christmas list! I keep a running list of small items that are perfect for stocking gifts. DH likes the ease of buying everything at the craft store!

I am entering this card over at Pixies Crafty Workshop - must use snippets. My snippets are the aqua embossed panel, the pink and red circular mats, the white branch, and the Xmas tree DP.


Card 2.  My NBUS item on this card is the Forever  In Time, Crystal Swirls that I used in the left hand corners. If anyone knows a foolproof way to get delicate swirly bling off the acrylic paper and onto the card without stretching and distorting it, let me know. After fighting with those swirls several times and even breaking a third swirl, I thought perhaps I should have lifted it off with transfer tape on the good side, and then peeled that tape off once the bling was attached. Let me know if you have tried that or any other good method.

The grey and white snowflake background DP is from my snippets file, and the border band is First Edition. I added two Impression Obsession snowflakes...how I love that die! They are the miniature snowflakes and fit card sizes quite well. A wee diamond in the centre of each one tied in the sparkle theme. The border branch is Memory Box and was given a good coating of Nouvo crystal paint pen. The black circle is Spellbinders, and the red stitched circle is Lawn Fawn.


Card 3. My NBUS on this card is the Simple Stories Claus and Co, DP.
The word Joy and the stars are part of the DP and I went over them with three coats of Nouvo clear glimmer pen. I added clear diamonds to the stars on the red DP and the vintage silver border is glitter tape from the dollar store. I added a thin layer of Nouvo pen over the red and grey mats as I thought they looked a bit plain and I needed to make the card shine for the Shimmer and Sparkle theme..


Wednesday 1 November 2017

October Rudolph Days Challenge Winner

Wow! We have over 300 trick or treaters at our house this evening.   Most were under 12 years of age and the costumes of the kids (as well as many of the parents) were fantastic. There were some teenagers and they were all so well mannered and polite and bursting with exhuberance. It was great to see them having fun and laughing and giggling.

Sadly, there were several groups of young girls around 8 or 9 years old, who were quite cheeky and disrespectful. One girl grabbed the candy bowl and told me she liked to choose her own and then passed it to her 5 or 6 friends.  Another group who looked around 9 years old told me they liked two chocolate bars. I told them I was only giving out one each and they repeated that they would rather have two... Oh my! Needless to mention, their parents were not accompanying them...which is strange in my neighbourhood. Most children are well escorted by parents here...right up to about 12 years old.

On the other hand, I had some of the sweetest toddlers. One tried to give me a chocolate bar. She tried about 5 different times. Another came up to the door, rang the doorbell and told me her age! Several 18 month to two years old kiddies, tried to come into the house....the parents were so embarrassed. I was laughing and leading them back out and they wanted to kiss me goodbye!

Well...back to Rudolph Days. We had 61 entries... that made me so happy! I enjoyed viewing each and every card or Christmas project, and leaving you comments and praise. .

Once again I used Random org to choose the winner
Here is a photo of the winning number, #26 Steffi H.


Steffi,, would you please email me at    maureenkane@telus.net and let me know which whether you want the stamp or the die.


Monday 30 October 2017

Christmas Card Club - Sentiment as the focal point

Sylvie at Gibmiss blog chose the theme of The Sentiment As The Focal Point, for this fortnight's  Christmas Card challenge. If anyone is interested in joining our challenge group, drop me an email.  You can view the other club members cards if you follow the hyperlinks on my right sidebar.

My Recollections 290140 sentiment stamp is my NBUS item today. I have had this stamp for quite a while and have been looking forward to trying it out. I was not disappointed. I stamped with Tsukineko Brilliance white ink and heat set it with my heat gun.


I painted over the holly leaves with some Yasutomo colours. They are little pots of shimmery colours that you just whirl a damp paintbrush through and then colour with it. I do not know what oher name they are called... A few red teensy diamonds for the holly berries and outer corners and sentiment image was done!

I matted with a snippet of red Echo Park, This and That DP and then matted again with a green snippet of My Minds Eye, 12 Days of Christmas   DP.

I wish I had matted the black sentiment rectangle with a piece of green card so it would stand out more against the red DP,  but chose instead to keep the layers down for postage weight. Wish I had followed my first instinct!.

Wednesday 25 October 2017

October Rudolf Days Challenge

Whoops...I am late...very, very late!
Thought I had this post scheduled...but obviously not. My apologies to everyone, but better late than never.


Here are the rules for your perusal:

 1. The Rudolph Days Challenge will start each month on the 25th, and will close at midnight PST, on the last day of that month.
2. The theme is always Anything Goes, as long as it is Christmas.
3. One entry per person and you just need to enter one Christmas card or Christmas project.
4. You may combine your entry with other challenges (maximum of 10 in total).
5. Your card (or Christmas project) should not have been previously posted to your blog. It should be posted to your blog during the current months Rudolph Days Challenge, (between the 25th and last day of the current month)
6. Please link back to or at least mention, the Rudolph Days Challenge.
7. Please leave a comment on the challenge post.
8.   The winner will be selected by random draw and announced on the first day of the following month. Prizes will be mailed anywhere in the world.

Our designers have been busy making some wonderful inspiration for you all.

Sonia has made this fabulous Xmas tree ornament/bauble. It is so pretty. Lots of glitter, and sparkle. I think we will all be inspired to tackle making up some ornaments too. I especially love the poinsettia blossoms.  A visit to Sonia's blog is sure to interest you. Sonia always has the best tutorials for her projects


Linda has made the sweetest Penny Black card. I am loving this sweet little fox and as always, Linda has beautiful colouring here. Pop over and visit Linda's blog. I promise you will not be disappointed.


We have a guest designer this month. I am pleased to welcome Jane Willis of Onions and Paper blog
Jane has made this gorgeous card featuring gold embossing and beautiful gold mats.  Hope you will pop on over and welcome her.


This prize this month is a choice between this Hero Arts CL 722 stamp.


or this Impression Obsession 108-F die kindly donated by Carol L of Our Little Inspirations blog. Please pop over to Carol's blog and view her wonderful cards

Wednesday 4 October 2017

A NBUS Christmas

This card has been a LOT OF FUN!!!

There are a lot of NBUS items on this card (Never Before Used Stash). It was great fun finding all these  papers, stamps, and other elements, in my craft room. I am taking this card over to the 12th NBUS Challenge at Darnell's Blog djkardkreations. Darnell has a fabulous challenge with over a dozen prizes.


The first NBUS is the card base and envelope which are from a Hunky Dory 6x6 square easel card set.  I paid one dollar for 4 cards and envelopes still in their package, at the September 13th  papercraft garage sale.

Second NBUS is the three Design Papers. They are all from the Tim Holtz, Idea-ology Yuletide Paper Stash. The red snowflake border is K&Co, from my stash.

Third NBUS is the Tim Holtz Stampers Anonymous, Mini Holidays CMS 177 stamp. The Horse Drawn Sleigh stamp and the Christmas Greetings stamp are both from this set. The sentiment is stamped onto an edged diecut that came with the Yuletide paper pack mentioned above.


Fourth NBUS is the Darkroom Door trees stamp. I used my Misti for all the stamping as I find that I do not get even coverage from these silhouette type stamps, without it. Even with the Misti, it took three stampings to get them even! I used two shades of Momento green ink and sort of swirled them onto the tree stamp. It gave a mottled green look that I was quite happy with.

I used a snippet of another K&Co border, to anchor the sentiment die. I pop dotted it to help hold the easel card open.

Fifth NBUS is the rusty/copper coloured mini diamond bling. I popped them on the stars in the top piece of DP and also onto the fabric snowflakes I used on the snowy hills. The hills are just snippets of Bazzill ivory heavy card, cut by hand into hills, pop dotted together and Nouvo drops painted onto the edges. Nouvo drops were also dotted onto the trees. A few more brush strokes of Nouvo drops around the tree bases as well as under the sleigh and horses, helped to ground them all. I think they are NBUS as well...but since I am not sure, I will not list them as such!

I am entering this card in the following challenges:

1. 12th  NBUS Challenge.at djkardkreations - must use at least one NBUS item

.

Tuesday 3 October 2017

Christmas Card Club - Round Card

Valery Anne at Valery Anne designs,  set the theme of Round cards for this fortnights Christmas Card Club. If you would like to pop on over and check out the other club members cards, The hyperlinks are on my right sideboard.

Today's card is for my eldest daughter. I wanted to make her a personalized Christmas card...something that acknowledged her "new" vintage trailer, and the enjoyment she has found in camping!

She recently bought a vintage Trillium trailer.  I have made a few adjustments to my NBUS  Cottage Craft Christmas trailer die to accommodate the design style of her her trailer. I left out a window that sits at the top of the door and moved the wreath that sits sits on that window to sit alone. She will get a kick out of the fact that this actually looks like her trailer!

I will entering this card over at Darnell's 12 th NBUS Challenge. Pop over to take a peek. It is a wonderful challenge that closes on Oct 4th and has many fabulous prizes.


This card is made from snippets of black, grey, white and cream card. The circle card as well as the red Bazzill Pomegranite  Splash scalloped mat, were cut on the free machines at my local papercraft store. I just did not anything large enough at home. To make it a wee bit more Christmassy, I added a few snippets of red and green glitter card as well.

It  was an easy card to make, just a bit tedious to find all the wee die cut elements and piece them back together. Found some rather large rhinestones in my drawer and added those for some extra sparkle.  My daughter just bought a house 12 doors away, so I can add as much depth as I want to this card as it will be hand delivered!

I randomly used two shades of Stampin up chalk on the stitched round die, to create an illusion of the sky. The design of the rest of the card was created by simply following the Round card brief set by Valery.

I would love any suggestions for an appropriate verse to use for the inside of this card. I will be awaiting your ideas.

Since the trailer scene was completely made with snippets, I am taking my card over to Di at Pixies Crafty Workshop where the theme is always "must use snippets".

Sunday 1 October 2017

September Rudolph Days Challenge winner


We had 52 entries this month. It was a delight to see all the cards and visit your blogs. We have so much talent among our participants...it makes me so happy to see you share that talent with us all!

Random Org was used to chose our winner.

The winner is  Jackie T.   # 7


Jackie, please email me at maureenkane@telus.net and let me know your mailing address so I can get your prize mailed off to you. Let me know if you want the die or the stamp set.

Monday 25 September 2017

September Rudolph Days Challenge

Once again it is time for the Rudolph Days Challenge.

Here are the rules for your perusal:

 1. The Rudolph Days Challenge will start each month on the 25th, and will close at midnight PST, on the last day of that month.
2. The theme is always Anything Goes, as long as it is Christmas.
3. One entry per person and you just need to enter one Christmas card or Christmas project.
4. You may combine your entry with other challenges (maximum of 10 in total).
5. Your card (or Christmas project) should not have been previously posted to your blog. It should be posted to your blog during the current months Rudolph Days Challenge, (between the 25th and last day of the current month)
6. Please link back to or at least mention, the Rudolph Days Challenge.
7. Please leave a comment on the challenge post.
8.   The winner will be selected by random draw and announced on the first day of the following month. Prizes will be mailed anywhere in the world.

Our designers have been busy making some wonderful inspiration for you all.

First up is Jenny at Cardsarus

She has made this wonderful Three Wise Men card. Loving the golden accents and mats.  Loving the sumptuous bow, and loving that holly!


Next up is Sam at Whispers Cards

I love this LOTV image as it is so adorable. I am loving the the Stampin Up design papers used here and loving the gorgeous red border trim! The snowflake dies have me drooling.  


My card is a combination of new and old elements. This image is the last one of a series that I stamped and coloured up a couple of years ago.  My first NBUS item is the DCWV copper Mirri paper that I used for the scalloped mat. My second NBUS item is the copper mercury glass look  rectangular mat. This was from a 12 x 12 scrapbook pad that I cut down into 6x6 papers. I matted it with a snippet of dark brown card just to ground it. My photo makes that brown mat look almost grey, but it was the only photo that did not horrid glare from the mirri card!!!

The brown satin ribbon is my third NBUS. It was on a present I recently recieved and I upcycled it onto this card. The mat is actually the same colour as this ribbon...


The DP is possibly from a 6x6  Best Creations paper pad. The glued edge of the pad fell apart so I am not positive. The Merry Christmas and the reindeer were already heat embossed onto the paper.


I used a VOS snippet of  berry red World Win card for the final mat. The scalloped 6x6 card was purchased in England on my last trip over there.


My sentiment is my fourth NBUS. I bought this stamp for $2.00 at one of the 4 garage sales my local papercraft store holds each summer. Vendors rent a spot and set up in the parking lot and sell like a car boot sale. Such fun!!! Sadly, the vendor did not have the original packaging so I do not know the manufacturer..

I am entering my card in Darnell's 12th NBUS Challenge over at djkardkreations blog. The challeng is to use at least one NBUS (never before used Schtuff)

Our September Rudolph Days Challenge prize is a choice between this Hero Arts CL722 stamp set


or This Memory Box Holly Leaf Border Die.


Sunday 10 September 2017

Sympathy

My sympathy card stock is sadly depleted at the moment. I like to have these type of cards on hand. Sometimes I am sending them out, but often a friend asks if I have one on hand as they want to send something made with love.

My NBUS item today is this modest background DP. It is from a 6x6 Forever in Time Vintage Two paper pad from the Dollar Store. The stamp is another image from the Inkadinkado Meadow stamp I used on my last card. I think it is also NBUS as I do not remember using this image before...but...one never knows.

To help keep my goal of using a NBUS item on every card I post this year, I am now adding a red dot to items as I use them, and also to items that I  know for certain I have used in the past. As you can assume, sometimes it gets daunting to remember.  


In keeping with my last card, the image is again stamped onto a snippet of Momento faux inky card. I matted it with another snippet of black card. I added some pop dotted butterflies that are also from the Dollar Store.  They have a lovely glittery surface.

The indigo inky background and my silhouette meadow flowers stamp now qualify for Mrs. A's Butterfly challenge. Check out her lovely challenge. She has great themes and some lovely prizes!

Over the last few years,I used to go to the Dollar Stores with my neighbour (the cardmaker). I would pick up items for scrapbooking or cardmaking and stash them away in my craft room. I am making an effort to use up these items as I would like to use them up and regain the real estate they occupy in my craft room! Keeping that in mind, I am now working on several more sympathy cards just like this one. Might as well use all 4 pages of the black script background and the rest of the blue butterflies!

I am entering this card in the following challenges
1.The Butterfly Challenge - the colour indigo and a silhouette and a butterfly of course!

Monday 4 September 2017

Inky Birthday Wishes

I have a faux inky card to share. The inky background is a piece of faux inky card from the Walmart Momento 8x8 paper pad.

My background is from the Maja Designs Vintage Summer Collection. I won that paper pad in a prize draw from Maja...lucky me as it is gorgeous paper.

I stamped the Inkadinkadoo Meadows stamp with Momento Tuxedo Black ink and die cut the image with the Sizzix Banner die. I used a snippet of Michael's purple 120 pound card for an off centered mat.

My NBUS item today is the Tutti Designs Happy Birthday Topper die which I cut from another snippet of the purple card. I really like the die, but it was very hard to cut it cleanly. I shimmed with two extra pieces of card and used wax paper as well.  I still fought to get it out of the die.


The purple rayon ribbon is from a huge roll that my local paper craft store had on clearance a few years ago. The bow was made on it's own and I then glued it to a flat strip of the same ribbon that I'd wrapped round the base card. It seemed the easiest way to keep that ribbon from looking tattered. I find the rayon ribbon can look that way so easily if I handle it too much..

This is another card for the finished cards box. I never seem to have enough in there!

I am entering this card in the following challenges:

1. Pixies Crafty Workshop -  must use snippets

Friday 1 September 2017

Winner of August Rudolph Days Challenge


I am delighted to announce that we had 55 entries. Not too bad for the hot days of summer!

Once again I used Random Org to chose the winner.  #21 Marianne is our winner!
Marianne, could you email me at  maureenkane@telus.net with your mailing address, so I can get your present sent off.


Thanks for everyone who participated. It is such fun to view the cards and see the lovely creativity you all possess. I learn so many new things from all of you.

Friday 25 August 2017

August Rudolph Days Challenge

Once again it is time for the Rudolph Days Challenge.

Here are the rules for your perusal:

 1. The Rudolph Days Challenge will start each month on the 25th, and will close at midnight PST, on the last day of that month.
2. The theme is always Anything Goes, as long as it is Christmas.
3. One entry per person and you just need to enter one Christmas card or Christmas project.
4. You may combine your entry with other challenges (maximum of 10 in total).
5. Your card (or Christmas project) should not have been previously posted to your blog. It should be posted to your blog during the current months Rudolph Days Challenge, (between the 25th and last day of the current month)
6. Please link back to or at least mention, the Rudolph Days Challenge.
7. Please leave a comment on the challenge post.
8.   The winner will be selected by random draw and announced on the first day of the following month. Prizes will be mailed anywhere in the world.

Our designers have been busy making some wonderful inspiration for you all.

First up is Linda at Snail's Space


I love the sweet image Linda used here! This Santa Hedgie has almost delivered the last of his presents. This wee Hedgie is perfect with this Ho Ho Ho sentiment. I think Linda created this snowflake background. I am going to pop over to her blog and read her post to see how she made it! I hope you will pop by her blog too and leave her some compliments!

Next up is Dr. Sonia at Cards, Crafts, Kid's Projects blog


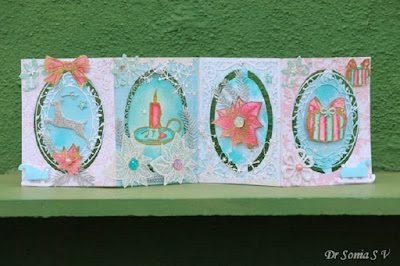
Sonia has made this delightful accordian card. I am loving the soft, non-traditional colours and the pretty die cuts used here. Methinks I now want to make an accordian card too! I am looking forward to reading Sonia's post as she always gives such clear and easy to follow directions. Pop on over to her blog and read along. I am sure she loves comments too!

My card was made at the recent Langley Stampers Card Box outing. Per usual, I forgot to write down the names of the reindeer and wreath die cuts and the embossing folder, but I do believe the red birds are Impression Obsession. The hills are perhaps Lawn Fawn or Stampin Up...?


We cut the background hill from white glitter card and then embossed another piece of it with the birch tree folder. The reindeer is cut from a silver pearlescent card. The birds, wreath and bow were cut from snippets of green and red card. We painted over them all with Wink Of Stella.

I made a boo boo on the inside of my card. I did not press evenly with the sentiment stamp and have some lighter patches. I can not try to correct it at the moment as I am not at home. I usually take an ultrafine black copic pen and sort of place wee dots of ink along where the missing bits of lightish ink are. It seems to blend in better that way as when I just try to draw in the missing light ink, it seems to stand out too much.


The prize this month is this Memory Box, Small Pine Branch


Sunday 20 August 2017

Tea-riffic

Langley Stampers Club organized a Shoebox card making day out. We attended a lovely hall across the bridge in Coquitlam.  Each person had to design a card and bring 20 kits.  As I rarely go over that way, it was a fun day out.

I decided on this NBUS Taylored Expressions stamp set and with a theme of blue and green in mind, I managed to find all the design paper at a clearance sale at Joanne's. They had 12 x 12 design papers ranging from 17 cents to 30 cents each. The background plaid paper is Happi Boy Plaid by Dena Designs.

I had a wee problem getting my photo image straight. Sadly it looks as if my papers are crooked but of course they are straight...just the camera operator (me...lol) doing my usual photo problems!


I inked the edges of the Canvas Corp Mini Dot Reverse Aqua and Ivory dotted paper with Ingvild Bolme blue chalk ink. Then inked the edges of the Tim Holtz Ranger Distress Collection Coordinations Aqua Textured card with her green chalk ink.

The doilies were from Michaels and I used snippet of green textured card with my Spellbinders Decorative Labels One die, for the fancy mat under the teacups.

I stamped the teacups on a snippet of card, and coloured them with Copics. I pop dotted them forward onto a Lifestyle Crafts Nesting Frames 7 mat, cut from another snippet of white card. Not many snippets, but just enough to allow me through the gates at Pixies Crafty Workshop...where you must use snippets somewhere on your card!

I love the sentiment inside this card. It is from that same Taylored Expressions stamp set. I flipped over the aqua cardstock I used on the outside of the card so that the smooth side was up, as I find the smoother side takes the stamp better. Here is a photo of the inside of my card.