Sunday 31 March 2013

Happy Easter - Giving to each other

Happy Easter everyone! Hope you are having a fun filled weekend and eating lots of chocolate!

The grandkids slept over Friday night and we were up and out of the house early Saturday to go into the city to the Stanley Park Easter Train.
 55 minutes to drive to the Park...35 minutes in a lineup to pay for parking! Poor DH and a huge queue of others couldn't get the parking ticket machines to work. After eating his money and refusing to take any other form of payment, he had to leave the lineup to walk back to the truck to get more cash from his jacket.
Luckily he did, as a woman was ticketing the vehicles of all those who were stuck in the lineup!!! After he got sorted out with her, it was back to the queue to get tickets again.

The train itself was nice. I remember going every Christmas to ride that miniature train. In those days, there was so much more at the park. There were pony rides, a free Zoo and also a petting Zoo. You could row a boat at Lost Lagoon. The ponds and man made lakes were bursting with ducks and geese...there were peacocks and tons of wildlife. The police had stables there  for the horses they rode to patrol the park. You could go and pet the horses and get a little talk from the policemen all about brushing or riding them...

I will slide in a warning for my British readers. Canadians just do not know how to do miniature train rides like you do! I have been on many of yours and they are all superb. That said...here is a little peek into our ride....you will see that my photography skills have not improved much!

I couldn't get the engine...or engineer...there was a swell of people trying for photos and we were near the back. Amazingly I managed to get in and out of the train without assistance...there were sort of pipe horizontal rails just under the red roofs...I hoisted myself in and out with them...Little Miss C took my poles!
There were a few little woodland scenes...


Both children quite liked the mechanical aspect of the water wheel and turned their heads to see it  till it was gone.
 Here is a glimpse of a Sasquatch and his camp.


The kids enjoyed the train ride itself and the little views of  "nature".

 There was a free easter egg hunt included and to my utter joy it was located in the old petting zoo. It was so much fun to walk around, through all the old areas I used to love to visit as a kid.

Afterwards we walked over to the Aquarium and had a great time looking through all the exhibits and seeing the Beluga whales, otters and small dolphins.  The otters were so busy playing, you just had to smile...all the faces around me were full of smiles at their antics.
I wanted to walk down to Lumberman's Arch and show the kids where DH and I learned to swim...well...in all honesty, where DH learned to swim...I learned to dog paddle at best!!! The lessons were held in the man made  tidal pool created within the park. You could always find it by the big log framed "arch". I think most  kids in Vancouver and even perhaps Burnaby learned to swim there. I was so hoping to get a picture of the arch but  my back couldn't keep up and after the Aquarium we staggered back to the truck. It was just as well as the kids were so tired too...poor Little Miss C was falling asleep at our late lunch and both fell asleep on the long drive home. Little Mr P was chattering away in the truck and suddenly there was silence...he fell asleep in mid sentence!!!

We carried them into the house and laid them down to have a wee rest...I knew my daughter would be here to pick them up shortly and Little Miss C so wanted to give her brother an Easter card and get one from him as well!!!  I ran down to the craft room and grabbed the leftover DP from the other day and some of my baggies of pre cut spellbinder dies. I put together 2 very quick cards and popped them into envelopes with their initial pencilled on  the front. When they woke up, I gave them each the others person card to address and sign...Poor Little Mr P...he couldn't figure out that the pencilled C was just there so I knew who to give them to...he carefully write her name...leaving off the C and writing in pen beside it, the rest of her name!
 

Here is the one she gave to him.


And a quick peek at the inside.

Not the best sentiment stamping in the world but I only had 30 or 40 minutes tops to make both cards so no times to pencil the bare spots back in!

No recipe as these are pretty basic and all the bits were listed the other day.
I am entering these cards in the following challenges:
.
1.Pixies Crafty Workshop - must use snippets.
2. Simon says Stamp - Anything goes

Saturday 30 March 2013

One more

One more Christmas card added to the finished cards bin. It sure has been nice to see that stack of cards grow! I made a commitment to make at least 3 of these cards per month so this is my final Christmas card for March. Whew...I was cutting it close to the wire! Had to get this posted before month end so that it counts in my totals.


Not sure that I like it all that much,,, I send cards to a wide variety of people so I know it will work out OK for someone...just have to figure out who!

Just one little tip and then on to the recipe as I am tired from our Stanley Park train ride and visit to the Aquarium afterwards. The large red cardstock was embossed in the center with a spellbinders square die...then the white cardstock in the center was embossed with a size smaller square die...and finally...yes...you guessed it the red cardstock square in the center was embossed using another smaller square. Hard to photgraph so thought I would share that detail.
Recipe:
Card base - Michaels 5x5 card and envelope pack from my stash
Cardstock - red and white from my snippets stash
Dies - Spellbinder squares used to emboss a frame around the white square
         - Corner Die Marianne Creatables LR0143 (a candy win from Shaz in OZ @ http://calligraphycards-shazinoz.blogspot.ca/
Bling - Dollarama from my stash
Ribbon - a very teensy snippet from my stash...could hardly tie it!
Stickles - Stardust stickles around the embossed edge of the smallest red square and the white square.
Sentiment - a rub-on from my stash...so old that I don't know the name anymore.
Stamp - unknown from the stamping day at the LSS (next time I  will stamp one image and record the names for my files.

I am entering this card in the following challenges:
1. Pixies Crafty Workshop - must use snippets...think I might win something for using the teensiest piece of ribbona nd managing to tie it too!
2. CHNC Extra - must be Christmas
3. Marks Finest Papers SpeedyTV Christmas Card Challenge - must be Christmas
4. Crafty Ribbons - Anything goes with ribbon
5. Jingle Belles Rock - Jingle Belles are Blinging I used stickles and lots of diamond gems
6. Marks Finest Papers Simple Salutations - Anything goes

Easter Chicks

Well, maybe not the real ones but this will have to do.

It's down to the wire and I have to produce a couple of Easter cards so finally buckled down to it tonight...

Spring is finally here in Surrey B.C.  DH spent a couple of hours in the garden yesterday and again today and I took advantage of that and raced down to the craft room to prepare some Easter card kits for the grandkids. They arrived at 4:30...full of giggles and boundless energy and dying to make some cards for their Mum and Dad. I had the kits all laid out to save time...Two lovely card were quickly created, signed, and into the envelopes before I could grab a picture!

I had a smile on my face as they both signed each card, using the same pen. Little Miss C went for the dark ink look...pressed nice and hard and went to town with medium sized writing. Little Mr P sat down after her and printed his name so tiny I may have to run out and buy a magnifying glass for them to see it! He also managed to make it appear as though he used a super fine point, pale ink pen!!! Oh, what a sweetie!

They were up into their beds at 9pm and this tired Grandma made a card with the leftover scraps from their creating spree. Now keep in mind that we are almost 60...we love them to bits but are TIRED by bedtime when we have them for sleepovers...they are great kids, quiet, play nicely together etc...but it is all the extras that we are not used to that tire us out! Glad  I got these cards made,  as we are off to Stanley park to ride the Easter train tomorrow. It is about an hour's drive to the park and probably a fair bit of walking from the car parking area to the train. I shall bring my poles and I'm sure buy the time we get home, I will not be making any cards tomorrow!

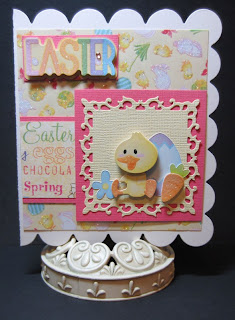
Here is the first one...A very simple card made from snippets and hoarded stash! I have finally come to the realization that they do not all have to be works of art. In some cases, they just have to be a card...ready at the right time...made to suit the audience they are intended for. This is one of those.

Gosh, this photo seems so washed out. I will try another one...I think it is a little clearer...but the photo is a little wonky...sigh...I need to take a photography course!

Recipe
Card base - 5 inch square scalloped card;  made on the accucut machine at my local scrapbook store...free to use as long as you are cutting paper you bought from them. I keep their heavy weight card stock in separate folders marked with their store name...that way I can use those machines when needed.
Designer Paper - from my stash, Floral with bunnies and chicks is Best Creations Craft n Craftin Glitter paper Bunny Love
Designer Paper - from my stash, Words;  Flair Designs 2008  Easter Surprise Collection - Words
Cardstock - from my snippets bin
Dies - Spellbinders square Fleur de Lis
Embellishments - from my stash,  3D chick and egg, tiny carrot and blue flower, as well as the 3D Easter sign are snippets of various  Dollar Store Easter scrapbook packets.

I am entering this card in the following challenges:
1. Pixies Crafty Workshop - must use snippets.
2. Simon Says Stamp - Anything Goes
3. Friends of Speedy TV MFP - # 65 Make an Easter card or project
4. Simple Salutations MFP - Anything goes
5. Inspirational Challenge MFP - Inspirational photos provided

Tuesday 26 March 2013

WOYWW 199 - The Birds

It's that snoopy day again...that day to get a peek into all the other crafty desktops and see what everyone else is up to! If you would like to join in or even just look around, go to Julia's blog at  Stamping Ground.
Be sure to leave her a comment though as she hosts this wonderful fun.

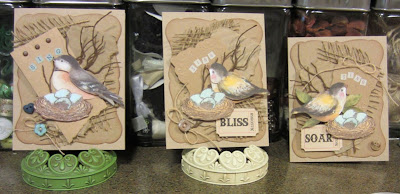
My desk is busy...busy with birds...bird cards that is. Look carefully, they are way at the back, along with all the left over bits from creating!

 I finally finished the series of bird cards for the scientist at my daughters work. They have been delivered and now I am hooked on  making more. There is something relaxing about making them...they just evolve...each a little different than the last. I have used a variety of birds on them , these have K and Co 3-D birds but some had embossed Kraft chipboard birds, and some even had stamped and coloured birds. I did up some similar cards last year but these are all just a little different from those.
Here is a close up.                                      

I decided to send one to my daughter in Monaco. I have written before about how I am making inspirational cards to send to her. She is so very far away and this is a nice way to keep in touch,. We email and facebook but it is not the same as a handwritten note in a nice card!
Here is the card I made for her. It is just a little different again...
Here is a photo of the inside...I have had to crop very tightly as I had already written the letter on the inside of the front flap. I have cropped it out for privacy.
Hope you enjoyed your little visit. See you next week! 

Challenges:

Sunday 24 March 2013

Christmas Card Club - Include some Kraft

I was happy to see that Clare from  http://mypurrfectworldccc.blogspot.ca/   chose this great Kraft theme as I love incorporating Kraft elements with my cards.

I used a Kraft corrugated card base and kraft envelope from Michaels. They are not so good for making it through the post office slot, so are best suited to cards that can be hand delivered.

I used some Bo Bunny papers I bought before Christmas...I think it is the first time I used this pad. I put a little Star Dust stickles  on the snowflake pattern of the mitts and some Frosted Lace Stickles on the cuffs.  I chose to colour them in a sort of kraft looking colour so I felt they needed a little pick me up!


The mitts and the sentiment are matted on a sort of dark Kraft coloured paper from a self adhesived DCWV mat stack from Joanne's.  I have a confession though...every time I use this stack I forget that they are self adhesived and I use self stick tape to attach them!!! ahahaha Even the pale aqua framing the sentiment is self adhesived. I guess they can really save time if you use them as intended!

Recipe:
Card base and envelope - Kraft corrugated card and kraft envelope from my stash (Recollections brand from Michaels)
DP - Bo Bunny - Snow Day
Card Stock - DCWV self adhesived
Image Stamps - unknown (from a stamp day at my local scrapbook store)
Sentiment Stamp - from my stash (Recollections brand, name unknown)
Bling - from my stash (Dollarama)

I am submitting this card to the following challenges:

1. Christmas Card Club - Include Kraft
2. CHNC Extra - Anything Goes
3. Stamping For Pleasure Rudolph Days - must be Christmas
4. Marks Finest Papers Christmas Card Challenge - must be Christmas
5. Pixies Crafty Workshop - Must use snippets. At first I didn't think I could submit this one and then realized that the sentiment circle came from my tupperware tub of card weight card stock. I am a bit OCD and like the white colours to match, so always save the wee bits for sentiments...they might be a heavy weight thickness...but they match!.

Tuesday 19 March 2013

WOYWW 198 - The room

Bit of a different view of my desktop today. This is the entire south wall of my craft room. . Usually my desktop photos are taken in that left side of the photo...in front of the glass jars, under the hanging white shelves. As you can see the counter top extends way over to the right and there is another opening to place a second chair. Yes...I am ashamed to say the ribbon and lace have not been put away yet!

I decided to show you that "right" side of my desk today.
This is where my neighbour Lisa sits, when she comes over to craft.  The counter top is about 12 feet long altogether and actually tucks another 16 inches behind those tall cupboards.
I utilize that hidden, tucked away area to store stacking boxes full of  card projects in various stages of assembly. There are boxes of card UFO's; boxes of precut card kits for lazy day creating; boxes of kiddie birthday card kits for the grandchildren's visits, boxes of card embellishments, etc.

Just above Lisa's chair is a hanging cupboard. I store all my prefolded card bases in those 4 black boxes on the bottom shelf. I had to store the matching envelopes separately as I did not have room here. They are all  typical  Canadian sized card bases. I bought them just as I started getting into card making. I was lured by a huge 75% or maybe even  80% off clearance sale, when one of our local scrapbook stores changed owners.

Fast forward to blogging and actually learning more about card making and seeing other people's gorgeous 6x6 heavy weight card bases and suddenly mine seem so flimsy and tiny!  I am on a campaign to use them up so have been using them to make the birthday cards for the grandkids pals   They are also suited to note card type cards ( like Hello or Thinking of you) as they are lightweight enough to use to write a bit of a letter in.  I am also using these for the series of cards I am making to mail each fortnight to my daughter in Monaco. I keep those to the $1.80 international postage so if the card base is light I have room to tuck in more pages of letter writing or perhaps some artwork from Little Miss C and Little Mr P.

The little brown woven baskets on that first shelf hold a few teensy self inked, word stamps. I love these as they come in handy to just add one word to a tiny tag. There are some date stamps in those bins as well...My trusty label maker sits in the brown woven basket on the right.

Second shelf hold my 5 1/2 x5 1/2 corrugated cards (both finished ones and new ones) and also holds  my 5 x 5 white cards. My large and small  Zyron machines and glue gun refills are on the right..

Cricut cartridges are on the third shelf with stamp cleaner refills and archival mist in that bin on the right. I save stamp cleaner containers as there are recipes on Pinterest to make your own. I have made one up for Little Miss C.

Fourth shelf has a metal box of puffs for chalking as Little Miss C prefers to chalk the edges of card elements. She likes that if she gets carried away with putting too much on, she can just erase it off again!!!
There are a couple rows of old fashioned acrylic paints and scrapbook paints at the back. I know they are out of style but every now and again I use them, so hate to throw them away! I am just a pack rat at heart!
The photo paper for my Epsom Picture Mate is over on the far right.

Top shelf needs a raised step to reach anything so it stores bits for scrapbook UFOs. The far right is a stack of  finished  8x8 pages for a album I'm working on for my Mum. I haven't been scrapbooking as much since I discovered I'd rather make cards, so this stuff seemed a good choice to tuck way up there!

Want to peek into the scrapbook/papercraft rooms of other crafters? Join Julia @ Stamping Ground and you can blog hop through nearly 200 other rooms too! Be sure to leave Julia some bloggy hugs as she sponsors this whole shebang!


CC Club - Roll Up, Roll Up, Snowballs and Glitter

Our latest challenge over at the Christmas Card Club is Roll Up, Roll Up, Snowballs and Glitter.

At first I thought of several ideas for a card to fit this theme...but I didn't have the right stamps. A snowman juggling snowballs, kids having a snowball fight, snowballs for sale, etc.  I started out with a snowman image that I had coloured before I left for my trip and a few snowballs that I had cut and glittered up. I was going to paper piece and hide his closed hands with snowballs and have him juggling.

Wednesday night was my paper crafts evening with my next door neighbour and as I was colouring up a wintery image of a little girl leaning forward with her hands under her chin, I mentioned that I would love to find a way to use her for this submission. I thought of having her lean over a fence but Lisa (the queen of card design) suggested having her lean on a little mountain of snowballs!!!

So from that brainstorming last evening, this card was created. I think it will go to Little Miss C as this image reminds me of her. I will have to watch for a little boy image to do something similar for :Little Mr P!


This is truly a card from scraps. The snowballs were cut from all the little teensy leftover scraps of copic paper that I keep after die cutting my coloured images. There are so many layers of snowballs...I popped some forward for depth. The little girl was even stamped onto one of those small scraps.
Here is a close up of the snowballs.


I know I save the scraps to be thrifty but also because I can then get the exact match of white or cream for my sentiment so it matches the shade of the image background. I am always amazed at how many shades of white paper there can be.


Recipe:

Card and envelope - from my stash, (Recollections brand 5 1/2 x 5 1/2 square from Michaels)
Cardstock - from my stash
Design paper - MME
Dies - SpellbinderPetit Circle, Petit Sscalloped Circle
Bling - from my stash (Dollarama)
Stickles - Star Dust
Stamped Image - unknown, from a stamping day at my LSS...they had 400 stamps to chose from!
Stamped Sentiment - from my stash name unknown

I am submitting this card to the following challenges:
1. Pixies Crafty Workshop - must use snippets.
2. Mark's Finest Papers Christmas Card Challenge - Must be Christmas
3. Christmas Cards All Year Long - Sparkle and Bling
4. CHNC Extra - Anything Goes
5. CHNC - Merry and Bright


Monday 18 March 2013

Buddy's Thank You Card


Here is a thank you card I sent to Buddy and Kath, @  Kath's Blog - diary of the everyday life of a crafter . Earlier in the year, they had a big clean out in the cubbyhole and several days of giveaways.   I was lucky enough to win Day 1.

I won a fabulous selection of stamps. Little Miss C was so excited and loved the cupcake and the snowmen!!! She will have some cards up on her blog featuring these stamps, fairly soon.
I love them all and they will be showing up on my blog this year.
Here is a picture of my goodies...


And here is a picture of the bottom row!...

Here is the thank you card I made them. It is safe to show it on my blog as Kath let me know it has been received.
Poor  Buddy, hope the pink trim didn't alarm him too much!


Tuesday 12 March 2013

WOYWW 197 Thrifting and Candy

My desk is a sea of ribbon and lace with the rest of my thrift shop finds buried underneath it all. It is in desperate  need of sorting!
They were all bargains from a fun day out with a girlfriend, wandering thru the various thrift shops in our area.   There are so many different types of ribbon and lace and so many colours and shades of colours that I feel giddy sorting it.

I usually roll lace on a bobbin winder thingy and then slide a teensy  elastic band around it very loosely so it doesn't get imprinted with a tight sort of pucker indentation..I then toss those into my rows of colour coded square glass jars that sit at the back of my worktop counter. Haven't managed to get this stuff sorted as I am out of elastics...well that's my excuse and I am sticking to it!!!

Here they are broken down into the individual lots I bought...
75 cents for all of these
and $1.50  total for these two lots.

You might remember the card I made from cutting up and 3D layering three floral shower invites. I found a few more invite sets that day...this sweet embossed tiny watering bucket of flowers and a set of three 25th wedding celebration invites. Strange as it may seem...I bought them to use on Christmas cards with the fancy 25 being die cut and used to symbolize Xmas day. They were 15 cents for all of them! The spool of thread was 15 cents and will come in handy for stitching on cards or layouts. The clear basket of ribbon and lace was 50 cents...I love the hot pink!
On the far right of the first photo, you may have noticed some crinoline material.and a  huge piece of  linen fabric. Here is a bit of a close up.
That linen jumped right into my basket as soon as I spied the $3.00 tag for a 60 x 106 inch piece! I have started to tear some into strips and may stamp a sentiment on it. Some I will cut into flowers and who know what else! I just had to have it.

Off to the far, far left of the first photo you can see the lovely blog candy that I won from  Daniella Hayes at
Daniella Hayes Layers of Creativity blog. Lucky me! She drew my name and sent me this lovely assortment of Tim Holtz products. Daniella tied them up with jute and decorated the Kraft tag with a Hello Kitty theme!
There are two distress inks - tumbled glass and pumice stone and a distress stain - broken china. There is also a TH Stampers Anonymous Visual Artistry stamp set - Natures Elements. I love the images but particularly love the sentiments. They will  be perfect for the inspirational type of cards I am sending my daughter in Monaco. Thanks so much Daniella!

 Stop by Julia's blog Stamping Ground and you too can visit all the other creative work desks this week.

Friday 8 March 2013

Many thanks

Here is the card I have made for my daughter's workmate who kindly gave me a lovely cross/body purse. After my back surgery,  I was struggling to control my poles for walking while carrying my purse.  He gave the bag to my daughter to take home to me. It is pretty and has many compartments to organize my wallet, makeup, etc.

I hope he will like the colourful aspect to it. It is a little bolder than my usual style and I feel like I am going out on a bit of a limb here...but hopefully he will like it.

The large shimmery fuschia swirl is the front flap of a bridal invitation. Michael's was clearing a box of 25 for 30 cents at that infamous clearance sale. Not only do you get the shimmery flourish, you also get a  5 1/2 x 8 1/2 inch fuschia shimmer page which the flourish is attached to. A wee bit of careful cutting apart, a bit of trimming with my cutter, and voila... a single sheet and a flourish x 25. That is just over a penny apiece!

I picked up a box so expect to see more cards made with this bright colour. When I saw it on the shelf, I thought it might work for Dora cards for little girls if it was combined with hot orange and purple. Or perhaps it might work for Disney princess or even Barbie cards!

While I was putting it away, I suddenly remembered this Tinseltown Glitter Ice flower which I have had for several years.A snippet of black damask paper, a snippet of black polka dot DP, a few little rhinestone blingy flowers, a couple of blingy butterflies and a string of black diamond bling and Alakazam (as little Mr P would say) it was done.

Recipe
Card base - from my stash, Recollections textured 5 inch textured white card & envelopes, originally from Michaels
DP - from my snippets stash bin (originally MME)
Fuschia shimmer paper - from my sash, originally from Michaels clearance bridal invitations section
Flower - from my stash, originally  a Tinsel Town Glitter Ice flower from my LSS
Bling - bling teensy flowers, from my stash (originally from the dollar store)
Bling - bling teensy butterflies from my stash (originally from the dollar store)
Bling - Black bling on a roll, Recollections brand; Michaels clearance...last little snippets of this roll
Sentiment - My Minds Eye, Fiddlesticks Story stickers

I am entering this card in the following challenges:
1. Pixies Crafty Workshop - Must use snippets. The two DP pieces are both snippets.

I have set this post to auto release while I am up visiting with my Mum. I have limited access to internet there, so may not get a chance to answer your comments until my return home on Sunday...I will drop round to catch up on visiting you then!

Monday 4 March 2013

Swimming along

This little guy is just swimming along to say Happy Birthday!

This is another "quick card" for my daughters section of the finished cards bin. She always needs so many kiddie type birthday cards. Of course Little Miss C and Little Mr. P want to give their friends a handmade card with their gift!

I kept the colours bright and the card design fairly simple since this card will be going to a 5 year old little boy. Hopefully the little fellow will like it.

Little Mr P helped me create this one. He rolled all the Memory Box dies through my  Big Shot and carefully cut and applied all the 2 sided tape. He even added the foam tape. He was very proud of himself I might add!

Here is a peek at the inside of the card. I like to place the diecut fairly high so there is room to sign on the actual card, below the die.


Recipe:
Card  base and envelope  - from my stash
Design paper - Paper Fever ; Tiny Bubbles Blue
Dies - Memory Box Loopy Rings and Big Splash Border
Dies - Spellbinder Petite Circles; Petite Scalloped Circles
Stamp - Stampin Up, Best Fishes
Stamp - Sentiment is Inkadinkado # 130609

I am entering this card in the following challenges:

1. Pixies Crafty Workshop - Must use snippets; the DP is snippets that are many years old. The blue card stock and the scrap of copic paper (and I mean scrap)  were snippets as well.
2. Crafting when we can - # 39 Earth, Air, Fire, Water
3. Penny Black and More - One For The Boys
4. Stamping Sensations - The Great Outdoors
5. Simon Says Stamp- Anything Goes

Saturday 2 March 2013

There is a new challenge on the block!

There is a new challenge on the block...a new card challenge blog that is!

Sister Act Card Challenge is going to be an Anything Goes- all the time, challenge blog. It is the brain child of two sister-in-laws, Jenn and Trish...hence the name, Sister Act.


They have a design team call out. It started today, March 1 and runs until March 22, 2013. If you are on the lookout for a design team, you can read all about it here.  I am submitting my top three cards to Sister Act to be viewed and considered for one of these design team openings.

This is the first time I have ever applied for a design team opening. I am retired now, with the time available to make this type of commitment. I like to be organized, so the deadlines shouldn't be a problem. I am also a  bit of a "Chatty Cathy" so the commenting duties that come with a challenge blog would be fun!

I think my blog reflects my love of paper crafts and combines it with a pinch of frugalness. I often share ideas for saving a bit of money by using off cuts from dies, using Upcycled items and shopping for bargains. These type of posts are quite popular with my followers.

Choosing three cards was so difficult. I don't think I have a standard "look". I like to make various styles of cards, so I have tried to pick three that reflect this.

The first is a Christmas card that shows my love of combining Kraft elements on my cards. My image is coloured with copics and includes a liberal sprinkling of stickles. Since the card base is corrugated Kraft, this card barely made it through the additional width slot at the post office. I did not have any width room left to use pearls or rhinestone bling accents, so used the offcuts from a Spellbinders star circle die as well as some snowflake offcuts from a Memory Box border for my accent pieces.
You can see my original post here.


The second is this golf themed birthday card. The image was coloured with copics, fussy cut and popped forward for a little dimension. The edges of the card stock were inked and distressed to give a masculine feel. The sun was judiciously pruned to fit on my card. I was quite proud I managed to get it on the card as this die had been in my stash bin for years.You can see the original post here.


The third is a elegant looking card. It was chosen to illustrate that I do not always include a stamped or digital image on my cards. I layered various Memory Box dies onto some shimmery card stock. The organza ribbon was threaded through a rhinestone belt buckle and layered over a Memory Box flourish buckle. You can see my original post here.


Hopefully I have chosen wisely and they will feel I could make a good fit on their design team!