Sunday 30 September 2018

Christmas Card Club - Camels, Turkey or Sheep

Rachel at Fischer's Cards and Crafts blog chose this fortnights theme and I picked Camels for my card. A quick look through my stamps turned up these Three Kings on their way to Bethlehem. I am not sure if this is NBUS. I do not remember using this Inkadinkado stamp before, but it is marked 2004 so perhaps I am wrong as that is a long time ago! I stamped it in Momento Rich Cocoa.

The background DP is Chatterbox two sided Light Snowfall. It was the perfect shade of blue to go with the aqua mirri card mat. I stamped the image on ivory Bazzil 110 pound paper and used a Sizzix stitched die for the image and the mirri mat.

The hills are made with snippets of  kraft stripey textured paper, from an 8x8 DP pad I bought at the last paper craft garage sale. The cover was missing from this pad so I do not know the manufacturer. I wiped a generous amount of that Momento Rich Cocoa  all around the edges, and let the ink edge up onto the hills themselves.


I used a snippet of kraft  paper for the Spellbinders die I used  behind the top portion of the image., It reminded me of Moorish windows.  I decided to go with that Eastern feeling.

The Merry Christmas Sentiment is from Make An Impression 1994. Now that is old!

There is one imported item on my card. It was imported by me! It is the golden diamond bling on the North Star! I bought it in Inverness at The Works!

It is always nice to make a religious card, hope you enjoyed it too.

If you would like to join our fortnightly club, drop me an email. We each take a turn picking the themes and if you want to view the other members cards, just click on the list on my right sidebar.

I am entering this card in the following challenges:

Pixies Crafty Workshop - must use snippets.


Tuesday 25 September 2018

September Rudolph Days Challenge

It is finally time for the Rudolph Days Challenge. Please have a quick peek at the rules before you play.

1. The Rudolph Days Challenge will start each month (January to November) on the 25th, and will close at midnight PST, on the last day of that month.
2. The theme is always Anything Goes, as long as it is Christmas.
3. One entry per person and you just need to enter one Christmas card or Christmas project.
4. You may combine your entry with other challenges (maximum of 10 in total).
5. Your card (or Christmas project) should not have been previously posted to your blog. It should be posted to your blog during the current months Rudolph Days Challenge, (between the 25th and last day of the current month)
6. Please link back to or at least mention, the Rudolph Days Challenge.
7. Please leave a comment on the challenge post.
8. The winner will be selected by random draw and announced on the first day of the following month. Prizes will be mailed anywhere in the world.

9. A special draw will be held at the end of the year, in December,  for all those who submitted a card or project every month that year, January to November.


Dr Sonia has made this gorgeous snowflake cascading card. It is so delicate and light looking. I love the combination of the pretty blue background for the scene, with the white and blue snowflakes.  Pop on over to her blog to read how to make one yourself!


Linda has made this Sweet snowman card. I think is is so fun and very, very sweet! That Merry Christmas frame die is fabulous. You can pop on over to Linda's blog to read about how she made it.


Finally, My card this month is a bit of a different one for me...no DP and lots of white space! I must admit I am still cringing a bit about all the white space. I may just make up another similar card but use a light grey, quite subtle patterned DP, over the card front...

It s so hard to photograph mirri card! The only shot I could get that shows even close to the right colour is this weird shot below, but it makes my card look as if it is rippled at the top! The colour of the mirri card on the flourish in the top left, is the correct aqua colour. It is very close to the colour of the jewel.


This is a 5 1/2 inch square card with an Aqua mirri Memory Box La Rue Flourish layered with  two  Memory Box snowflakes die cut from Heidi Swapp white glitter card. The first snowflake is completely  glued down and the second is only glued down in the white area around the large Aqua jewel.. That allows it to have a bit of movement.

The sentiment was cut from the same mirri card and is a Sue Wilson,  Let it Snow die.

I went around the outside edge of the card with ColorBok Prussian Blue chalk ink, then painted on some Art Glitter glue and finally sprinkled over that with some fine white glitter. 

Our prizes this month are a choice of this Memory Box Evelyn Snowflake 


or this Norland Cardigan Farmhouse stamp set.


Wednesday 19 September 2018

Christmas Card Club - Bears or Anything Goes

ValeryAnne of ValleryAnne Designs  chose the theme of Bears or Anything Goes for our Christmas Card Club Challenge. I am a little late posting as I was away camping with my daughter, son-in-law, grandkids, and my eldest daughter. They rented a whole campsite...every spot!  We had our own private breach and  only shared it with some friends from our neighbourhood who also camp, and a cousin and her daughter who came up from Seattle, USA.  We also had some friends drop by for a day of boating and tubing and fun!  It was a great group of campers and we had such a lovely time.

All the children  had a blast. The village nearby has a huge roller Coaster and theme park as well as lovely ice cream stands. What more could a kid want!

I made this card while my husband was out on the boat. I am not much of a boating fan as I can not swim and it has left me leery of deep water.  I took the elements of this card in a card sleeve and just brought glue tape and scissors with me, . It was fun to sit in the sunshine and make cards listening to the birds sing and feel the very gentle breeze.

I chose the theme Anything Goes.  The card base was picked up somewhere on my recent travels...might have been Blade Stamps in London. The DP is NBUS ...Kaiser Craft Christmas Edition. It has a light sheen and the black poinsettia design is a bit shiny.  I usually do not like shiny papers, but this one is very subtle with the amount of shine.


This adorable image is Penny Black's  Tweet Christmas. i think it is so fun! I bought it at one of the local paper craft stores garage sales. I paid $5. Canadian for it , which is a great price for a  Penny Black stamp. It stamps like a dream.

I coloured it with Prismacolour pencil crayons from Michaels and used Gamsol to blend.  The little purple Merry Christmas sign was a leftover I  had tossed into my sentiments drawer. I did not write the manufacturer on the back. Sorry!

The image is matted with a snippet of purple card stock and rematted with a snippet of red glitter card.


Inside my card is a 2004 Stampin' Up sentiment stamped onto Marshmallow Bazzill card with a triangle of the DP in two corners.

Here are some photos from that camping trip to Cultus Lake.

These type of private campsites where you rent the whole site (various  number of trailer allowances depending which site you choose) don't have alocated spots for  each trailer. You can park as close or far away as you want, dependant on the terrain of the site. It was lovely and flat all around the trailer area and then this small hill down to the beach, the open walled roofed eating area structure, and also the showers and bathrooms.
 That is our boat and tube in the lake.


This is it in action...

My daughter and her husband always bring kayaks, paddle boards and extra life jackets for anyone that drops by to visit. I think this is my son-in-law on the paddle board.


Meals were assigned and this yummy salmon was a hit. There are two salads in the blue bowls under those long trays. This is inside the mostly open walled eating structures. They seat at least 50 people but we hung hammocks in the back half of the building.


So that is for now...wish I had taken a long shot of the whole field including the structures!

Sunday 16 September 2018

Christmas Card Club - Anything Goes Option

This fortnights theme  was chosen by Zoe for our Christmas Card Club   I chose to make the Anything Goes Option.

If you wish to peek at the other girls cards, hyperlinks are on my right sideboard. You will not be disappointed!

 I made up a decoupage kit card that I picked up on clearance after Christmas. I had great fun up at Cultus Lake putting the layers together and giggling as I weighted every little part down with pebbles so the wind did not blow away the wee pieces.

Once the main part of the scene was assembled, it was then popped behind the folded card base pocket and then addition layers were added that overhung the framed scene.

I did not like the sort of shiny surface of the paper in the kit so I went over the layered image with a Nuovo clear glimmer pen. I then applied a thin layer of Art Glitter glue glue randomly over the snow and ice on the scene and liberally over the framed bricks. While that was still wet, I sprinkled opalescent  holographic glitter over it and carefully lifted the page to shake off the excess. A big gust of wind carried away all my precious left over glitter and made the cement floor of the open walled eating house glimmer!


And here is the inside...


All in all, this was a fun card to make. It came in a set of 4 different designs with the layered images for the scenes presented in a punch out fashion.

 The folded frame style is lovely and the the tent style card stays upright.  But...

For the first time ever, I would not recommend purchasing this kit to use as is.  I did not like the flimsy paper that made up the scene layers and I also did not like the sheen of it.

I think if I make up the other three images into cards, I would photocopy them first onto a mat type card stock and then fussy cut them out. This would solve the sheen problem, and also solve the feeling that the layered paper is too thin and would crease easily just from pressing it in place. I would only purchase these kits it if you were prepared to photocopy and fussy cut all of the scene layers. This will not make me too popular with the manufacturer, but I think it is only fair to warn crafters, as this was what I consider an expensive kit. Thank goodness I bought it on clearance!

Wednesday 12 September 2018

Like A Bat Out Of Hell

This is going to be a long post...Skip down to the card pictures if you do not want to be entertained with bits of my trip.

Still jet lagged but enjoying being home. It was 34 degrees outside when we arrived home and much hotter inside as the house had been closed up for a month! Today is supposed to be around 24 degrees and that break from the heat is much needed.

Our front garden hanging  baskets and front lawn are completely brown as the hose bib broke and so the watering system for the front garden failed. We have to get a plumber in as it requires cutting through the craft room walls and ceiling to reach the repair.  We have had to do this once before, so hopefully he can use the same access as was cut previously.

My card today is double meaning for me as not only is it my first Halloween card of 2018, but also celebrates the fact that we saw the musical Bat Out of Hell at the Dominion Theatre while in London. I think I may even scrapbook this card when I make up my London pages!

The singing and the acting in this performance was fantastic! The story was a little hokey for our tastes, but as DH said, it would be very hard to create a story that encompassed all the Meatloaf songs. I have been humming the various songs ever since we saw the production and can not get the songs out of my head! The performers got a thunderous applause at so many points in the production as well as a standing ovation at the end!

My card was made under the careful tutelage of Sue Tossell with whom I had the joy of visiting for a few days while we were in Britain. Sue has been to Canada three times previously, and spent a day with us each time, both at our house for lunch and then an afternoon of shopping and a nice supper out.

I learned so many things from Sue! We played with Tim Holtz dyes and  distress oxides and had great fun creating backgrounds which we then turned into card fronts. I shall be sharing these over the next few weeks. This background was created by wetting watercolour paper with with little powders called Brusho's. The effect is fabulous and varies according to the degree of wetness you work with, and the amount of powder you apply.

Sue has the largest selection of clear stamps I have ever seen! Beautiful Lavinia, Cardio, and much much more. She stores them by manufacturer on letter sized laminated sheets that store inside  clear/cloudy plastic cases. Each stamp has been stamped onto the card stock  it is to be stored on before it is laminated. Brilliant idea!

My background had a lovely moody, dark, foreboding feeling so I copied Sue and made a Halloween card. The stamps are by Lavinia and stamp like a dream. We used a stamping platform of course. Sue had one just for me to use, and so we were able to do the repeat stamping that watercolour paper sometimes requires.

So, here is my card. We each outlined our image in white gel pen...although if I remember correctly, I was too nervous to ruin this beauty so Sue outlined it for me!

I made it up into a card once I was home again. I used a snippet of  DP,  left overs of a 12x12 sheet. If you look closely, there is a snippet of a black and white DP sitting vertically behind the matted image.  This is truely a snippets card as the orange mats were also snippets.


I used a snippet of a Halloween damask looking paper on the inside. If you look closely you will see the top edge of the pattern has a skull worked into the damask design! The Studio G  sentiment was stamped on the last snippet of orange card that I matted the front image with.


I usually off center the inside sentiment mats so as to leave enough room for signatures below the mat, on the actual card base. In this case, I decided to center the mat and will sign on the inside flap of the card.

I will leave you with a few photos from our days in London. We used hop on hop off bus tours to get around and it was amazing how much we were able to hop off and see.


Here are some random shots taken from our bus tour....


We stayed in a lovely hotel in Kennsington Earl's Court,  and also used the underground to get around as there was a station just a half block from the hotel.. This is just a random station shot taken from the doubledecker bus top.


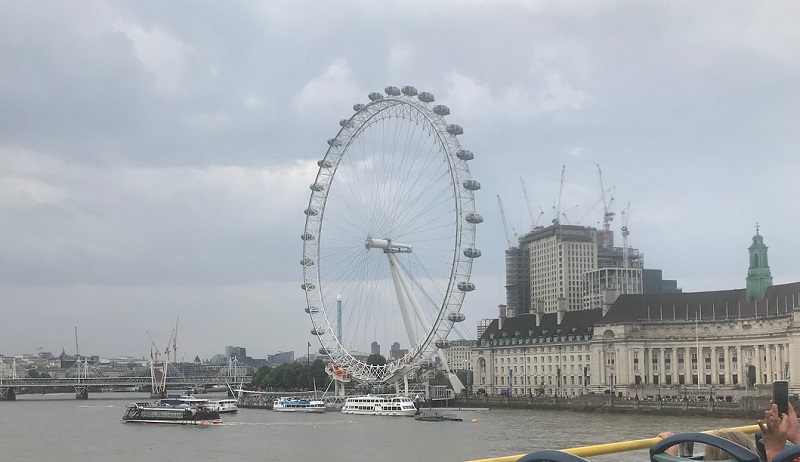
We did not go on the London Eye this time as we have had that pleasure on a previous trip, but I could not resist a photo. Sadly, London was the only time we had a break from the beautiful blue skies and hot, hot days. I rained several times during the day andthe skies were quite stormy looking. Not so great for photos, but good for the plants and lawns as there had not been any rain for over a month. .


Had to take a photo of the lovely red buses...


I could not resist a trip to the British Museum as Blade Stamps is only a half block away!
Here is a shot from inside the British Museum...


I am entering this card in the following challenges.
1. Pixies Crafty Workshop - must use snippets

Saturday 1 September 2018

August Rudolph Days Challenge Winner

55 entries.....Wow! That makes me so happy;

I enjoy viewing and visiting with each and every one of you. Sometimes though , I can not seem to leave a message.

 I think it is on the google plus blogger entries. It wants me to join google plus to be able to leave a message. But I see other bloggers who do not have google plus accounts have somehow managed to leave comments. If anyone knows how, please let me know.  I like to visit each entry and I feel badly when I am not able to do so.

I used Random Org to chose this months winner and  #40  is our lucky winner. Ionabunny, could you please email me at maureenkane@telus.net and let me know your mailing address for the prize..