Sunday, 9 December 2012

Oh Cristmas tree...

Got the tree up...and I mean just up. It is a fake tree so I spent almost  two hours fiddling with the lights,  fluffing all the branches and setting on the garland. I had to sit on a chair to do it and get DH to do the top. That slightly leaning forward position is murder on my back.  Finally it is up and ready for decorations.

Had to leave that aside for the rest of the afternoon as DD,  Little Miss C and I set off to a Xmas card  mini class in Langley. We made 2 cards each and took home a full package of 12x12 double sided paper and 2 sticker sheets. They sold it as a 30 minute mini class...Best of all it was only 6 bucks including the paper pack! It was a fun way to spend some time with my girls! It was Miss C's first card class...she was so excited. Here is what we made...

We went back to my daughters house as my husband was there getting my SIL's help with some woodworking...very special woodworking indeed. Now that he is retired, he is busy turning the office into a TV den.  He has given me his 2 drawer filing cabinet and oak worktop.. He has fashioned an "end" piece of wood  in lieu of legs for the right hand side. The worktop will balance on the filing cabinet (which is exactly my counter top height) and needs some sort of "legs" on the right hand side.  Sadly I also inherited several of the household filing folders but  managed to gain 1 1/2 drawers of empty hanging legal sized files...perfect for large card stock scraps!

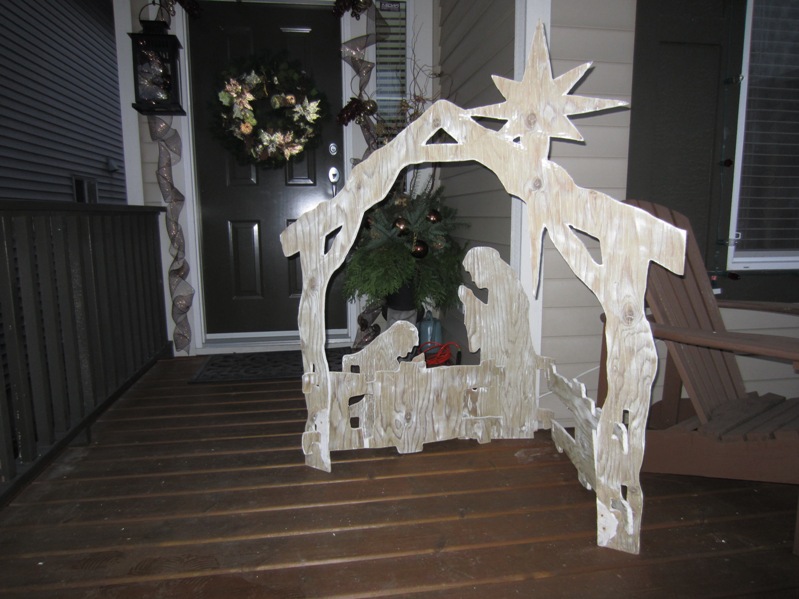
Here is a picture of my daughters front porch and door...all done up for Christmas! There are some lovely large glittered, shimmery  pine cones and lots of glittery mesh ribbon.
Just in front of that is the nativity scene she found on craigslist. They have just wirebrushed it this year and want to repaint it next year...I kind of like it just like this.
Off to start unwrapping the tree decorations!


Friday, 7 December 2012

Thank you to Jennifer Jumbles

Each year Jennifer @ Jennifer Jumbles sponsors the  Frosty Festivities blog hop. She and a bevy of her talented friends offer tutorials, and showcase cards, layouts, Christmas decor, challenges, and more. There are many fun prizes along the way and 3 mega prizes.  She has some wonderful sponsors so the prizes are fab.

She perhaps explains it better than I, so here is a snippet of her announcement:.

On Friday 16th November – Sunday 18th November I will be holding a Blog Event called ‘Frosty Festivities’. Over that weekend there will be posts every hour from 4pm-10pm Friday, and 10am-10pm Saturday and Sunday (GMT), all on the theme of 'Winter' including tips, tutorials, challenges, crafts, a blog hop, and lots of giveaways. The photo above shows you a mere snippet of  the projects and prizes!

I really hope you'll be able to join me for the weekend. The giveaways will stay open until Monday (19th November 2012) at 10.59pm GMT, so if you're away for the weekend you'll have Monday to try and catch up! The challenges will be open until the following Sunday (25th November 2012) too!

It caught my eye as I really liked that it was back in mid November...I am often just too busy in December to play along with all the wonderful festivities on line. Jennifer's dates worked for me and got me in the Xmas spirit. Best of all, this lucky bunny won one of the draws and here is my lovely haul.

My Minds Eye  All Is Bright paper pack 9 double sided sheets of 12 x 12 card stock and a sticker sheet to boot! There is also a sweet little card of chipboard banner with some pretty crocheted ribbon. Three glimmery pens in purple, silver and gold will keep my cards looking pretty.
The crowning touch is just such a great idea. Jennifer has rolled me off some different types of washi tape onto an old fashioned  peg clothespin and then finished it off with some beautifully coloured twine! I am treasuring this as I only own one roll of washi tape. Now I have 4 to play with!  My parcel arrived in a 12x12 pizza type box and Jennifer nicely set everything in a cloud of red tissue paper which was lightly closed with some bits of that Christmas patterned washi. That Christmas one is so wonderful...I love it so much, I carefully peeled it off of that very nice wrapping and transferred it onto the peg as well. teehee
 Waste not want not!!!
I notice that Jennifer has now prepared a pdf of all the project instructions. Check it out here: http://jennifersjumbles.blogspot.ca/2012/11/the-frosty-festivities-pdf-and.html
It is definitely  worth a peek!

Almost forgot, here is Jennifer's Christmas card that came in the bundle of goodies!


Wednesday, 5 December 2012

It's a blue, blue, blue, blue Christmas...

Well,  a blue snippets Christmas, that's for sure.

I am getting tired of creating Christmas cards...I don't know how you ladies that colour every image, do it. I follow a few ladies who produce a breathtakingly beautiful, hand coloured image on a card, every day!
I  am now taking a bit of a break and fishing bits of old cards out of the snippets bin and rebuilding them into new ones. I had forgotten I had even torn the backs off and thrown them in there. They have been carefully redesigned into something new and different but some elements are recycled.  The blue snowflake designer paper here, along with the teal scalloped border are recycled off an old card front. I trimmed it down and added it to some silver scalloped flat card front. I have a few of those silver flat fronts in the bin and some have been previously trimmed down and the pretty edge used for borders.
Luckily there was one trimmed up strip left, with one side still intact. Not for long...slice...and it was gone! I placed it  vertically down my card and added a row of snowflake ribbon. You will so proud of my recycling skills...the teal stars that I added to the center of the snowflakes are the star shapes that fall away when you cut the Spellbinders star circle. I always save all the die cut  fall away bits...they always seem to come in handy!

Adding the wee stars to the snowflake ribbon seemed to balance the larger  teal snowflakes over on the right. If you look carefully you will notice that one snowflake is smaller than the other cuz I gave it a haircut!   I added a white Memory Box snowflake corner under the larges teal snowflake...again just to tie it all together.
Recipe
Card Base and envelops - cut from card stock in my stash.
Designer Paper - cut from a finished card front from previous years...stored in my  Xma stash snippets. Originally Stampin Up, I think
Cardstock- White, teal , from my stash
Bling - from my stash (originally from Dollarama)
Ribbon - White snowflake ribbon from my stash
Punches - Threading Water for the teal border, Stampin' Up curly label punch for the Santa stamp, Martha Stewart for the teal snowflake (smaller one  has had a hair cut)
Dies - Memory Box , Snowflake Corner Die
Stamp - I think it is an older Stampin Up

I am entering this card in the following challenges:
1. Pixies Crafty Workshop - use snippets - All of this card is made from snippets, one type or another!
2. Addicted to stamps #44 - must use stamped image-  Xmas time
3. Dream Valley Challenges - Non Traditional Christmas - Blue is my non traditional colour
4. Eclectic Ellapu - Santa paws or Snowflakes
5. Sentimental Sunday - non traditional Christmas - Blue is my non traditional colour My sentiment is the Christmas Cheer on the Santa stamp
6. 2 Sisters Challenge - Sparkle - the snowflakes is heavily sparkled
7. Challenge up your life - First Snow
8. Hiding in my Craftroom - Blue and White
9. Little Claire's Challenge - Christmas
10. My Sheri Crafts - Christmas
11.MFP  Speedy Fox and Friends - No red or green
12. Crafts4 Eternity - Christmas Chaos, Any Xmas Themed Project
13. Jingle Belles - Anything Holiday goes
14. Winter Wonderland - Santa Claus is coming to town
15. Wags and Wiskers - Christmas
16. Fussy and Fancy - I love Christmas
17. Pause, Dream, Enjoy -  Forgotten Stash
18. Allsorts - Advent
19. Penny Black and More at Allsorts - It's your choice
20. Cards Galore - Christmas
21. Go Fish - All about the holidays


22. Simon says Stamp - Anything goes