Sunday, 31 August 2014

3 more for 104 Round II - Card 17

Three more flowers to add to the  flower ticker at the top of my blog. That makes it 104 flowers that I have used up so far this year. Not even half way yet...Yikes...Think I had better start cruising my Pinterest boards for more ideas.

This is another card featuring the Memory Box, Massa Leaf Frame die. I inked it with the Invild Bolme chalk inks again and then tucked a snippet of hessian over the aperture. Once again, I used some teensy tags that came with the First Edition Boho 6x6 paper stack.

Added some more flowers from my never ending stash.  Staring at the card photo as I type this post, I wish I had just added one. Three is a bit of overkill, methinks.

I have not added a sentiment yet. I thought the two little birds on the tag makes it perfect for an Anniversary card. I will add a suitable insert once home again as we do not have a printer up here..


Recipe
DP - First Edition Boho Chic
Card Stock - snippet of white card inked with greens
Die - Memory Box Massa Leaf Frame die
Flowers - Prima or maybe Recollections...I think
Hessian - from my stash
Tags - Cut from the First Edition Stack embellishment page
Bling - teensy green diamond on the tag...from my stash
Ink - Prima Invild Bolme chalk inks in two shades of green, and also a cream

I am entering this card in the following challenges
1. Pixies Crafty Workshop - must use snippets (the hessian and the card for the die)
2. We Do Doobadoo - texture
3. Simon Says Stamp - Anything Goes I did use a memory Box Die

A few readers have wondered how I craft in an RV. I have mentioned B4 that I craft in the bunkie  (our 8 x 10 foot guest bunkhouse). I work on a folding 2 x 4 foot table from Costco, where I  have my two long Rubbermaid under the bed boxes, sitting out on the futon bed. When company comes, the table gets put outside and is employed as a bar surface. The Rubbermaid boxes slide under the bed and the room is ready for your visit! You can see the lids just beside the boxes.

Here is a close up so you can see what it all is...


The long bin on the right of the screen holds my little one page photo albums from the Dollar Store. Some hold die cuts I have rolled off at home, and one holds images waiting to be coloured. Another holds images I have already coloured! The pink box is my pencil crayons and nibs; the middle larger box holds some embellies; the pink plastic file envelope is some bling, and the back bin is some stamps and 2 Momento ink pads and blocks, with my chalks perched on top.

Next long bin to the left holds some 6x6 pads of cardstock and DP. There is some Xmas DP and  regular everyday DP as well. Across the center of that box are my finished or almost finished cards. Behind that are my copics and other pen.  Tools and glue tape etc are at the back.

Far bin on the left of the screen is some prefolded corrugated cards and Xmas embellies, The blue bag is ribbon...hahahahha...Too funny, considering how I rarely use ribbon! I don't know what came over me to pack up this much ribbon! It does hold jute and twine as well...but still!

Here is where I work...just across from the bed! I was painting the dresser and night table with Annie Sloan chalk  paint just B4 this photo. The Ott light usually sits on the dresser but the wax has to cure for 4 or 5 days. There is just enough room for a wastebasket at the right edge of the table! We hope to add a TV in here next year. It will sit angled across the dresser so it can be seen from the bed.


Now, here is the bunkie with my craft supplies put away under the bed. It is set up for my youngest daughter and my two grandchildren (arrived today). Little Miss C sleeps in the top bunk, my daughter on the double bed futon and Little Mr P camps out on a thick foam mattress on the floor. I do have to slide the night table over to sit alongside  the dresser, to accommodate him...but this gives you an idea. The sheets and quilts are stacked on the bed...This Grandma was too tired from painting the dresser to make the beds up this time! lol
You can just see the edge of Little Mr P's mattress tucked under the blue futon.


Here is the rest of Little Mr P's bed...


Beside him is the finished dresser and night table. Well, not quite finished as I still have to add the silver Viva Gold to the edges of the router detail on the tops. I then will add the final step... distressing the whole thing with a lick of soft green chalk paint added to the next coat of wax.
That will have to wait as I need to give my hands a rest for a bit though!
Oh look, there is a slim sized 12x12 iris cart under the dresser...I forget what is in there!


The dresser and night table were a find off Craigslist. The night table drawer handle does not match so I am watching for another one. I did Annie Sloan it up a little, to try to get it to blend in!

We have just stripped wallpaper off the walls. They now need the drywall seams sanded, as well as various screw holes and marks need patched as well. A new coat of paint will follow. Then I will have to pester DH to bring up some of the left over baseboards from our house remodel, and lay it in here!

If you stuck with me so far, good on  you! This is crafting at the lake...bunkie style! Got to run as I am being called in to play Horse-Opoly...a horse mad little girls Monopoly game!!!   lol

Friday, 29 August 2014

Pet Loss - Round II Card 16

Poor Little Miss C woke up one morning last week to find her Chinese Fighting Fish had died. It was about 4 years old and lived on the kitchen island. It was very social and would try to jump out of the tank if it liked you and you paid it some attention. My how that fish loved it when the kids came downstairs for breakfast.

Little Mr P has one too and has kindly offered to share his fish with her! It lives on the island too and watches them with great interest as they eat their breakfast. Sadly, her day got worse when she went to check on her rabbit, she found it had died in the night too. Her Dad thinks a racoon came by and the poor bunny was frightened to death.

I have made this card for the two of them as I know they will be watching the mail, expecting this Grandma will send something.


I had this rhinestone cross tucked in with the images I brought up here. I was planning  to make a Christening card with it. I thought it was perfect for this sad occasion so figured i can sort the Christening card out once I am home.

I only had a few dies with me that layered at all, so had to use what I had. Some of you may in fact recognize the Spellbinder kraft Fancy Labels 2 die, that has already been layered with the soft pink background and then painted here and there with some ivory acrylic craft paint.  I did a series of card with these dies and tones last year...luckily I had one die left over.

I stuck the cross to that die and then layered it onto a black diecut that came with a scrapbooking kit (about 10 years ago)! That is my VOS item for sure! I did not realize I even had this black die with me. For some reason I stuck it with my diescuts as I was rolling them off. Thank goodness I did.
I then placed them onto a Memory Box Debutante die, and attached that to  a piece of black houndstooth paper. I did not actually have any black DP up here...this was cut off the front of a prefolded note card!

I was working backwards from my usual...cuz when my whole card top was finished, I then glued it onto a 4/14 x 5/12 card base. Weird I know, but that was the mood I was in...lol


The inside is a wee envelope that I bought at Michael's quite some time ago. I sliced off the folded top and made it into a pocket. I then wrote a little letter to them both, folded it up and place it inside the pocket.
At 6 and nearly 8, they are still young enough to like the secret letter in a pocket idea.

Hope you like it...it was a very sad card to make and this Grandma had tears in her eyes making it!

I am entering this card in the following challenges:

Wednesday, 27 August 2014

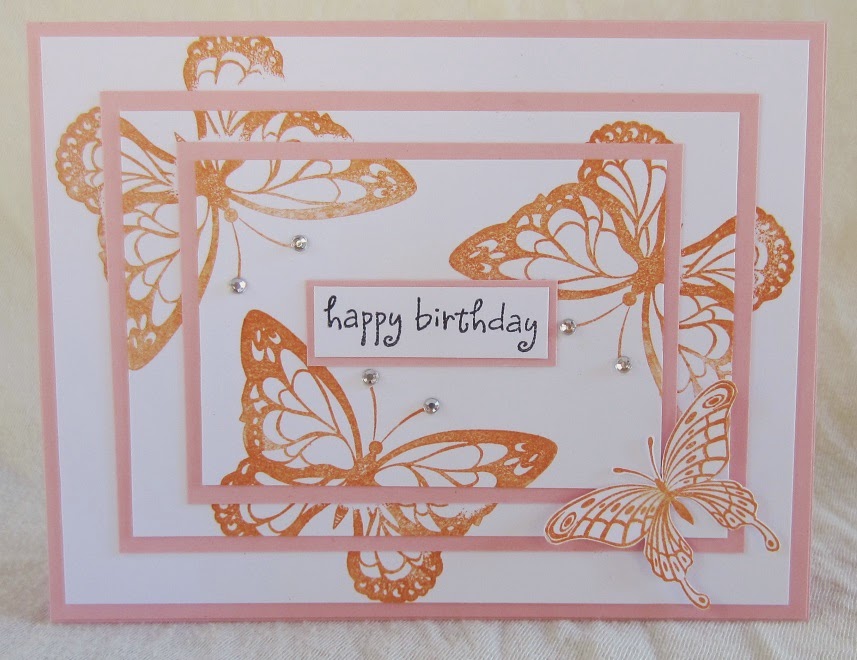
Butterflies with Sentiments Round II Card - 15

The theme at The Butterfly Challenge is Butterfly cards with a sentiment.

This summer has brought the usual hot, dry weather to the Shuswap. As my DH would say...that is why we are here! Some weeks had temperatures hovering around 35 Celcius and some days even hotter! The RV got so hot, we needed to turn the air conditioning on to prepare supper. We were barbqueing and eating in the shaded gazebo every night, but still there is meal prep etc, and it was quite stifling inside!

The vivid colours of summer seemed washed out from the heat. Unless irrigated, everything is a soft golden tan here,,,the grasses on the verges, the fields, even the flowers, seem washed out from these high temperatures.


This triple stamped card is showing that hot, Shuswap summer look. While the orange butterflies are a vivid shade, the pink framing mats are quite subdued. Just like summers here...

This was my first attempt at triple stamping.
I do not have a steady hand or steady pressure when I stamp so my images do show that flaw...but I do not mind it too much on this card.  I fussy cut and pop dotted the bottom right butterfly, and then added a little colour to him after the fact...he just blended in too much without it.

I made this card a while back, but just posted it now, as I think it fits the theme at Mrs A's Butterfly Challenge.

Recipe
Card Base - hand cut from stash
Card stock - snippets of pink and also white card...just ordinary white card stock as it is not coloured, so didn't have to worry about bleeding inks!
Bling - teensy clear diamonds from my stash
Stamp - Inkadinkadoo Butterflies
Sentiment Stamp - Costco (years ago... this is my VOS item)

Iam entering this card in the following challneges
1. Pixies Crafty Workshop - must use snippets
2. The Butterfly Challenge - Butterflies With Sentiments #13
3. Simon Says Stamp Wednesday Challenge - Anything Goes