Sunday, 29 September 2013

Holly Jolly Christmas

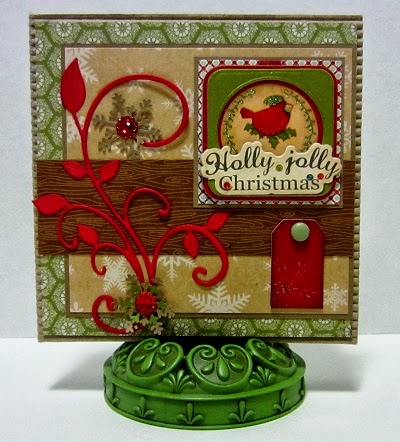
This is another of the cards I have made to give to kiddies at Christmas. This has certainly been a great way to use up my VOS...especially stash from the dollar store! Some of the elements would make a cardmaker shudder, but a kid would think they were heavenly!
The little square with the cardinal in reverse relief is the last of one huge sheet of 3D chipboard stickers. Can't believe I have managed to use up that whole sheet this year! The red tag with the green brad is from another package of dollar store items...I still have what seems like a zillion of these! They will get used on scrapbook pages and the cards my grandkids like to create.
 Here is a closeup of the bit of sparkle on the tag.
The gorgeous red flourish was sent to me in a RAK from Sandra at Stamping for Pleasure. Pop on over there if you have time. She is currently running her September Rudolph day challenge. It is a great way to get your Christmas cards done and dusted before the busy Christmas season. I added a couple of snowflakes to the flourish...layered two colours for the bottom one and did a little haircut on the green layer! The center gem is a slim one from the dollar store that I am trying out to see if they will make it through the slot at the post office. In this case, I think the brad and the Holly Jolly chipboard are going to fail the slot...but that is OK, as this card will be hand delivered to a good friends little boy!

I managed to use some snippets of paper so will be dropping by Di's playground at Pixies Crafty Workshop. Her challenge is a great way to encourage you to use some snippets from your never ending pile. My kraft snowflake paper and the scrap of wood grain DP, as well as the kraft card stock,  were all from my snippets. Feels good to make something from those scraps!

No recipe tonight as I am a wee bit overtired...had a busy, busy week and have to get up early as DH is driving our eldest daughter (Glamour Girl) to the airport. She is off for 10 weeks in Monaco again:(

I will try to write out the recipe tomorrow. Ten more days of hectic life and then I will settle into our winter routines. I always seem to get more crafting done in the late Fall and winter! I am squeezing in a trip to visit my Mum and my sister, before the icy roads make travelling to the Okanagan difficult. I so do not enjoy winter driving on the Coquihalla Hwy (nicknamed the Highway to Hell)  There is actually a TV show called that, about the tow truck drivers and the rescues they do, on that highway. It is a 4 to 5 hours drive so I will stay there a few days.

I have been keeping up my errand walking on Wednesdays and Thursdays...when I head up to Mum's, I plan to walk into town for her errands. That way, I can still keep to my walking plan. It is a bit further to the shops in her village but that will be good for me. There are 2 benches along the route, so I will just sit for a minute along the way.

I am entering this card in the following challenges:
1. Pixies Crafty Workshop - must use snippets
2. CHNC Extra - must be Christmas


Saturday, 28 September 2013

A baby banner and other fun!

Glamour Girl and the Domestic Diva are throwing a baby shower for a girlfriend they have known since High School. Their friend is very much a Glamour Girl too, always impeccably dressed with a great sense of style.

I was asked to make a banner, card, and some photo booth props. My brief was to keep to black, white and hot pink and make sure anything I made looked glamorous. Hopefully I have fulfilled the brief...I did get the colours fairly close, and  managed to throw in some bling.
    
They chose a Parisienne theme, although I am not quite sure why! Their friend was a ballerina and went to school in Britain or maybe even France, where she studied and took dance class daily. That must be the link!

I hope she (and my daughters) like what I have made. During her pregnancy, she has always referred to the baby as "Lil'  Baby Longo" so that is what I used for the banner. It was really hard to take a decent full on photo, as they only place I could lay it out in full was on my dining room table.  Sadly, I couldn't step back far enough to get the whole width in the photo!

I keep the leaves in the table to seat 8 as we do use the dining room quite often.  I do not like to struggle with putting in and taking out a leaf, depending on the number of diners.  We seem to average 8 so I leave the table set up for that all the time. You get to see my not very pristine ironing job! lol  This particular tablecloth puckers when it goes in the dryer...those puckers are a bi*** to get out, let me tell you!


The little sticks with the mustaches and signs on them are props for the photo booth. They have duck feather boas and other props to enhance the fun...lol
This is another NBUS project. I am a bit addicted to the dollar bins at Michaels. Especially so when they put them on clearance for 50 cents or sometimes even less.  I always pick up the chipboard albums as they make great bases for banners. I have two drawers full of them so had to go on a bit of a rummage through, to see what matched up to spell the words! Each album has 4, 5 or 6 chipboard pages depending on which style it is. I found angels, stars, Christmas trees, gingerbread houses, scallops, file tabs and finally...down at the bottom of the second drawer, I found these canvas covered chipboard top note die style albums. I decided to use the matching canvas, chipboard hearts for the "spacers" between the words. Nobody said that shabby chic can't be glamorous too.

I tried a variety of black and white design papers for the background but they were all not quite right.
Then I remembered that I had a pack of back and white damask cupcake papers from the dollar store! I ran upstairs and grabbed them, pressed them flat with the iron (they were so much easier to iron than that tablecloth) and presto, backing paper problem solved. I did not even have to roll them through my Big Shot!

I managed to get the rhinestone Eiffel Towers from another 50 cent sale at Michaels...I thought that was quite a good score and luckily bought every one they had. My daughter are placing some of the extra ones on the glass vases etc on the buffet table.
The black glittered chipboard alphas are from a little Korean store a few blocks from my house. They have the most fun things in there...these did not come with an adhesive backing so I used glue dots but combined them with a few drops of Glossy Accents. Hopefully they stay stuck on!!!

I found some teensy, hot pink ornate frames that were another Michael's 50 cent find. They will be used for the name tags for the buffet table foods. The 3 metal crowns above, were a darker gold colour and I rubbed some silver wax over them to make look a bit more feminine. They will just be tucked in here and there on the buffet table.

In all the rummaging about, I just might be inspired to use the Christmas albums next! I will be haunting the dollar stores to see what fab Christmas designed cupcake liners they bring in this year!

I am entering this banner in the Simon Says Stamp Wednesday Challenge - anything goes. They have a fabulous challenge this week with lots of extra prizes.

Thursday, 26 September 2013

September Rudoph Day


Once a month, Sarn at Stamping For Pleasure, runs a Christmas card challenge. It is a great way to boost your finished Crimbo cards.
This year, I am trying to have all my cards made, written out and addressed sometime before mid November. I want to relax and enjoy the Christmas season! Sarn's challenge and some others that I also take part in, keep me on track to meet this personal deadline.

Pop on over and take a peek...the ladies are all a friendly bunch and Sarn will make you feel so welcome.

I stamped my holly image several years ago at a Michael's Make and Take. I think it may have been the first time I used embossing powders. The image and the sentiment are both stamped with versamark and then embossed...hopefully you can see it in the photo.


Although  I love the look of embossing, it is not a technique that I use very often. I am a bit of a neatnik and the loose pieces of powder drive me crazy and make me itch! lol  I tend to emboss at classes or at make and takes like this one. If I emboss at home, I tend to do it outside in the summertime!

I made this so long ago (several years ago at least) that I can not remember the name of the EP. It does have a shimmer of various sparkly colours.
The tag is the remant of  large Basic Grey tag and is from a sheet of various punch out tags. It is so old, I do not have the ID strip anymore. Sorry!

Recipe
Card Base and envelope - from my stash 
DP - My Minds Eye = Winter Wonderland
Card Stock = snippets of green and navy blue
Tag - from my stash (Basic Grey, Pattern unknown)
Pointsettia - K and Co
Brad - red brad from my stash

I am entering this card in the following challenges
1. Stamping for Pleasure Rudolph Day - must be Christmas
2. Pixies Crafty Workshop - must use snippets
3. CHNC Extra - Must be Christmas 
4. CHNC - Challenge 143 Stamp, Stamp, Stamp