Happy Belated Easter! I can finally post these cards. They were for my grandchildren and as they read my blog, I could not show them any earlier.
My friend Darnell has a fabulous NBUS challenge running till the end of April. Since we are all somewhat housebound, it is a good time to break out the Never Before USed Stuff and actually use it!
My NBUS item today are the Hunky Dory step card bases. I bought them at my local papercrafts store as I have always wanted to give stepper cards a try. I know I could cut them by hand, but these seemed like a huge timesaver.
The certer panel is Best Creations 12x12 paper that I cut down into 6x6. It is a very thick paper with lots of embossed and glittery accents. It was a bit too thick for the step pieces so I chalked them with aqua and teal chalk. Obviously not enough though, as you can barely see it in the photos. The lovely thing about chalk is that you can add extra coats so easily. If it gets on the stepper embellies, then you just run a white eraser over them. The fishtale flag is a snippet from my snippets box.
The images are precoloured Sylvia Zet Wee Bunnies from The Hobby House. I photocopied the sheet so that I could use the photo copy for the bottom layer and then fussy cut the actual images from the precoloured sheet for the top layer. I ran a quick coat of Wink of Stella over select areas for a bit of sparkle. The mat is a circular frame die, manufacturer unknown.
The Happy Easter sentiment is from Lawn Fawn and the grass diecuts are Memory Box, Grassland Border and Fresh Cut grass.
Flowers are from my VOS. They are various types of paper fibre, material and felt.
The inside sentiment is by Cottage Cutz called Happy Easter Phrase. I cut it from glitter paper as it is a little heavier than 110 pound paper and did not distort the script when removing it from the die.
I am entering this card in the following challenges.
1. Darnell's NBUS challenge - Hunky Dory stepper card base
2. Pixies Crafty Workshop - must use snippets. I used snippets for the Lawn Fawn sentiment and the various bits of grass.
It is time for the April Rudolph Days Challenge. As always, here are the rules for your perusal...
1. The Rudolph Days Challenge will start each month (January to November) on the 25th, and will close at midnight PST, on the last day of that month.
2. The theme is always Anything Goes, as long as it is Christmas.
3. One entry per person and you just need to enter one Christmas card or Christmas project.
4. You may combine your entry with other challenges (maximum of 10 in total).
5. Your card (or Christmas project) should not have been previously posted to your blog. It should be posted to your blog during the current months Rudolph Days Challenge, (between the 25th and last day of the current month)
6. Please link back to or at least mention, the Rudolph Days Challenge.
7. Please leave a comment on the challenge post. 8. The winner will be selected by random draw and announced on the first day of the following month. Prizes will be mailed anywhere in the world.
9. A special draw will be held at the end of the year, in December, for all those who submitted a card or project every month that year, January to November.
Linda has made these delightful penguin cards. These penguins look ready for a cold, frosty day with their cute earmuffs and colourful scarves! The first has a great masculine look and the second shouts out it is feminine...in fact it is calling to me!!! While the plaid background is perfect for the first card, I so love the beauty of the pink design paper on the second card.
I also really like the way the merry die cut sentiment is showcased on this second card. As always, Linda has coloured these little fellows so beautifully.
First up is this amazing polar bear card. The bear looks fabulous but the card design takes center stage! I love the Merry Christmas sentiment popping up over the top edge of the card.
Sam's second card is so pretty. I think the colouring is spot on and the wee mittens are so sweet here.
Perfect with that background design paper!
I am also loving the rounding of the two corners...this is something I must remember to try as it gives such a polished look.
I think we were all thinking of two cards, as I have made up two as well. First up is this square card featuring a Sue Wilson angel die from her Festive Collection.
The angel was cut from a snippet of plain golden yellow card stock. I slid a snippet of white glitter card behind for a little extra punch and mounted that finished angel onto a square snippet of white snowflake embossed card.
The embossed snippet was a tad too small for my card so I just pretended that I meant to look more like a mat than a background!
The Joy sentiment was cut from another white glitter snippet. I think it is a die from The Works, picked up while I was in England last year.
My second card is very similar except I used the Sue Wilson Three Wise Men die from the Festive Collection. I think you can notice the white glitter card easier on this one!
Our prizes this month are a choice of this Peace and Joy Kaiser Craft stamp
I am posting the February Rudolph Days Challenge early as I want to see it up on my blog before I leave on my cruise. This way I can sort out any problems with it posting, before I leave. I would prefer you wait until Feb 25 to enter, as that is the date that the coordinating posts will show on the design teams blogs. If you forget and enter early, you will be forgiven! hahaha
Here is a perusal of the rules for this challenge.
1. The Rudolph Days Challenge will start each month (January to November) on the 25th, and will close at midnight PST, on the last day of that month.
2. The theme is always Anything Goes, as long as it is Christmas.
3. One entry per person and you just need to enter one Christmas card or Christmas project.
4. You may combine your entry with other challenges (maximum of 10 in total).
5. Your card (or Christmas project) should not have been previously posted to your blog. It should be posted to your blog during the current months Rudolph Days Challenge, (between the 25th and last day of the current month)
6. Please link back to or at least mention, the Rudolph Days Challenge.
7. Please leave a comment on the challenge post. 8. The winner will be selected by random draw and announced on the first day of the following month. Prizes will be mailed anywhere in the world.
9. A special draw will be held at the end of the year, in December, for all those who submitted a card or project every month that year, January to November.
First up is Sam at Whispers Cards. Sam has made this gorgeous gnome slider card. Now I have noticed that gnomes are very on trend at the moment. I was thinking of looking for some gnome stamps for my own use and as I was going through my stamps recently, I was shocked to find that I already own some. Mine are really old, from before they became so in style...just like me!!! Sam has coloured up her gnomes so cute and I am loving that snowy sky and textured snow featured here.
I think the slider aspect of Sam's card is really sweet. Here is a photo of it. I can see a young fellow like my grandson would have so much fun opening and closing it back up again. Well done, Sam!
Sam has made us a second lovely card this month! This pretty angel sits on a gorgeous vintage looking DP background. The burgundy sheer ribbon and what looks to me like a velvet ribbon overlay is so, so pretty.
Next up is Jenny at Cardsarus.
Jenny has been having home reno's done and made us this card when she was well in the midst of all the work. Not only was her kitchen worked on and we all know how hard that is to deal with, but her craft room had to be refitted with a new heater! She has had to replace her desk and valuable drawer space, so has been very busy redesigning her room and cataloging everything as she puts it away.
I am honoured that she took the time to make us this beautiful vintage style card featuring a gorgeous hand made tag. I love the sumptuous look of this card. The tag is so lovely on its own...and even more so on this lovely card.
Linda at Snails Space has made this sweet card with a surprise pop up interior. As always her colouring is so delicate and pretty.
Here is the inside... I love the way the tree and presents pop up. It looks so good and makes for a lovely surprise! I think I just have to get some of these dies. How about you?
Prizes this month are a choice of this Penny Black Bird and Twigs stamp
or this Darice large snowflake cut and emboss die 2014-34
Please remember that I am away till March 1st (see previous post). So if you enter twice in error, or have any other problems, I will fix them once I am home. The prize draw will not happen till very late in the evening on March 1st...could be March 2nd overseas, due to the time difference!
I will not get round to commenting until I am home, as I do not have an internet package on the cruise. I will get round to all of you in early March, it just will take me till then as have you may have noticed, I have not been round visiting much lately as my knee does not like to be kept bent when I sit to type. I will visit about in same increments to keep my knee happy.
Sylvie at Gibmiss blog chose Cute as the theme for our Christmas Card Club. If you would like to see the other ladies creations, I have hyperlinks up on my right sideboard. If you would like to join our fortnightly Christmas Card Club, just drop me an email.
Several years ago, a girl friend let me stamp off this cute image. I had never coloured it as my stamping skills were very poor that day and parts of the image did not stamp clearly. But I am on a mission to use up my VOS items (Very Old Stash) and so I carefully filled in the missing parts of the image with a micro fine black pen. The furry trim on the hats is not quite right as I made a boo boo and made the lines too thick. I drew in a lot more lines in varying thickness to try to hide that mistake! I am not sure of the manufacturer. I think it is a Stampin' Up image but not positive. If you recognize it, please let me know the name.
I coloured this image up with copic pens and die cut with a Spellbinders label die. A snippet of silver mirri card gives it a a bit of shimmer and since I liked the look of that, I then added a very small snippet of silver ribbon as a border round the Echo Park Dots and Stripes DP.
I do not know the name of the kraft word background. It is a snippet of a 12x12 scrapbook page. Before I started making cards, I was a scrapbooker. I did not mark manufacturer or name on my snippets as I had no need to at that time. Now that I make cards, too, I sure wish I had developed that habit years earlier!
The hessian ribbon is from Michael's. It is another snippet and has the luxury of being self adhesived. What a treat.
Hope you like my take on a cute Christmas Card. It was fun to make and I thank Sylvie for the inspiration.
We are back home from 30 glorious days away in Britain. Twelve of those days were spent on a cruise round the British Isles. Although this was our fourth trip, we saw so much more of Britain than ever before. Will tell you all some details of that trip on my next few posts, but it is now finally time to have our errant July Rudolph Days Challenge!
1. This July challenge will run from Aug 1st until midnight on Aug 7th, 2018.
2. The theme is always Anything Goes, as long as it is Christmas.
3. One entry per person and you just need to enter one Christmas card or Christmas project.
4. You may combine your entry with other challenges (maximum of 10 in total).
5. Your card (or Christmas project) should not have been previously posted to your blog. It should be posted to your blog during the current months Rudolph Days Challenge, (between the 25th and last day of the current month)
AMENDED RULE #5
for this July challenge only: Your card can have been posted to your blog anytime between July 25th and Aug 7th, 2018
6. Please link back to or at least mention, the Rudolph Days Challenge.
7. Please leave a comment on the challenge post. 8. The winner will be selected by random draw and announced on the first day of the following month. Prizes will be mailed anywhere in the world. 9. A special draw will be held at the end of the year, in December, for all those who submitted a card or project every month that year, January to November. AMENDED RULE #9 This errant July challenge will not be included into the special draw. If you miss this month, you are still eligible.
I would like to take this opportunity to point out that some people forget to leave a comment on this post, thereby disqualifying themselves if they were chosen by random org. (see rule 7)
My Rudolph Days Challenge designers have this month off as I have made several cards for your perusal. I hope you will get some inspiration from them.
First up is this sweet Sylvia Zet pre coloured angel image.This card was made from snippets. The gold mirri scalloped mat was cut with care from a snippet just large enough to fit the die. The corner pieces of the offcut were tucked away to eventually become corner elements for another card.
The mauve snowflake DP is a left over from a 12x12 scrapbooking page and the white glitter border strip is a leftover from a previous card. The snowflakes are from my files of snippets that I have already die cut and punched into various shapes. (I try to do this task whenever I am bored, and stuck with a hopeless mojo). It is so fun to open the teensy file boxes and pick and chose what is needed to finish up a card. A little WOS gave them a bit of Christmas sparkle! The largest, glittery fabric snowflake is from a dollar store package that I bought several years ago. It was a large package of them and I have barely dented the numbers! I used my Fiskars fussy cut scissors to trim off the overlap.
The inside is just another scalloped circle which I chalked to get the right shade of pink. I did not center this sentiment mat, but raised it a little on the card to allow room for signatures on the card base below it.
My second card is made with a Sue Wilson die that I bought at the May paper craft garage sale. There are at least 4 of these sales each summer, with about 30 vendors and hundreds of shoppers! I think I paid 7 or maybe 8 dollars. I made up four of these cards all the same colours, copying the vendors sample card. They were so quick and easy to make up! I think I am going to make up another 6 with red mats, either with red card or perhaps a very small, lightly shaded red pattern. Will post that group once finished.
I have not put a sentiment inside. This is a lovely flat card, perfect for mailing to family in Britain. I think I will just write a short letter in each one, and just let the front sentiment be the only one. That way, I can squeeze more news into the letter itself!
Next up is one of my upcycled thrift shop cards. I picked up a "new in package" sealed packet of 20 Christmas cards and envelopes for $1 This is the style of card where you slide a photograph into a premade frame. I usually buy sets like this if the envelopes are gilded inside, just to get the envelopes at such a good price. But, as I opened them, I spied a snippet of embossed green card in the front of my green file and noticed it was just barely the right size to slide into the pocket!
I sliced the frame off the card, and then slid the green snippet inside and with great care, dug my tweezers in to unpeel the two sided tape I had placed on it. It took a couple of tries to get the long one out! Next time I will just use my long needle tipped glue bottle...it would be easier, methinks.
I added a few blue and white snowflakes from the same filing boxes I mentioned on my first card. They are so handy to keep on hand. Various sized rhinestones give them a little bling.
Luckily, my Sue Wilson Let it Snow die fit quite nicely onto that embossed green snippet...what luck! I mounted this now finished topper onto a white card blank, and this card was done. Quite a good use of a 5 cent topper frame and envelope!
Our prize this month is a choice of this Memory Box Batavia Stitched Snowflakes die
Darnell over at djkardkreations has started a new challenge this year. It is called the Twofer Challenge and runs monthly. The Feb theme was Love and themes are usually announced on the 10th of each month. You must make two cards with the same stamp or die, and they must be for two different occasions.
Sadly, I forgot there was a time change between Darnell and I, and so I waited too long to post these (at ten pm my time) on the 24th. The contest was closed and as I had my Rudolph Days Post due in another two hours, I decided to save these and post them later.
My first card is a Valentines card, and I used the Stampendous Love Letters stamp, in a Lawn Fawn stitched rectangle. The red background mat is just hand cut to match. The Love Sentiment is a dollar store stamp, brand unknown, stamped onto a wee snippet of the same white card stock. The background paper is by Creative Imaginations, and is part of their Neutrals line.
As this is a Valentine for my DH next year, I kept the design paper on this card quite plain and masculine looking.
My second card is an Anniversary card for DH. I restamped the Love Letters stamp coloured the hearts in red, and then fussy cut them out. I stamped a Crafts Smart Dove stamp on a snippet of white and used a circular Marianne die for the image and their doily die, for the pink mat (snippets again).
The dove was stamped twice and then I fussy cut the second image. Popped it on top of the first one and gave it a coat of Nuvo aqua glimmer.
The first wee heart was glued to the end of a branch that was part of the dove image. The rest were used to look like the dove was scattering the hearts, as spouses do as they live their lives together. We scatter love through our own lives and our children's as well. These scattered seeds of love help us grow together.
After viewing the photo in this post, I wish I had coloured another set of the hearts in the lighter pink of my background papers. They could be gued just slightly off of the red hearts... just enough to leave the red peeking through one side of them. I think that would have tied the background papers in more. Perhaps I shall do that still!
The background papers are snippets from my 12x12 scrapbook pages. I added a piece of dollar store blue glimmery Washi tape to hide the seam. Love that Washi...although it is looks like glitter paper, it is only a thin glimmery tape and so it fairly slim in depth.
The sentiment is Stampin' Up. The larger love script stamp is from 2004 and the smaller always script stamp is from 2005. Too bad I seem to have stamped the always script just a bit crooked. This card is for DH as our Anniversary is in April. Hopefully, he will not notice!
All in all, there was a good attempt at the use of snippets. All the white, red, and pink card were snippets. For regular card stock, I save anything credit card sized or larger. The cloud and striped paper used on the second card were also from my snippets box. It is a great feeling to use up some of this never ending stack of pretty snippets!!!
The other benefit of both cards today is that they are very slim in depth. They will sail through that tester slot at the Post Office and just take regular postage Yay!
I am entering this card in the following challenges:
My sympathy card stock is sadly depleted at the moment. I like to have these type of cards on hand. Sometimes I am sending them out, but often a friend asks if I have one on hand as they want to send something made with love.
My NBUS item today is this modest background DP. It is from a 6x6 Forever in Time Vintage Two paper pad from the Dollar Store. The stamp is another image from the Inkadinkado Meadow stamp I used on my last card. I think it is also NBUS as I do not remember using this image before...but...one never knows.
To help keep my goal of using a NBUS item on every card I post this year, I am now adding a red dot to items as I use them, and also to items that I know for certain I have used in the past. As you can assume, sometimes it gets daunting to remember.
In keeping with my last card, the image is again stamped onto a snippet of Momento faux inky card. I matted it with another snippet of black card. I added some pop dotted butterflies that are also from the Dollar Store. They have a lovely glittery surface.
The indigo inky background and my silhouette meadow flowers stamp now qualify for Mrs. A's Butterfly challenge. Check out her lovely challenge. She has great themes and some lovely prizes!
Over the last few years,I used to go to the Dollar Stores with my neighbour (the cardmaker). I would pick up items for scrapbooking or cardmaking and stash them away in my craft room. I am making an effort to use up these items as I would like to use them up and regain the real estate they occupy in my craft room! Keeping that in mind, I am now working on several more sympathy cards just like this one. Might as well use all 4 pages of the black script background and the rest of the blue butterflies!
I am entering this card in the following challenges
1.The Butterfly Challenge - the colour indigo and a silhouette and a butterfly of course!
I have a faux inky card to share. The inky background is a piece of faux inky card from the Walmart Momento 8x8 paper pad.
My background is from the Maja Designs Vintage Summer Collection. I won that paper pad in a prize draw from Maja...lucky me as it is gorgeous paper.
I stamped the Inkadinkadoo Meadows stamp with Momento Tuxedo Black ink and die cut the image with the Sizzix Banner die. I used a snippet of Michael's purple 120 pound card for an off centered mat.
My NBUS item today is the Tutti Designs Happy Birthday Topper die which I cut from another snippet of the purple card. I really like the die, but it was very hard to cut it cleanly. I shimmed with two extra pieces of card and used wax paper as well. I still fought to get it out of the die.
The purple rayon ribbon is from a huge roll that my local paper craft store had on clearance a few years ago. The bow was made on it's own and I then glued it to a flat strip of the same ribbon that I'd wrapped round the base card. It seemed the easiest way to keep that ribbon from looking tattered. I find the rayon ribbon can look that way so easily if I handle it too much..
This is another card for the finished cards box. I never seem to have enough in there!
I am entering this card in the following challenges:
Langley Stampers Club organized a Shoebox card making day out. We attended a lovely hall across the bridge in Coquitlam. Each person had to design a card and bring 20 kits. As I rarely go over that way, it was a fun day out.
I decided on this NBUS Taylored Expressions stamp set and with a theme of blue and green in mind, I managed to find all the design paper at a clearance sale at Joanne's. They had 12 x 12 design papers ranging from 17 cents to 30 cents each. The background plaid paper is Happi Boy Plaid by Dena Designs.
I had a wee problem getting my photo image straight. Sadly it looks as if my papers are crooked but of course they are straight...just the camera operator (me...lol) doing my usual photo problems!
I inked the edges of the Canvas Corp Mini Dot Reverse Aqua and Ivory dotted paper with Ingvild Bolme blue chalk ink. Then inked the edges of the Tim Holtz Ranger Distress Collection Coordinations Aqua Textured card with her green chalk ink.
The doilies were from Michaels and I used snippet of green textured card with my Spellbinders Decorative Labels One die, for the fancy mat under the teacups.
I stamped the teacups on a snippet of card, and coloured them with Copics. I pop dotted them forward onto a Lifestyle Crafts Nesting Frames 7 mat, cut from another snippet of white card. Not many snippets, but just enough to allow me through the gates at Pixies Crafty Workshop...where you must use snippets somewhere on your card!
I love the sentiment inside this card. It is from that same Taylored Expressions stamp set. I flipped over the aqua cardstock I used on the outside of the card so that the smooth side was up, as I find the smoother side takes the stamp better. Here is a photo of the inside of my card.
Once again it is time for the Rudolph Days Challenge.
Here are the rules for your perusal:
1. The Rudolph Days Challenge will start each month on the 25th, and will close at midnight PST, on the last day of that month.
2. The theme is always Anything Goes, as long as it is Christmas.
3. One entry per person and you just need to enter one Christmas card or Christmas project.
4. You may combine your entry with other challenges (maximum of 10 in total).
5. Your card (or Christmas project) should not have been previously posted to your blog. It should be posted to your blog during the current months Rudolph Days Challenge, (between the 25th and last day of the current month)
6. Please link back to or at least mention, the Rudolph Days Challenge.
7. Please leave a comment on the challenge post. 8. The winner will be selected by random draw and announced on the first day of the following month. Prizes will be mailed anywhere in the world.
Our designers have been busy making some wonderful inspiration for you all.
First up is Sam at Whispers Cards
Sam has made this fabulous fancy fold card...with lovely Old World looking Santa images. I am itching to try this fold now. The Santa charm is such a wonderful embellishment here. The reds, greens and golds suit these Santa's!
Jenny at Cardsarus has made this elegant fancy folded round easel card. Loving the pop of the white against the blue and all the fabulous dies here.
You can pop over to Sam and Jenny's blogs by just clicking on their blog names where I have embedded a hyperlink straight to them!
My card has a decoupage image. My NBUS item is the plaid background paper. It is from a 6x6 Basic Grey, Jovail paper pad I bought at the Papercraft garage sale. Think I paid $2.00 for the unopened pad. It has lots of lovely design papers.
The trees are a Sue Wilson die. There are a lot of sizes of tree dies in this set. One evening, I sat and used up a lot of green coloured snippets cutting out a lot of these trees in various sizes. I inked them up with Ingvild Bolme chalk inks and am really happy with the results..
The Merry Christmas die is Elizabeth Crafts. I cut it from heavyweight red Bazzill card...the same red card I used for the scalloped mat.
The snowflakes are another NBUS item. They are Memory Box Twilight Snowflakes. A light touch of Wink Of Stella finished off this card with a little Christmas sparkle!
Our prize this month is a choice of this Stampendous Snowy Postcard cling stamp,
This is another card made from snippets. The card base is made with a heavy weight sheet of 12x12 wood grain paper that I cut in half to make two cards. The dotted paper is VOS (very old stash). It is ten years old or maybe even more, as it was a snippet from a scrapbook I made of Little Miss C when she was a toddler.
The tree, flowers, scalloped mat, banner and sentiment tag were all cut from snippets quite some time ago. I like to do things like this with snippets and file them away for future use.
I used a pre coloured image (Hobby House methinks...but not sure) and highlighted it with a clear Wink Of Stella pen. I added a little WOS to the flower petals too. A few teensy diamonds on the flowers and this card was done!
Since there are so many snippets on this card, I am taking it over to Di's challenge, Pixies Crafty Workshop.
Recipe:
Card - hand cut from a heavy weight 12x12 VOS scrapbook page in my stash
DP - snippet of 12x12 DP so VOS that I do not remember the manufacturer
Card Stock - snippets of pink and kraft card from my stash
Die Cuts - Memory Box tree and banner; Impression Obsession tag; Spellbinders circle and scalloped circle.
Punch - Martha Stewart Hydrangea punch
Image - from my stash...I think it is a Hobby House image
Sentiment stamps - tiny acrylic alphabet stamps from my stash
Bling - diamonds from my stash
Glimmer - Wink Of Stella pen
I am entering this card in the following challenges:
1. Pixies Crafty Workshop - must use snippets.
Here is another of the Birthday cards I made for my friend. She uses cards for the classmates of her son and daughter, so I made her 4 of each type.
They are all quite simple and straight forward, and I had a lot of fun making them. I do not use bold colours enough, so choosing bright, vivid colours for the boy cards was great fun.
This is another card made from my snippets, so it was just a matter of going through them and choosing colours and patterns that went together.
You may remember the stars from the last card. I off-centered and double layered the larger two I used here...Orange pop dotted on top of aqua in the top left and aqua on top of orange in the middle right. I have been punching and die cutting stars from my teensy snippets. It is such a great way to use up those tiny scraps.
My NBUS item is the Somewhere In Time, Birthday Celebrations stamp, used for the cake image.
This is a three dollar, dollar store stamp. There are about a dozen stamps in this package and I am looking forward to trying some of the other ones too.
I slid an unknown snippet of unknown blue jean DP under the sentiment paper...just to make the border wider. That way, the narrower snippet of striped DP on the bottom, fit the card.The blue jean material has a lovely texture and a shimmer to it as well.
Recipe
Handmade card 5 1/2 x 5 1/2
Envelope - from my stash
Card - snippet of rust Bazzill heavy weight DP
DP - left over snippets of 12 x 12 scrapbook paper from my stash, Creative imaginations, Make a Wish
Embellies - stars cut from snippets of matching Bazzill heavy weight card.
Colouring method - Polychromo pencil crayons and gamsol
Stickles - Star Dust
I am entering this card in the following challenges: (will add later tonight)
Here is another of the birthday cards I made for my friend. They were all designed to be given to kids, 4 for boys and 4 for girls birthdays.
Now this little hedgie was coloured before I knew the correct colour of hedgehog. I do not think we actually have them in Canada. I realize now that the belly should be ivory-ish in colour and there should be mostly grey in the spines. WEll...I guess we will just have to pretend this is a Canadian hedgehog!
The image and the green mat were cut with my Wonky Rectangles Spellbinders die. They were assembled a couple of years ago (or maybe even more). I chose the DP based on whether they suited that particular shade of green! The DP used here are my NBUS item. I think they are Studio Basics
It was luck that allowed the wonky part of the matted image to fit on the card so the Blue Happy Birthday words showed as if they had been designed to...I assure you it was sheer luck.
I have been punching stars out of my teensy shippets. Stars in all different colours and sizes. I raided my stash of them and used some here, just for embellishment. I pop dotted the larger blue star for effect.
I am entering this card into the following challenges:
1. Pixies Crafty Workshop - must use snippets (my stars and the green mat are my snippets).
Todays theme at Christmas Card Club is Mistletoe and Wine, chosen by our lovely Rita at RMG Creations. After you read this post you will see that I made a Mistletoe and Whine card!
This card was a bit of a disaster in the making.
There are actually two finished images. Yes, two, on the same card.
I stamped this NBUS Penny Black Mistletoe image and coloured it with Prisma Pencil Crayons. I stamped a NBUS Hero Arts sentiment (CL722) direct to card and breathed a sigh of relief that I managed to stamp it straight!
I was then very silly and forgot to blend with the Gamsol. Instead, I chalked the background to look like sky. I then started to blend the pencil crayoned leaves, and when I got to the very last leaf, I managed to drip two large drops of gamsol right over the top leaves of the image.
Weill, let me tell you, gamsol on chalk dries with the droplet showing as the chalk has changed composition once wet.
I then cut a second image and sentiment, coloured it with the pencil crayons again, painted liquid pearls on the berries and then chalked the edges.Whew! No Spills.
I then flipped the image over to place the two sided Sook Wang tape on the back...AND THEN...
flipped it back over to see a new splodge of gamsol just beside the "yours". Oh No! There must have been a small droplet of gamsol on my desk.
I then tried to ink the edges with black momento ink, hoping to minimize the look of the splodge. But in doing so, I managed to over ink and I am now not so much liking this card.
I don't know why I didn't wash all the chalk with the gamsol and thereby hide the splodge. I was too afraid that the gamsol would pick up and bleed the black ink of the sentiment and muddy the area all around it., but I think I should have taken the risk.
So, instead, here is my card...with a definite shabbied up look! I am sure you have notice the lack of wine on this card. The inside of my card has two teensy wine glasses in the right bottom corner, well under the sentiment. Sadly, my camera ran out of charge so you will have to trust me on that, Rita.
I will update this post with that photo, once my camera is charged.
Recipe
Card Base - prefolded Silver glimmer card and matching envelope, from my stash
DP - DCWV - Premium Glitter Basics Stack ( NBUS) new
Stamps - Penny Black Festive Florals Mistletoe image (NBUS)
Sentiment Stamp - Hero Arts CL722 (NBUS) new
Bling - Ivory Liquid pearls , From my stash
I am making up some birthday cards for a Thank you gift. Three boy, and three girl themed cards
I will show the rest of these cards over the next couple of weeks. Here is the first.
The tied fly hook is an image I picked up at the thrift shop. I cut it out with a Lawn Fawn stitched square die and matted with a snippet of Bazzill heavy weight card, cut with the larger stitched die. I pop dotted the image off the mat for some depth to the card.
I covered the white card base with some snippets of DP from my stash. The party hat DP is a snippet of Crate Paper, Party Day. The bottom piece looks like cork strips and was the perfect colour to go with the snippet of birthday party hats. I think it is another Crate Paper selection...this time, Party Time.
The HAPPY banner was left over from a set of cards shown in a previous post. I pop dotted it forward too. The BIRTHDAY word sentiment was left over from that same set of cards. It is stamped on a Stampin' Up word punch.
My NBUS item today is the tied fly image.
I am entering this card in the following challenges:
I have a quick and easy Birthday card to share today. It was made at my Langley Stampers club.
I cut a pink mat from cardstock and then punched a scalloped oval and die cut some butterflies, from the center of that mat.
I then embossed a piece of white card with a swirly EF that has butterflies within the swirls.
Mounted the embossed panel onto what was left of the pink card mat, and the attached all that to a white card base.
The butterflies were pop dotted over the embossed butterflies on the embossed swirly panel. I hope this gives a feeling of movement to the card. A wee bit of bling was placed on the centers of each butterfly.
Happy birthday was stamped onto a snippet of white card and then punched with a Stampin' Up scalloped oval. This was placed off center onto the pink scalloped oval and pop dotted forward as well.
Easy Peasy!
I am entering this card in the following challenges...
1. Pixies Crafty Workshiop - must use snippets.
I have been trying to use up any stamped and coloured images I have on hand. Frankly, I am a bit tired of most of them and want to get them used up so I can get on with stamping and colouring up some new ones. lol
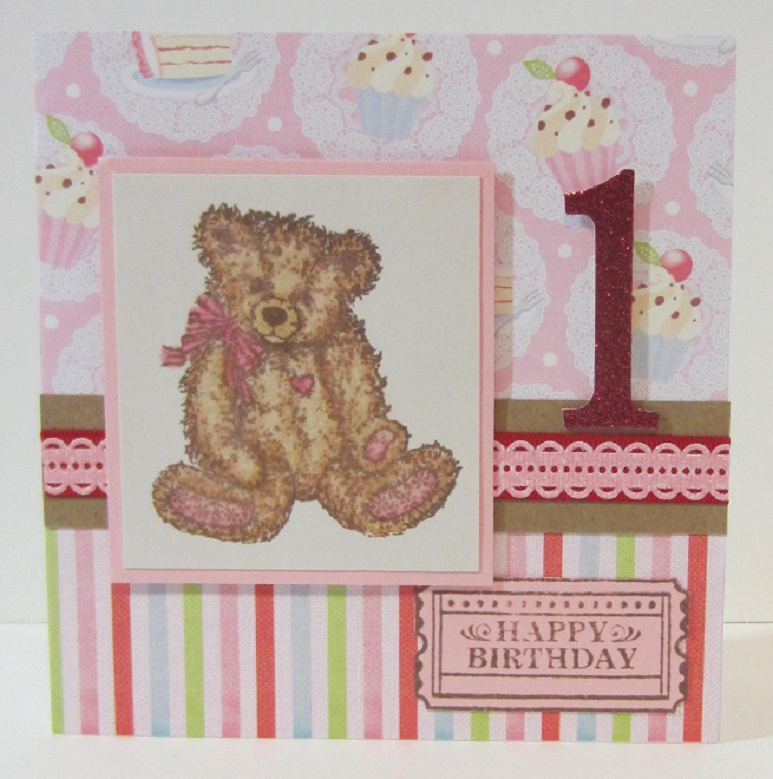
This wee bear is a Stampin' Up stamp that I have made several cards with, over the years. This is the last of my stamped and coloured bears, so that is a good feeling! My NBUS item on this card is the Wild Rose Birthday DP. I won the 6x6 paper pad from Kate at Wild Rose Studio. Thanks so much Kate!
The image mat is from my snippets pile. The ribbon on this card is one of those that never unravel. I wish all ribbon was like this. I backed it with a snippet of kraft card just to tie in the bears fur colour.
The number one diecut is actually cut from red glitter card. It is the same shade of red as the red strip of ribbon behind the glittery pink lace part of the ribbon. This red glitter card is very hard to photograph and seems to like to photograph very dark...but I promise you that is is red!!!
I have a second NBUS item on this card. It is the sentiment stamp. It is one of those Studio G $1.50 stamp sets that are commonly sold at Michaels. I stamped it in Brown Momento ink to match the image ink and then I fussy cut it out.
I have so many of these studio G stamps and almost all are still NBUS. I am going to make an effort to use a couple of these stamps each month. Perhaps some of you have a hidden stash of these wee stamps too and would like to join me in a campaign to let them meet ink.
For me, I managed to use one today, and only have 500 or so to go!!
This card started out from a desire to use up the three stacking mats you see here. I often precut mats from my snippets and place them in tiny photo albums from the dollar store. Each book holds one particular colour. They are very handy for taking to the lake or to crops. Once I realised that these three stacked nicely, I was determined to make a card with them.
The DP is from snippets of 12x12 DP left over from a scrapbooked Zoo outing. I used a snippet of reddish brown woodgrain DP to back the word border. Sorry, but I do not know the manufacturer of the original papers.
This card has a couple of NBUS items. The 3D giraffe was purchased quite some time ago from the Dollar store, and never used till today.
The red number 1 is cut from a brand new sheet of 12 x 12 red glittered card. I used the free large number dies at my local papercraft store. As long as you buy the paper from them, you can use their dies for free.
I had a hard time getting a photograph of this card. I needed two lamps to illuminate the red glitter paper on the right hand side. Sadly, I only have one! Both corners, the number one and the Happy Birthday are all cut from the same red glitter paper that photographed correctly on the bottom left corner.
Future Project ideas...
I am going to make an effort to feature some Studio G stamps in my card totals each month. I have a couple to post at the moment, so watch this blog if you too have stockpiled these teensy stamps!
I have been having fun lately, looking through my stash of Studio G stamps. They were so popular a few years ago and I fell into the craze, collecting two or three every time I went to Michaels. I stashed them into baseball card plastic sleeves and promptly forgot about them. Out of sight, out of mind! I am going to select a coupleof these stamps to use each month. They are great for adding a sentiment when you have forgotten to leave room. Usually I can find a teensy sentiment in my Studio G stamps!
This fortnights theme for the Christmas Card Club was chosen by Carol of CM Designs.
I am in the midst of a kitchen reno, as well as replacing the laminate on our main floor with hardwood.. Everything from the main floor of my house is tucked into every room on the floors above and below, It was a bit of a flurry of activity to get this card finished for today. I was very silly not to remember to make this card ahead of tine!
I have used a topper made in a class a couple of years ago (NBUS). I did not notate the stamp manufacturer, but we wet embossed with a glossy black embossing powder and coloured the image with Twinkling H2O's. There is a beautiful glimmer on the painted parts of the image.
I matted a sheet of NBUS Kaiser Christmas Wishes font DP onto a purple mat and then placed that at the bottom of a glimmery silver card. I triple matted the image with various snippets of purple card and set that onto a Christmas Wishes floral DP. I picked up that Kaiser 6x6 Christmas pad a short while ago and I'm very pleased with the non-traditional colours and designs.
I went around the edges of that floral piece of DP with Purple Stickles. It gave it a lovely bit of sparkle.
If you wish to look at any of the other ladies contributions, their names and hyperlinks are on my right hand sideboard.
I am entering this card in the following challenges.
1. Christmas Card Club - Christmas Flowers
My card today features my NBUS Spellbinders Jeans Pocket die. I am ashamed to tell you just how long I have owned this die and had not even opened the package yet!
I have thrown caution to the wind and made quite a colourful card today. As much as I love colourful cards, choosing vivid shades does not come naturally to me. Once I get started, I am always happy with the colour though!
I cut the jeans pocket out of some lightly embossed (with a sort of striped pattern) denim coloured card. The card has a sort of sateen sheen and is quite pretty. Because it a bit delicate, I cut the die again from heavy weight black card and glued the sateen card to it.
I used some leafy cluster dies and layered a bunch of paper flowers with them. Luckily I had some blue brads, as well as some teensy, orange button brads, so I was able to alternate the colours of the layers. I need to make an awful lot of flower cards as I have so many paper flowers stockpiled from when they were in style, many, many years ago!
The DP is all from the My Minds Eye, My Girl 6x6 paper pad. I also used a second NBUS item, the ombre peach coloured, Recollections canvas die cut. (just behind the flowers). It was actually too tall for my card, so I cut it in half and then trimmed about 1/2 inch or so from each middle edge
Most of the flowers and the butterflies were from Michaels many years ago. I tore the diamond off the turquoise one and layered the white butterfly overtop.
The leaves were all cut from snippets. I cut up the entire green snippet and have two leafy branches leftover for another project. This was a fun card to make, no stress at all and very relaxing. I am looking forward to making a couple more for my card box.
Recipe:
Base Card and Envelope - premade orange card from my stash
Card Stock - snippets of green for the leafy branches
DP - My Minds Eye - My Girl
Canvas - Recollections canvas banner
Flowers - from my stash (Michaels\)
Butterflies - from my stash (Michaels)
Brads - Colorbok aqua teensy brads from my very old stash( VOS) , orange button teensy brads from my very old stash (VOS)
Dies - Memory Box Small Leafy Twig die and Sue Wilson Pine Twig die
I am entering this card in the following challenge: Pixies Crafty Workshop - must use snippets.
2. Darnells NBUS #11 - must have NBUS and or a boo boo