Tuesday, 25 August 2020

August Rudolph Days Challenge.

Hi there. Once again, it is time for the Rudolph Days Challenge. Here are the rules for your perusal...

1. The Rudolph Days Challenge will start each month (January to November) on the 25th, and will close at midnight PST, on the last day of that month.
2. The theme is always Anything Goes, as long as it is Christmas.
3. One entry per person and you just need to enter one Christmas card or Christmas project.
4. You may combine your entry with other challenges (maximum of 10 in total).
5. Your card (or Christmas project) should not have been previously posted to your blog. It should be posted to your blog during the current months Rudolph Days Challenge, (between the 25th and last day of the current month)
6. Please link back to or at least mention, the Rudolph Days Challenge.
7. Please leave a comment on the challenge post.
8. The winner will be selected by random draw and announced on the first day of the following month. Prizes will be mailed anywhere in the world.

9. A special draw will be held at the end of the year, in December,  for all those who submitted a card or project every month that year, January to November.

I must warn you that there may be some delay getting the prizes mailed out. Al and I are not venturing out except to pick up our groceries.  We are still sheltering at home as we both are high risk.  Whe my daughter has time, she will mail them for me, but it has to fit into her schedule, and they do not go out much either. They both have had to work throughout the pandemic, so still limit any other ventures to enclosed spaces. All their time off is spent camping with the same few friends that practise sociall distancing as well.  They do not go inot friends homes nor have anyone in theirs...
So, when she has something to mail or pickup herself, she will post the prizes...so bear with me and it will eventually get there. Currently, we are up to date on our mailing, except one, where the winner has asked me to hold onto it till Christmas time!

The design team has been busy. First up is Sam at Whispers Cards.

Sam has made this adorable Penny Black card. Is this image not the cutest thing ever! The fur on the hat looks so real!!!
I am loving all the pretty design paper here and the non traditional colours! The pink and grey is so beautiful together. 

Sam has made us a second card. I think the sentiment is wonderful here. Great to showcase it and let it take center stage.  All those presents on the design paper make me yearn for Christmas crafty presents!

I hope you will pop on over to Sam's blog and leave her some love...

Next up is Sue at Sue's Crafty Corner blog. 
Sue has created this lovely inky sky as a backdrop for this wonderful bird image. I love the soft inky colours and the pretty colours of the bird image.

Sue was very hardworking and managed to make eight of these beautiful cards! I hope you will pop over to her blog and leave her some love,,,

My card is another upcycled one.  Because the original image was so large, I made a 6x6 inch card base and added the trimmed down card front straight onto a piece of shimmery pale blue card stock by DCWV.  I hand cut two hills from white glitter card, hoping that they would look like snowbanks.
Added a glittery aqua foam snowflake that is eons old. I bought a few packages of these at my local dollar store many years ago and still have a few tucked away!  I added a small bow from some fine ivory cord, just to contrast with the more dressy look of this card...


The prize this month is this Studio Light, Winter Trails Frame Stamp. 


Sunday, 16 August 2020

Christmas Card Club - Winter Scene

Mrs A at ValeryAnne Designs blog has chosen the theme of a Winter Scene for this fortnights Christmas Card Club.

We are a group of ladies who take turns choosing a theme to make a Christmas card every two weeks. This way, we have lots made by Christmas time. You can click on the hyperlinks that are on my right sideboard if you wish to see the other ladies cards.

I chose to upcycle another of the old cards my girlfriend gifted to me. Most were from the 1950s era and all with a lovely vintage feel.


This one captures a lovely winter scene...Looks like the Mom and child with the sleigh are heading over to that hill for some great sledding fun!

I fussy cut the matted scene and added it to some gold mirri card. I added a K&Co 3D poinsettia and a mistletoe spray from another K&CO set. I added a border strip of hessian ribbon across the middle of the Lily Of The Valley Krafty Christmas snowflake DP that I used for the background. I thought it added to the vintage feel....

I finished off this card by fussy cutting the sentiment from the old card and popped it up with pop dots.

Tuesday, 11 August 2020

Gardening

In this time of staying close to home and limiting our social contacts, thank goodness for my garden.We have made a few changes this year to accommodate the extra time we are spending out there.

Many of you are aware that about 5 years ago we downsized to a teensy sized lot and a slightly smaller house. We have tried ever since to maximize every square inch of garden space. I think we are doing a fairly good job on that part, but alas, the flower blooms themselves are not what they have been in past years!

Usually my Montana clematis has a hundred blossoms or more in the springtime. This year it had 6 or 7. A couple of months later, it bloomed again and had about 10 more blossoms. Weird!

Two other trellises that have two different  clematis each, are even worse. One trellis had one blossom and the other had....NONE AT ALL...sigh Here is a photo of last years Montana clematis


Luckily, the clematis closest to the front of the garden seems to be blooming up a storm to make up for the others. I keep a diary with a hand drawn map of what grows where in the garden. I list names of flowers and even tape the name tags (if I have them) into the book. I went to look up the name of this blooming clematis and although I have carefully taped in the tag, the name is not on the tag! And of course, I had not written down the name yet, thinking I could just rewrite it off the tag.


I chat with a couple of ladies via email and promised to post photos of my clematis and garden bed. So here they are...please remember I mentioned that I have a teensy, teensy lot! Perfect for my arthritis as I can garden and yet not tire myself out!

This is the back edge of the patio that adjoins the flower bed I showed above. As you can see, the evergreen that is in the foreground has a lot of brown needles in the bottom area of the tree.
Some of the clematis have that browning too, as well as all the ivy in my big pots and hanging baskets. I had to cut the ivy back to the ground and even then, some rusty coloured leaves grew back.
Normally, I would just take a few sample leaves into my master gardener booth at the local nursery, but not this year, with COVID. I think it is perhaps a virus of some sort, or maybe rust...


We removed some river rock edging around the lower patio and changed it over to brick patterned slabs. We needed the extra room as we added a portable hot tub. When it wears out, we will change over to a pack and play hot tub, They are sold out right now across Canada. In some cases, the factories have not yet reopened and in others the manufacturers delivery dates are running into mid October. The main factory that we want to purchase from (through Costco) is still shut down due to COVID.
This one we bought is just a cheapie, but serves its purpose well. Al has been in soaking nearly every night. It is easily maintaining 104 degrees Fahrenheit.

Luckily the patio doors to our walk out basement are right beside this tub. So it is just a few steps inside to a bathroom with a shower for a quick rinse off afterwards!

The antique looking trunk was Al's grandfathers. He bought his tools in it when he left Wisconsin to come and make a home in Canada. We are now keeping the spa chemicals in it.


The tall topiary tree in one of the large pots behind the tub, is a California lilac. We had masses of beautiful teensy blue blooms earlier in the year. I think there are still a few left in this photo...
We are going to take out the small evergreen trees you see in the other pots and replant with two more California Lilac. It is a nice way to create a visual screen between the neighbour's house and ours. An added bonus is that it keeps those glossy green leaves all winter!

We are very lucky that our neighbours are not outdoor people. We have only seen them out in their back garden once, in the last 5 years. Al always mows their grass when he does ours as the front gardens are so teensy here. It is easier to mow straight up to their sidewalk, than guess at the arbitrary line down the middle. He asked if they minded, when we first moved in and they burst into huge smiles and said they were not garden people at all and would love it. He also shovels their sidewalks when it snows, as he is out there anyway and he knows that they have to go out to work. Each Christmas, they bring us a bottle of very pricey wine, and a lovely box of chocolates. 
 
Here is a shot from the main sidewalk, just inside the gate to the garage..


Hope you enjoyed this little peek into my back garden!

Sunday, 2 August 2020

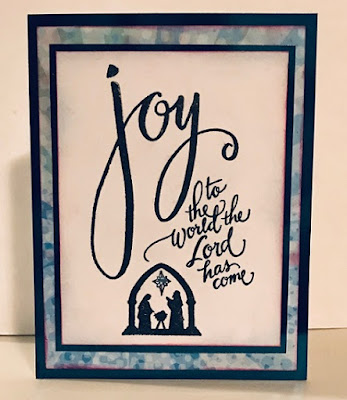
Christmas Card Club - Nativity

It has been a few weeks since I posted a card for the Christmas Card Club Challenge. I was babying  my neck to relax and release it, so I just had not been making cards.

If you are interested in joining this club challenge, let me know. We take turns chosing the theme and we make a Christmas card every two weeks. My right sidebar has hyperlinks to the others members blogs...click on them if you want to take a peak.

My Nativity  stamp is  Christmas/Noel, from Recollections, 2017. I think it is the first time I have used it...but not completely sure. I can not remember using it but wonder of that is just old age setting in!

The image was hard to stamp. I wasted a whole 8x10 sheet of Bazzill stamping paper and kept getting an image that was not crisp. I switched to Tsukineko, Versa Fine Clair, Nocturne and got a crisp image first time!
I swiped the image with soft aqua and pale lavender chalk inks. You can barely see it as I think I was a bit too cautious.

I matted the finished image with a snippet of  dark teal ombre style HunkyDory Mirri card and placed that on a piece of Best Creations Surf's Up glitter embossed paper.


This card is proof that any design paper can be used on any type of card! The A side of this paper is large aqua hibiscus flowers heavily embossed with clear glitter here and there.  Luckily, the flip side is this sunburst type design hopefully looking like the rays from the North Star.
I wiped all the edges of the DP and the mirri card with a violet chalk ink. The teal ombre Mirri card fades into a violet colour even though it hardly shows up on this card.

Another mat of the HunkyDory mirri and this card was done.   Well, almost done. I added a small aqua diamond on the star over the nativity. Of course I did not realize it was slightly crooked till I took this photo...it has since been straightened,

Saturday, 1 August 2020

Winner of the July Rudolph Days Challenge

Hi there. I am so happy to say that we had 55 fabulous entries this month. I think there is always a lot of "Christmas in July" challenge themes, so perhaps that is the reason  our numbers are up a bit this month!

As always, I have used Random Org to chose our winner, #38, FT Fit Kitty

FT Fit Kitty, will you drop me an email to maureenkane@telus.net and give me your mailing address? I can not promise exactly when, but will send your prize as soon as I can.