It is Sue J at Olliesmam 's turn to choose the theme for our Christmas Card Club. Sue chose Nativity Cards as our theme this fortnight. This is a great theme for me as I like to make a religious themed card that captures the true spirit of Christmas. So thanks for this great challenge, Sue! If you would like to check out the other girl's cards, the links are on my right sidebar.
My mojo was a wee bit tired...so I took my inspiration from this card on Taylored Expressions blog.
I did not have that exact ribbon on hand and remember that I have not been purchasing consumables...so I used what I had on hand. This was a very enjoyable card to make as I think it captures the true meaning of Christmas! Thanks again Sue J for the wonderful theme this fortnight.
Here is my take on the pinterest card...
I am skipping this card number ahead of my other finished cards posts as I wanted to be able to share with you that this in my 50th card! 50 cards without purchasing any consumables was quite easy to do. I even went to the scrapbook shops a few times...bought a couple of dies and a stamp for a friend. I did purchase my exceptions... Sook Wang tape and the heavy weight paper that I usually cut my cards from. I managed to get both for 40% off so that was a bonus.
I did not actually use much of that paper as I decided to try and make an effort to use the precut, folded card sets that I have on hand. They are thinner and flimsier, but that does allow some leeway for adding embellishments and still getting the card through the regular mail slot! Once I use these thinner cards up, I will switch back to cutting my own cards as I sure like the look and feel of the heavier weight paper!
I am going to come out of the freezer tomorrow for one day. It is the scrapbook store's garage sale. Bargains abound at these sales and I plan to shop there tomorrow. The shop itself has 25% off everything in the store for the day. I plan to purchase some Memory Box dies and perhaps a new style Spellbinders set. Then I am placing myself right back in the freezer until I make 50 more paper projects! Stay tuned to this blog for my next 29 posts and you will have seen all of this first 50!!!
****************This is card #50 of 50. I am on a consumables spending freeze until I have made 50 cards (Sook Wang tape and heavy weight card stock are exempt).***************
Recipe
Card Base and Envelope - from my stash
Card Stock - snippets of Kraft and white
Stamp - Stampendous, manger
Ribbon - twill ribbon from stash
Twine - snippet of jute twine
I am entering this card in the following challenges:
1. Pixies Crafty Workshop - must use snippets
2. Crafty Hazelnut's Christmas Challenge Extra - must be Christmas
3. MFP Speedy TV Christmas Card Challenge - must be Christmas
4. Two Peas In A Bucket - Christmas in June - must be Christmas
5. Christmas Card Club - must be Christmas
Showing posts with label cards kraft. Show all posts
Saturday, 31 May 2014
Tuesday, 20 May 2014
Handyman Card - Card 18
Do you have a handyman in your family? Seems every extended family has at least one. Found this stamp in my recent tidy up of my craft room and decided to put it to ink.
I inked a lot of the dies this time as they wrinkled and tore so badly on my inky last card. This worked out so much better on the big frame around the image. That was the bit I had the most trouble with last time. Not getting it damp seemed to be the answer.
I am planing to do a few more of these cards. I will use watercolour paper for the dies next time. That should solve the paper problems I encounterted. I don't think I would use the script Happy birthday with these again. Now that I see it blown up for the computer, I think it looks too girly!!! Not to mention, slightly crooked! lol
I am also going to try the image embossed with black EP next time. I think that will help it pop off the card a bit as it seems to blend in too much on this card.
I will finish the inside of all the cards I have made both at Mum's and while up at the lake, once I am home again. I just did not have enough room to bring verse style stamps and do not have access to a printer here to do computer generated verses.
****************This is card #18 of 50. I am on a consumables spending freeze until I have made 50 cards (Sook Wang tape and heavy weight card stock are exempt).***************
Recipe:
Card base - Kraft corrugated card and envelope from my stash (originally from Michael's)
DP - snippets of Scrabble tile paper from my stash. Will have to update the name of the measuring tape paper once I am home, as I did not jot it down.
Card Stock - Snippets of cream for the dies cuts
Jute - from my stash (given to me by my friend)
Dies -Spellbinders Cogs and Elizabeth Happy Bithday
Stamp - Stampin' Up
Enamel dots - black dots from my stash
I am entering this card in the following challenges:
1. Pixies Crafty Workshop - must use snippets
2. Crafty hazelnut's Patterned Paper Challenge - must cover card with paper
I inked a lot of the dies this time as they wrinkled and tore so badly on my inky last card. This worked out so much better on the big frame around the image. That was the bit I had the most trouble with last time. Not getting it damp seemed to be the answer.
I am planing to do a few more of these cards. I will use watercolour paper for the dies next time. That should solve the paper problems I encounterted. I don't think I would use the script Happy birthday with these again. Now that I see it blown up for the computer, I think it looks too girly!!! Not to mention, slightly crooked! lol
I am also going to try the image embossed with black EP next time. I think that will help it pop off the card a bit as it seems to blend in too much on this card.
I will finish the inside of all the cards I have made both at Mum's and while up at the lake, once I am home again. I just did not have enough room to bring verse style stamps and do not have access to a printer here to do computer generated verses.
****************This is card #18 of 50. I am on a consumables spending freeze until I have made 50 cards (Sook Wang tape and heavy weight card stock are exempt).***************
Recipe:
Card base - Kraft corrugated card and envelope from my stash (originally from Michael's)
DP - snippets of Scrabble tile paper from my stash. Will have to update the name of the measuring tape paper once I am home, as I did not jot it down.
Card Stock - Snippets of cream for the dies cuts
Jute - from my stash (given to me by my friend)
Dies -Spellbinders Cogs and Elizabeth Happy Bithday
Stamp - Stampin' Up
Enamel dots - black dots from my stash
I am entering this card in the following challenges:
1. Pixies Crafty Workshop - must use snippets
2. Crafty hazelnut's Patterned Paper Challenge - must cover card with paper
Thursday, 15 May 2014
Guys and Trucks - Card 15
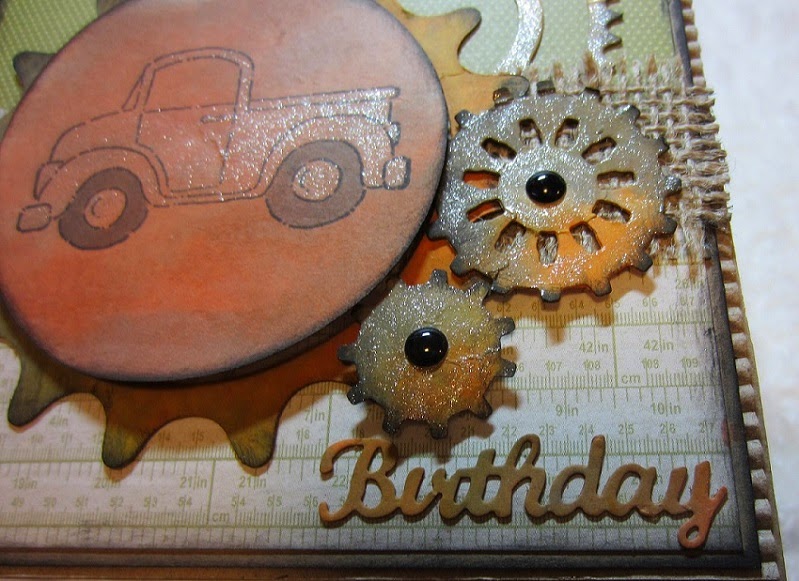
I made a couple of masculine cards for my girlfriend. Remember that gift set of purple cards I showed you a couple of posts ago? Well, these are the masculine cards I made for her as well. I made the purple cards for the feminine cards, as that is her favourite colour; and rusty metal cogs and wheels for the guy cards, as she works in an Auto Parts store.
Some of her auto parts come wrapped in new burlap bags, so I used a bit of the burlap she has kindly given me.
I ran a Spellbinders cog die through my Big Shot and then smooshed the paper through the TH stains on my craft mat. I think I did something wrong as the paper seemed to get soaking wet and lose it's crispness. Perhaps I should have used the watercolour paper...I will try that next time. When I dried the cogs with the heat gun, the paper seemed ready to tear and actually did on the pointy frame around the image. Probably would have been better to just let it dry...but wanted to get them finished to take up to her when I am at my Mum's on Monday.
I used my old Stampin Up truck this time, but will check out the internet for some images of old antique trucks for the next card. Yes, there will be a next card...batch baking I think! On the next ones I think I will drag half sheets of the paper through the stain and let it dry thoroughly....and then cut it with the dies. Should prevent tearing, methinks! If it still tears, then it will have to be back to the watercolour paper, I guess.
I kept the inside fairly simple. Just the sentiment verse with a cog tucked in behind! Forgot to take a photo of it. Drat...Here is a photo to show the look of the Wink of Stella |Pen. I used it on the truck body, and the dies. You can see from this closeup how the paper kind of lost it's crisp look and got tattered looking...
****************This is card #15 of 50. I am on a consumables spending freeze until I have made 50 cards (Sook Wang tape and heavy weight card stock are exempt).***************
Recipe
Card Base - corrugated Kraft square card from my stash
Design Paper - don't have my book handy that I record the deets in...will update this when I am home
Card Stock - snippet of Kraft card, snippets of cream heavy weight card for the cogs and sentiment
Dies - Spellbinders Cogs; Elizabeth Crafts, Happy Birthday
Stains - Tim Holtz Frayed Burlap, Spiced Marmalade, Bundled Sage
Burlap - from my stash (given by my friend)
Ink - Ingvild Bolme black chalk ink
Stamp - Stampin Up Truck
Enamel dots - from my stash. I got these for 80% off, after Halloween
I am entering this card in the following challenges:
1. Pixies Crafty Workshop - must use snippets
Some of her auto parts come wrapped in new burlap bags, so I used a bit of the burlap she has kindly given me.
I ran a Spellbinders cog die through my Big Shot and then smooshed the paper through the TH stains on my craft mat. I think I did something wrong as the paper seemed to get soaking wet and lose it's crispness. Perhaps I should have used the watercolour paper...I will try that next time. When I dried the cogs with the heat gun, the paper seemed ready to tear and actually did on the pointy frame around the image. Probably would have been better to just let it dry...but wanted to get them finished to take up to her when I am at my Mum's on Monday.
I used my old Stampin Up truck this time, but will check out the internet for some images of old antique trucks for the next card. Yes, there will be a next card...batch baking I think! On the next ones I think I will drag half sheets of the paper through the stain and let it dry thoroughly....and then cut it with the dies. Should prevent tearing, methinks! If it still tears, then it will have to be back to the watercolour paper, I guess.
I kept the inside fairly simple. Just the sentiment verse with a cog tucked in behind! Forgot to take a photo of it. Drat...Here is a photo to show the look of the Wink of Stella |Pen. I used it on the truck body, and the dies. You can see from this closeup how the paper kind of lost it's crisp look and got tattered looking...
****************This is card #15 of 50. I am on a consumables spending freeze until I have made 50 cards (Sook Wang tape and heavy weight card stock are exempt).***************
Recipe
Card Base - corrugated Kraft square card from my stash
Design Paper - don't have my book handy that I record the deets in...will update this when I am home
Card Stock - snippet of Kraft card, snippets of cream heavy weight card for the cogs and sentiment
Dies - Spellbinders Cogs; Elizabeth Crafts, Happy Birthday
Stains - Tim Holtz Frayed Burlap, Spiced Marmalade, Bundled Sage
Burlap - from my stash (given by my friend)
Ink - Ingvild Bolme black chalk ink
Stamp - Stampin Up Truck
Enamel dots - from my stash. I got these for 80% off, after Halloween
I am entering this card in the following challenges:
1. Pixies Crafty Workshop - must use snippets
Friday, 25 April 2014
Inky Goodness - Card 8
This is the test card I made on my own, when I was planning and making up the kits for last week's craft day with my neighbour. I was a wee bit nervous cuz had only played with inks once before. I decided I liked the outcome and went ahead with the inky card kits I showed you on a previous post.
I used watercolour paper. Not sure if I like the result on it, but I do like the colours. I used heavy, water colour paper. I think it was 130 pound paper, but it seemed to get these little grainy spots. Next time I try these, I will use the same card stock I used for the ATC's last year. It seemed to take the stain better and looked smoother, for want of a better word.
I used some stamps that had never before seen ink (NBUS), so that was a good feeling. I think I need to implement a policy of stamping a "practice run" before laying a stamp to good paper. Stamps seem to all have a mind of their own Some need a heavy hand, some a light touch, some a lighter touch on one side more so than the other.....I am sure you all know what I mean!
I will keep up trying to make inky cards! It was fun and I enjoyed making this one.
****************This is card #8 of 50. I am on a consumables spending freeze until I have made 50 cards (Sook Wang tape and heavy weight card stock are exempt).***************
Recipe
Card base - hand cut from stash
Card stock - snippets of kraft and pink card from my stash
Water Colour Paper - 130 pound from my stash
Tim Holtz stains: Worn Lipstick, Pickled Raspberry, Mustard Seed, Spiced Marmelade
Ink - Momento black for images; ColorBok Charcoal Chalk ink for edging
Stamp - will have to fill this in once I am home as I forgot to write down the name...sorry
Bling - From my stash
Embossing Folder - Darice Woodgrain
Twine - jute twine from my stash
Button - glittery button from my stash
I am entering this card in the following challenges:
1. Pixies Crafty Workshop - must use snippets
I used watercolour paper. Not sure if I like the result on it, but I do like the colours. I used heavy, water colour paper. I think it was 130 pound paper, but it seemed to get these little grainy spots. Next time I try these, I will use the same card stock I used for the ATC's last year. It seemed to take the stain better and looked smoother, for want of a better word.
I used some stamps that had never before seen ink (NBUS), so that was a good feeling. I think I need to implement a policy of stamping a "practice run" before laying a stamp to good paper. Stamps seem to all have a mind of their own Some need a heavy hand, some a light touch, some a lighter touch on one side more so than the other.....I am sure you all know what I mean!
I will keep up trying to make inky cards! It was fun and I enjoyed making this one.
****************This is card #8 of 50. I am on a consumables spending freeze until I have made 50 cards (Sook Wang tape and heavy weight card stock are exempt).***************
Recipe
Card base - hand cut from stash
Card stock - snippets of kraft and pink card from my stash
Water Colour Paper - 130 pound from my stash
Tim Holtz stains: Worn Lipstick, Pickled Raspberry, Mustard Seed, Spiced Marmelade
Ink - Momento black for images; ColorBok Charcoal Chalk ink for edging
Stamp - will have to fill this in once I am home as I forgot to write down the name...sorry
Bling - From my stash
Embossing Folder - Darice Woodgrain
Twine - jute twine from my stash
Button - glittery button from my stash
I am entering this card in the following challenges:
1. Pixies Crafty Workshop - must use snippets
Sunday, 20 April 2014
Ink To Paper - While crafting with my neighbour - Card 4
It was my weekly craft day with Lisa, my next door neighbour. It was once again my turn to design and prepare our card kit. I decided that it is high time I practised more with my Tim Holtz stains. So I set out my TH mat, some water colour paper, and lots of twine, found some sparkly buttons and cut up some Kraft card stock for card bases.
We were off and running! We made a few inky backgrounds and both loved every minute of it! Then we promptly ruined the first couple of toppers by wrecking what we stamped over them. Fits of giggles and then we managed to make some more inky goodness. Whew! We were both happy with our outcomes and Lisa headed home stating that she was going to make more!
Here is my first. We dabbed some stain onto the mat and then picked it up with a H2O brush. I found that made the stain really watery on the card, so we dabbed the stain dauber right onto the now wet area on the card, and then used the H2O pen to spread the stain. Not sure if that was the right way...but we liked how it turned out! Flicked a little water from our fingers on it...next time I will try a mini spray bottle.
The stamp is just one from the Michael's $1.50 bins. I bought a couple of these inspirational type stamps a couple of years ago. I found the stamp was large enough to make a statement on its own. I learned my lesson from the sentiment that failed on my last inky card!
I kept embellishments to a minimum. Just a sparkly button tied through a bit of fine jute twine.
I have not finished the inside as I am writing a letter inside to a friend.
****************This is card #4 of 50. I am on a consumables spending freeze until I have made 50 cards (Sook Wang tape and heavy weight card stock are exempt).***************
Recipe:
Card Base - Kraft card cut from my stash
Card stock - snippets of pink and Kraft from my stash
Embossing folder - Darice Woodgrain
Embellishments - Jute twine from my stash; glittery button from my stash
Bling - diamonds from my stash
Ink - Momento Ink for the image; Charcoal Colorbok Chalk Ink for the shading
Tim Holtz Stains - Broken China, Pickled Raspberry, Mustard Seed
Jute - fine jute twine from my stash
Stamp - Michael's dollar bins
I am entering this card in the following challenges.
1. Pixies Crafty Workshop - must use snippets
2. Two Peas In A Bucket April Mood Board Challenge
3. MFP Speedy TV Inspirational Challenge - #59 The eyes have it. I chose the colours of the middle photo for my inspiration.
4. Dream Valley Challenges - #80 Say it with Words
5. Crafty Calendar Challenge - Things with Wings
We were off and running! We made a few inky backgrounds and both loved every minute of it! Then we promptly ruined the first couple of toppers by wrecking what we stamped over them. Fits of giggles and then we managed to make some more inky goodness. Whew! We were both happy with our outcomes and Lisa headed home stating that she was going to make more!
Here is my first. We dabbed some stain onto the mat and then picked it up with a H2O brush. I found that made the stain really watery on the card, so we dabbed the stain dauber right onto the now wet area on the card, and then used the H2O pen to spread the stain. Not sure if that was the right way...but we liked how it turned out! Flicked a little water from our fingers on it...next time I will try a mini spray bottle.
The stamp is just one from the Michael's $1.50 bins. I bought a couple of these inspirational type stamps a couple of years ago. I found the stamp was large enough to make a statement on its own. I learned my lesson from the sentiment that failed on my last inky card!
I kept embellishments to a minimum. Just a sparkly button tied through a bit of fine jute twine.
I have not finished the inside as I am writing a letter inside to a friend.
****************This is card #4 of 50. I am on a consumables spending freeze until I have made 50 cards (Sook Wang tape and heavy weight card stock are exempt).***************
Recipe:
Card Base - Kraft card cut from my stash
Card stock - snippets of pink and Kraft from my stash
Embossing folder - Darice Woodgrain
Embellishments - Jute twine from my stash; glittery button from my stash
Bling - diamonds from my stash
Ink - Momento Ink for the image; Charcoal Colorbok Chalk Ink for the shading
Tim Holtz Stains - Broken China, Pickled Raspberry, Mustard Seed
Jute - fine jute twine from my stash
Stamp - Michael's dollar bins
I am entering this card in the following challenges.
1. Pixies Crafty Workshop - must use snippets
2. Two Peas In A Bucket April Mood Board Challenge
3. MFP Speedy TV Inspirational Challenge - #59 The eyes have it. I chose the colours of the middle photo for my inspiration.
4. Dream Valley Challenges - #80 Say it with Words
5. Crafty Calendar Challenge - Things with Wings
Monday, 10 March 2014
It's a guy thing
At one of our weekly craft days, it was my neigbour's turn to design the the card. I think she aced it with this great masculine card!
This is an auto scheduled post as I will be up at Mum's and have very little access to the internet. I will return all comments once I am back home!
I am entering thos card in the following challenges
1. Pixies Crafty Workshop - must use patterned paper
2. Crafty Hazelnut's Patterned Paper Challenge - must cover your card with paper
My card kit envelope contained a corrugated card, a piece of glittered silvery and gold paper, a piece of coppery Miri card, a decoupaged motorcycle image and a piece of fine silver stretchy cord.
This was a fun card to make. The stretchy cord was a great idea as you can tie a bow or a knot and still get it nice and tight. I am going to watch for something similar as it was so easy on my hands to tie a bow with this cord.
Here is a closeup of the decoupage...
This card will be perfect for a friend of ours who led the motorcycle division when he was in the police force.
I have left the inside blank as I am not sure the occasion I will use it for. The retired policeman friend has house parties a couple times a year and visit us up at the lake for a few days. I may keep it just as a note card or thank you note...Or may save it for his birthday.
I have been pretty good about finished the inside of about 95% of my cards. It has been made a bit easier as I generally know who I am going to give a card to and for what reason. That really helps plan what to put inside.
For the ones that are unknown, I have stamped a little drawer full of sentiments. I have done a few of my fave Birthday, Thank You and Hello sentiments in the three common colours of card I generally make...white, cream and of course kraft. That way, once I decide what I want to use the card for, I can just grab one and glue it down. I try to leave a couple of snippets of the front DP inside the card before I place it in the plastic sleeve. I can then use those when I add that sentiment.
I have left the inside blank as I am not sure the occasion I will use it for. The retired policeman friend has house parties a couple times a year and visit us up at the lake for a few days. I may keep it just as a note card or thank you note...Or may save it for his birthday.
I have been pretty good about finished the inside of about 95% of my cards. It has been made a bit easier as I generally know who I am going to give a card to and for what reason. That really helps plan what to put inside.
For the ones that are unknown, I have stamped a little drawer full of sentiments. I have done a few of my fave Birthday, Thank You and Hello sentiments in the three common colours of card I generally make...white, cream and of course kraft. That way, once I decide what I want to use the card for, I can just grab one and glue it down. I try to leave a couple of snippets of the front DP inside the card before I place it in the plastic sleeve. I can then use those when I add that sentiment.
This is an auto scheduled post as I will be up at Mum's and have very little access to the internet. I will return all comments once I am back home!
I am entering thos card in the following challenges
1. Pixies Crafty Workshop - must use patterned paper
2. Crafty Hazelnut's Patterned Paper Challenge - must cover your card with paper
Sunday, 2 March 2014
Christmas Card Club - Feature a Robin
Here is the third card I made from the banner card kits I made up for the weekly craft day with my neighbour. For this card I needed to feature a Robin as that is the Christmas Card Club theme chosen by Margaret at dutchess .
I used some of the Simple Stories 25 Days Of Christmas papers that I received from the lovely Aliwinn. After she made her 2013 Xmas cards, she posted a RAK on the Two Peas blog and gave away a huge box of her left over items. I won! Here is a photo of my wonderful package. There were papers, embellishments, stamps, a stencil, trimmings and much, much, more.
They have a lovely country, rugged feel...perfect for distressed cards and cards with a decided masculine feel. There are even papers for Project life type pages, or December Daily.
Here is the Robin card I made. I was on a bit of a roll to use up the last of the poinsettia images I had already coloured up. I used a K&Co 3D Robin and I think he fit the card quite well. I made him a little nest from some snippets of kraft card and he Martha Stewart branch punch. I inked some of them up a bit and left others untouched to try and gain a bit of depth to the nest.
Here is a close up of the bird. I had to add a bit of red chalk to make him into a robin...he started this life as another type of bird...but was given the chance to evolve! lol
And finally the arty shot...You will have to take my word that the inside is finished...you can just see the edge of the sentiment. The shots Itook turned out too wonky to show you!
Recipe:
Card base - 5 inch square cream card from my stash
DP - Background is from a Heidi Swap 6x6 pad...I can't find the style name anywhere on it...
DP - Flag, PP mats are all Simple Stories 25 Days Of Christmas
Cardstock - Kraft snippets and red velvet card teensy snippets for the snowflake layers, from my stash
Punches - Martha Stewart snowflake and also her branch punch
Bling - cream pearls from my stash
Embellishment - K&CO 3D bird
I am entering this card in the following challenges:
1. Pixies Crafty Workshop - must use snippets
2. Crafty Hazelnut's Christmas Challenge Extra - must be Christmas
3. Two Peas In A Bucket - Christmas All Year Long - March
4. MFP Speedy TV Christmas Card Challenge - must be Christmas
5. Crafty Hazelnut's Patterned Paper Challenge - must cover card with paper
6. Christmas Card Club - must be Christmas and Feature A Robin
I used some of the Simple Stories 25 Days Of Christmas papers that I received from the lovely Aliwinn. After she made her 2013 Xmas cards, she posted a RAK on the Two Peas blog and gave away a huge box of her left over items. I won! Here is a photo of my wonderful package. There were papers, embellishments, stamps, a stencil, trimmings and much, much, more.
They have a lovely country, rugged feel...perfect for distressed cards and cards with a decided masculine feel. There are even papers for Project life type pages, or December Daily.
Here is the Robin card I made. I was on a bit of a roll to use up the last of the poinsettia images I had already coloured up. I used a K&Co 3D Robin and I think he fit the card quite well. I made him a little nest from some snippets of kraft card and he Martha Stewart branch punch. I inked some of them up a bit and left others untouched to try and gain a bit of depth to the nest.
Here is a close up of the bird. I had to add a bit of red chalk to make him into a robin...he started this life as another type of bird...but was given the chance to evolve! lol
And finally the arty shot...You will have to take my word that the inside is finished...you can just see the edge of the sentiment. The shots Itook turned out too wonky to show you!
Recipe:
Card base - 5 inch square cream card from my stash
DP - Background is from a Heidi Swap 6x6 pad...I can't find the style name anywhere on it...
DP - Flag, PP mats are all Simple Stories 25 Days Of Christmas
Cardstock - Kraft snippets and red velvet card teensy snippets for the snowflake layers, from my stash
Punches - Martha Stewart snowflake and also her branch punch
Bling - cream pearls from my stash
Embellishment - K&CO 3D bird
I am entering this card in the following challenges:
1. Pixies Crafty Workshop - must use snippets
2. Crafty Hazelnut's Christmas Challenge Extra - must be Christmas
3. Two Peas In A Bucket - Christmas All Year Long - March
4. MFP Speedy TV Christmas Card Challenge - must be Christmas
5. Crafty Hazelnut's Patterned Paper Challenge - must cover card with paper
6. Christmas Card Club - must be Christmas and Feature A Robin
Thursday, 28 November 2013
Let's Talk Turkey
Happy Thanksgiving to all my American blogging friends. Hope this day finds you eating lots of yummy turkey, surrounded by family and celebrating the occasion!
Seemed only fitting to make a Thanksgiving card to join in on the festivities. We had Canadian Thanksgiving in October so I already had a lovely assortment of fall and Tday papers and embellies out on my desk. Since I still had snippets of Forever In Time, Autumn Art on my worktop, I decided to use up some more of that line. I have three different papers from this collection and managed to use pieces from all of them. I did not have to cut into any new papers at all, as I even used snippets of leftover 12x12 scrapbooking card stock.
I used a kraft corrugated card base and boy oh boy, do I love those corrugated bases. The enture outside of the kraft card is corrugated, so even though the DP covers most of the front, there is still the lovely side edge and back exposed. These are the cards that are quite thick. They have a double fold so you can comfortably fit a chocolate bar or small gift inside. It goes without saying that they are best suited to hand delivery!!!
The sentiment sticker is by Bo Bunny and I was worried that it was a bit small for this card. I stuck it to another snippet of card stock and fussy cut that into a mat. I wanted the scarecrows to show up so didn't want to use a Spellbinder die as it would obscure too much of the background.
Once I got the snippet of jute tied round the top layer, I felt like it needed something more. I cut a couple of Memory Box Woodland and Grove branches from a bit darker card stock, and tucked them under the jute. Then I thought they looked a little too bare, so I fussy cut some leaves out of one of the Autumn Art papers and glued them down at random, around the bottom of the branches. Not too fond of the dark one that sort of slid to the bottom of the card...but I am stuck with it there as the glossy accents had dried by the time I noticed it!!!
Recipe:
Card base and envelope - from my stash (Michael's Recollections corrugated kraft square card pack)
DP - Forever In Time, Autumn Art, and a snippet of wood grain MME
Cardstock - from my stash, snippets of rust, terracotta and brown card
Sentiment - Bo Bunny Sticker
Dies - Memory Box Woodland Branch and Grove Branch
Punches - Martha Stewart border punch
Jute - snippet from my stash
Glue - Glossy accents to adhere the branches to the card
I am entering this card in the following challenges:
1. Pixies Crafty Workshop - must use snippets
2. Simon says Stamp Wednesday Challenge - Anything Goes
3. Oozak Challenge - #26 Holidays and Anything Goes
4. Ribbon Carousel Challenge - Holidays and Celebrations
5. Craft Your Passion Challenges - # 190 Thanksgiving/Give Thanks
6. Make it Monday with Kraft Outlet - #148 So Thankful
7. The Paper Girls Challenge - #44 Time to Give Thanks
8. Word Art Wednesday - # 108 Anything goes with an uplifting sentiment
Seemed only fitting to make a Thanksgiving card to join in on the festivities. We had Canadian Thanksgiving in October so I already had a lovely assortment of fall and Tday papers and embellies out on my desk. Since I still had snippets of Forever In Time, Autumn Art on my worktop, I decided to use up some more of that line. I have three different papers from this collection and managed to use pieces from all of them. I did not have to cut into any new papers at all, as I even used snippets of leftover 12x12 scrapbooking card stock.
I used a kraft corrugated card base and boy oh boy, do I love those corrugated bases. The enture outside of the kraft card is corrugated, so even though the DP covers most of the front, there is still the lovely side edge and back exposed. These are the cards that are quite thick. They have a double fold so you can comfortably fit a chocolate bar or small gift inside. It goes without saying that they are best suited to hand delivery!!!
The sentiment sticker is by Bo Bunny and I was worried that it was a bit small for this card. I stuck it to another snippet of card stock and fussy cut that into a mat. I wanted the scarecrows to show up so didn't want to use a Spellbinder die as it would obscure too much of the background.
Once I got the snippet of jute tied round the top layer, I felt like it needed something more. I cut a couple of Memory Box Woodland and Grove branches from a bit darker card stock, and tucked them under the jute. Then I thought they looked a little too bare, so I fussy cut some leaves out of one of the Autumn Art papers and glued them down at random, around the bottom of the branches. Not too fond of the dark one that sort of slid to the bottom of the card...but I am stuck with it there as the glossy accents had dried by the time I noticed it!!!
Recipe:
Card base and envelope - from my stash (Michael's Recollections corrugated kraft square card pack)
DP - Forever In Time, Autumn Art, and a snippet of wood grain MME
Cardstock - from my stash, snippets of rust, terracotta and brown card
Sentiment - Bo Bunny Sticker
Dies - Memory Box Woodland Branch and Grove Branch
Punches - Martha Stewart border punch
Jute - snippet from my stash
Glue - Glossy accents to adhere the branches to the card
I am entering this card in the following challenges:
1. Pixies Crafty Workshop - must use snippets
2. Simon says Stamp Wednesday Challenge - Anything Goes
3. Oozak Challenge - #26 Holidays and Anything Goes
4. Ribbon Carousel Challenge - Holidays and Celebrations
5. Craft Your Passion Challenges - # 190 Thanksgiving/Give Thanks
6. Make it Monday with Kraft Outlet - #148 So Thankful
7. The Paper Girls Challenge - #44 Time to Give Thanks
8. Word Art Wednesday - # 108 Anything goes with an uplifting sentiment
Wednesday, 30 October 2013
All Hallows
I'm back with Little Mr P's card.
He is such a typical boy. He loves scaring people, popping out from hidden places to say Booo! and having fun on Halloween. He like bats and spiders and rustling leaves, so hopefully will enjoy this card.
He will be dressed up as Darth Vader when he opens this card. Tomorrow will be dress up day for him at Kindergarten as well.
I managed to use another piece of that ancient VOS paper for the background of his card too. I matted it with a snippet of black card stock again, roughed it up with the blade of my scissors, and adhered that to another corrugated cardboard square card.
I had a tree die cut in my stash. I had rolled it off at the local scrapbook store. They have a great selection of accucut dies that you can use for free. Thought I would use the tree on his card as he so enjoys walking through the crunchy leaves on the sidewalks on our morning walks up to the school. They always notice their surroundings and he has remarked about how many trees are completely bare now, when we walk up to school.
Another piece of the bargain ribbon, another Pink Paisley Twilight rectangle matted with black card and then I tucked the tree die cut overtop. I only had to add a couple more MME Wicked Merchant Malvado embellishments and I was nearly done. The "piece de resistance" is the Jolees Silhouettes Spider in the frame. Little Mr P loved the spiders my daughter put on the porch this year. He gets me to go out on the porch every morning since his Mum decorated, to ohh and ahhh over them!
Here is a close up of the Joleees Spider. He is going to love running his finger over the domed resin!
Here is a peek at the inside...
Think this is a world first for me...two cards in one day. Off to watch some British TV with DH before that 5:30 am alarm rings.
I am entering this card in the following challenges:
1. Pixies Crafty Workshop - must use snippets
2. Ribbon Carousel Challenge - must use spooled ribbon, theme Fall and Halloween
3. Sparkles Monthly Challenge - Halloween or colours orange, purple and black #49
4. Simon Says Stamp Wednesday Challenge - Anything Goes
5. MFP Friends of Speedy TV - Halloween
He is such a typical boy. He loves scaring people, popping out from hidden places to say Booo! and having fun on Halloween. He like bats and spiders and rustling leaves, so hopefully will enjoy this card.
He will be dressed up as Darth Vader when he opens this card. Tomorrow will be dress up day for him at Kindergarten as well.
I managed to use another piece of that ancient VOS paper for the background of his card too. I matted it with a snippet of black card stock again, roughed it up with the blade of my scissors, and adhered that to another corrugated cardboard square card.
I had a tree die cut in my stash. I had rolled it off at the local scrapbook store. They have a great selection of accucut dies that you can use for free. Thought I would use the tree on his card as he so enjoys walking through the crunchy leaves on the sidewalks on our morning walks up to the school. They always notice their surroundings and he has remarked about how many trees are completely bare now, when we walk up to school.
Another piece of the bargain ribbon, another Pink Paisley Twilight rectangle matted with black card and then I tucked the tree die cut overtop. I only had to add a couple more MME Wicked Merchant Malvado embellishments and I was nearly done. The "piece de resistance" is the Jolees Silhouettes Spider in the frame. Little Mr P loved the spiders my daughter put on the porch this year. He gets me to go out on the porch every morning since his Mum decorated, to ohh and ahhh over them!
Here is a close up of the Joleees Spider. He is going to love running his finger over the domed resin!
Here is a peek at the inside...
I am entering this card in the following challenges:
1. Pixies Crafty Workshop - must use snippets
2. Ribbon Carousel Challenge - must use spooled ribbon, theme Fall and Halloween
3. Sparkles Monthly Challenge - Halloween or colours orange, purple and black #49
4. Simon Says Stamp Wednesday Challenge - Anything Goes
5. MFP Friends of Speedy TV - Halloween
Spooky Greetings
Spooky greetings to you all!
It is so very close to Halloween and I still did not have my Halloween cards made for Little Miss C and Little Mr P!
Once we got back home from walking them to school this morning, I set off to my craft room and got this one finished up...this will be for Little Miss C as she loves animals. She will be dressed up as Dorothy from The Wizard of Oz when she opens this tomorrow! It is dress up costume day at school tomorrow.
I am continuing along in my campaign to use up VOS (very old supplies) and managed to find a snippet of paper that is at least 10 years old. It was originally part of an 8 1/2 x 11 Provo craft Pathways, Heartland paper stack that someone gave me for a present. It has papers that would have been considered old school, even ten years ago. So it was shoved into the dark recesses of the paper cupboards, languishing all these years.
I tore a bit and scuffed up the edges, inked it with purple chalk ink and matted it with a snippet of black card stock. I distressed the edges of that as well. Once that was affixed to my square corrugated kraft card, I added a K and Co carved pumpkin.
I stumbled across a 25 cent per yard/metre ribbon sale at my local scrapbook store. I picked up a few metres of assorted ribbons...the Halloween word ribbon I placed under the pumpkin, was one of them.
Not bad, eh? I have been trying so hard to add ribbon to my cards and usually struggle to find a place that it will look good. If you are not in the habit of using it, it can be hard at first to think of where to incorporate it into the design!
I added another snippet of black card under the Pink Paisley Twilight rectangle and popped a circular MME Wicked Merchant Maldavo 3D sticker element over the top right of it. I stuck 2 layers of black card behind the top half of the circle, and then trimmed it so it did not show. This way the sticker sticks perfectly level as half sits on the sentiment rectangle and half does not.
A little snippet of three MME Wicked Merchant Maldavo banners and I was done. Another one of my faster cards...perhaps I am on a roll.
Here is a closeup of that K and Co pumpkin...the inside of the mouth is heavily glittered...it makes the little mouse show up so well!
I kept the inside fairly simple.
Off to put up the front porch and front garden Halloween decorations and then I will settle back downstairs in my craft room till my second card is completed...see ya later!
This card is entered in the following challenges:
1. Pixies Crafty Workshop - must use snippets
2. Ribbon Carousel Challenge - must use spooled item, Halloween or Fall
3. Sparkles Monthly Challenge - Halloween or colours orange, purple and black
4. Simon Says Stamp Wednesday Challenge - Anything goes
5. MFP Friends of Speedy TV - Halloween
It is so very close to Halloween and I still did not have my Halloween cards made for Little Miss C and Little Mr P!
Once we got back home from walking them to school this morning, I set off to my craft room and got this one finished up...this will be for Little Miss C as she loves animals. She will be dressed up as Dorothy from The Wizard of Oz when she opens this tomorrow! It is dress up costume day at school tomorrow.
I am continuing along in my campaign to use up VOS (very old supplies) and managed to find a snippet of paper that is at least 10 years old. It was originally part of an 8 1/2 x 11 Provo craft Pathways, Heartland paper stack that someone gave me for a present. It has papers that would have been considered old school, even ten years ago. So it was shoved into the dark recesses of the paper cupboards, languishing all these years.
I tore a bit and scuffed up the edges, inked it with purple chalk ink and matted it with a snippet of black card stock. I distressed the edges of that as well. Once that was affixed to my square corrugated kraft card, I added a K and Co carved pumpkin.
I stumbled across a 25 cent per yard/metre ribbon sale at my local scrapbook store. I picked up a few metres of assorted ribbons...the Halloween word ribbon I placed under the pumpkin, was one of them.
Not bad, eh? I have been trying so hard to add ribbon to my cards and usually struggle to find a place that it will look good. If you are not in the habit of using it, it can be hard at first to think of where to incorporate it into the design!
I added another snippet of black card under the Pink Paisley Twilight rectangle and popped a circular MME Wicked Merchant Maldavo 3D sticker element over the top right of it. I stuck 2 layers of black card behind the top half of the circle, and then trimmed it so it did not show. This way the sticker sticks perfectly level as half sits on the sentiment rectangle and half does not.
A little snippet of three MME Wicked Merchant Maldavo banners and I was done. Another one of my faster cards...perhaps I am on a roll.
Here is a closeup of that K and Co pumpkin...the inside of the mouth is heavily glittered...it makes the little mouse show up so well!
I kept the inside fairly simple.
Off to put up the front porch and front garden Halloween decorations and then I will settle back downstairs in my craft room till my second card is completed...see ya later!
This card is entered in the following challenges:
1. Pixies Crafty Workshop - must use snippets
2. Ribbon Carousel Challenge - must use spooled item, Halloween or Fall
3. Sparkles Monthly Challenge - Halloween or colours orange, purple and black
4. Simon Says Stamp Wednesday Challenge - Anything goes
5. MFP Friends of Speedy TV - Halloween
Sunday, 20 October 2013
Christmas Card Club - On The Second Day Of Christmas
Sue P of Planet Susie chose the Christmas Card Theme this fortnight. She chose the Twelve Days of Christmas. This one was a lot of fun!
I searched through my Christmas stash looking for something to suit the brief...No luck there.
I looked through all my stamps...no luck again. I then though perhaps I might have golden rings in my Wedding themed embellishments...nada again.
Things were looking desperate...I thought I might have to hand draw 3 french hens!!! Oh my!
Just when I had given up and was further pawing through my embellies to create card kits for an up coming card crop...I found it! The perfect embellishment...two turtle doves! I nearly fell off my chair...I just needed to look through that Wedding section a little more carefully. These little birds were part of a 12 x 12 scrapbook page...the type you cut apart into little rectangles and use them for Project Life or something.
I thought they looked a little Un-Christmasy...you know what that means...yep...pull out the stickles bottle and go to town with it. Stardust stickles and me...we're pals! Attached at the hip, so to speak!
Here is a wee close up of the turtle doves...I never knew what they actually looked like till now! This photo more accurately depicts the stickles look IRL!
I decided to go for a bit of a country look to my card...a little vintage collage paper and some embellishments chosen more for their colours. Some kraft and canvas add to the country feel but the pearl brad and tub of stickles helped to make it more in the Christmas spirit.
When it came time to fit the sentiment on, I was truly stumped...I had used up all the best spots with my other embellies. I finally decided to make it look like the Christmas tree skirt!
Recipe
Card base and envelope - square white card from my stash.
Design paper - MME All Is Bright, from my stash
Card Stock - Kraft snippets from my stash
Tag and turtle doves - Cosmo Cricket, Ever After Elements from my stash (VOS, as is from 2009)
Pointsettia, Iy, and Christmas tree - K and Co from my stash
Canvas - cross stitch aida cloth picked up at the annual garage sale at the lake RV resort
Pearl Brad - from my stash
Die Cut - Spellbinders Fantastic Florals Two (corner die)
Sentiment - Can't remember the name and can't locate the package at the moment! Hangs head in shame...
Stickles - lashings of stardust stickles
I am entering this card in the following challenges.
1. Pixies Crafty Workshop - must use snippets
2. Marks Finest Papers Christmas Card Club - must be Christmas
3. Christmas Card Club - must be Christmas, 12 Days of Christmas
4. CHNC - must be Christmas
5, Sugar Creek Hollow - #72 Birds of a feather
6. Polkadoodles - Christmas is coming
7. C.R.A.F.T. Challenge - Christmas
8. Crafty Little Fairies - Christmas
9. Crimbo Crackers - Christmas Birds
10. Simon Says Stamp Wednesday Challenge- Christmas
I searched through my Christmas stash looking for something to suit the brief...No luck there.
I looked through all my stamps...no luck again. I then though perhaps I might have golden rings in my Wedding themed embellishments...nada again.
Things were looking desperate...I thought I might have to hand draw 3 french hens!!! Oh my!
Just when I had given up and was further pawing through my embellies to create card kits for an up coming card crop...I found it! The perfect embellishment...two turtle doves! I nearly fell off my chair...I just needed to look through that Wedding section a little more carefully. These little birds were part of a 12 x 12 scrapbook page...the type you cut apart into little rectangles and use them for Project Life or something.
Here is a wee close up of the turtle doves...I never knew what they actually looked like till now! This photo more accurately depicts the stickles look IRL!
When it came time to fit the sentiment on, I was truly stumped...I had used up all the best spots with my other embellies. I finally decided to make it look like the Christmas tree skirt!
Recipe
Card base and envelope - square white card from my stash.
Design paper - MME All Is Bright, from my stash
Card Stock - Kraft snippets from my stash
Tag and turtle doves - Cosmo Cricket, Ever After Elements from my stash (VOS, as is from 2009)
Pointsettia, Iy, and Christmas tree - K and Co from my stash
Canvas - cross stitch aida cloth picked up at the annual garage sale at the lake RV resort
Pearl Brad - from my stash
Die Cut - Spellbinders Fantastic Florals Two (corner die)
Sentiment - Can't remember the name and can't locate the package at the moment! Hangs head in shame...
Stickles - lashings of stardust stickles
I am entering this card in the following challenges.
1. Pixies Crafty Workshop - must use snippets
2. Marks Finest Papers Christmas Card Club - must be Christmas
3. Christmas Card Club - must be Christmas, 12 Days of Christmas
4. CHNC - must be Christmas
5, Sugar Creek Hollow - #72 Birds of a feather
6. Polkadoodles - Christmas is coming
7. C.R.A.F.T. Challenge - Christmas
8. Crafty Little Fairies - Christmas
9. Crimbo Crackers - Christmas Birds
10. Simon Says Stamp Wednesday Challenge- Christmas
Sunday, 29 September 2013
Holly Jolly Christmas
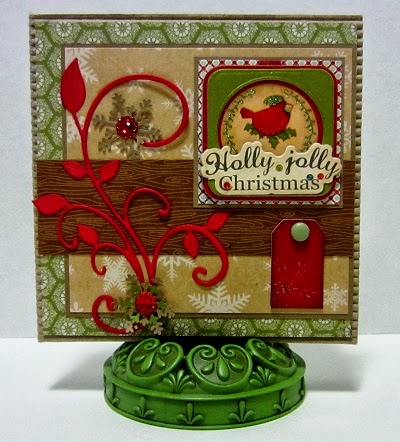
This is another of the cards I have made to give to kiddies at Christmas. This has certainly been a great way to use up my VOS...especially stash from the dollar store! Some of the elements would make a cardmaker shudder, but a kid would think they were heavenly!
The little square with the cardinal in reverse relief is the last of one huge sheet of 3D chipboard stickers. Can't believe I have managed to use up that whole sheet this year! The red tag with the green brad is from another package of dollar store items...I still have what seems like a zillion of these! They will get used on scrapbook pages and the cards my grandkids like to create.
Here is a closeup of the bit of sparkle on the tag.
The gorgeous red flourish was sent to me in a RAK from Sandra at Stamping for Pleasure. Pop on over there if you have time. She is currently running her September Rudolph day challenge. It is a great way to get your Christmas cards done and dusted before the busy Christmas season. I added a couple of snowflakes to the flourish...layered two colours for the bottom one and did a little haircut on the green layer! The center gem is a slim one from the dollar store that I am trying out to see if they will make it through the slot at the post office. In this case, I think the brad and the Holly Jolly chipboard are going to fail the slot...but that is OK, as this card will be hand delivered to a good friends little boy!
I managed to use some snippets of paper so will be dropping by Di's playground at Pixies Crafty Workshop. Her challenge is a great way to encourage you to use some snippets from your never ending pile. My kraft snowflake paper and the scrap of wood grain DP, as well as the kraft card stock, were all from my snippets. Feels good to make something from those scraps!
No recipe tonight as I am a wee bit overtired...had a busy, busy week and have to get up early as DH is driving our eldest daughter (Glamour Girl) to the airport. She is off for 10 weeks in Monaco again:(
I will try to write out the recipe tomorrow. Ten more days of hectic life and then I will settle into our winter routines. I always seem to get more crafting done in the late Fall and winter! I am squeezing in a trip to visit my Mum and my sister, before the icy roads make travelling to the Okanagan difficult. I so do not enjoy winter driving on the Coquihalla Hwy (nicknamed the Highway to Hell) There is actually a TV show called that, about the tow truck drivers and the rescues they do, on that highway. It is a 4 to 5 hours drive so I will stay there a few days.
I have been keeping up my errand walking on Wednesdays and Thursdays...when I head up to Mum's, I plan to walk into town for her errands. That way, I can still keep to my walking plan. It is a bit further to the shops in her village but that will be good for me. There are 2 benches along the route, so I will just sit for a minute along the way.
I am entering this card in the following challenges:
1. Pixies Crafty Workshop - must use snippets
2. CHNC Extra - must be Christmas
The little square with the cardinal in reverse relief is the last of one huge sheet of 3D chipboard stickers. Can't believe I have managed to use up that whole sheet this year! The red tag with the green brad is from another package of dollar store items...I still have what seems like a zillion of these! They will get used on scrapbook pages and the cards my grandkids like to create.
Here is a closeup of the bit of sparkle on the tag.
The gorgeous red flourish was sent to me in a RAK from Sandra at Stamping for Pleasure. Pop on over there if you have time. She is currently running her September Rudolph day challenge. It is a great way to get your Christmas cards done and dusted before the busy Christmas season. I added a couple of snowflakes to the flourish...layered two colours for the bottom one and did a little haircut on the green layer! The center gem is a slim one from the dollar store that I am trying out to see if they will make it through the slot at the post office. In this case, I think the brad and the Holly Jolly chipboard are going to fail the slot...but that is OK, as this card will be hand delivered to a good friends little boy!
I managed to use some snippets of paper so will be dropping by Di's playground at Pixies Crafty Workshop. Her challenge is a great way to encourage you to use some snippets from your never ending pile. My kraft snowflake paper and the scrap of wood grain DP, as well as the kraft card stock, were all from my snippets. Feels good to make something from those scraps!
No recipe tonight as I am a wee bit overtired...had a busy, busy week and have to get up early as DH is driving our eldest daughter (Glamour Girl) to the airport. She is off for 10 weeks in Monaco again:(
I will try to write out the recipe tomorrow. Ten more days of hectic life and then I will settle into our winter routines. I always seem to get more crafting done in the late Fall and winter! I am squeezing in a trip to visit my Mum and my sister, before the icy roads make travelling to the Okanagan difficult. I so do not enjoy winter driving on the Coquihalla Hwy (nicknamed the Highway to Hell) There is actually a TV show called that, about the tow truck drivers and the rescues they do, on that highway. It is a 4 to 5 hours drive so I will stay there a few days.
I have been keeping up my errand walking on Wednesdays and Thursdays...when I head up to Mum's, I plan to walk into town for her errands. That way, I can still keep to my walking plan. It is a bit further to the shops in her village but that will be good for me. There are 2 benches along the route, so I will just sit for a minute along the way.
I am entering this card in the following challenges:
1. Pixies Crafty Workshop - must use snippets
2. CHNC Extra - must be Christmas
Thursday, 19 September 2013
Not again!
Finally have a card to share. Just started to make the recipe list and had to chuckle. I am so predictable...sure enough, there is a K & Co embellishment on my card! Not again! It seems I use them on almost every Christmas card I make.
My image has been coloured for quite some time. Stamped twice and the wee flower fussy cut for some added double layer dimension. I stickled the leaves and the petals as it seemed too plain. Into the binder it went and has been launguishing in there for several months. Just could not decide how to make it look less plain.
Finally dragged it out and since I had one last acrylic whitewashed painted diecut left over from the butterfly cards, I popped it on there to add the look of a frame.
Here is a bit of a close up...
I have mentioned before that I do not like poinsettias in my house. I always manage to kill them off in no time flat. I have quite a green thumb with other plants...but it is only a matter of time before they start dropping their leaves like mad!
So I have decided the best poinsettia is one that I am giving away! Whether it be a plant, on a card, or even on giftwrap...I like to be giving it away...lol
I chose the sentiment Rejoice as a bit of a pun...Rejoice that this bloom is still alive!
Recipe
Card base - from my stash, Michaels Recollections brand, square corrugated cardboard
DP - My Minds Eye ( I think), snippet from my stash
Card Stock - snippets of green and kraft, from my stash
Dies - Spellbinders oval circle; Spellbinders floral Ovals; Quickcutz corner die;
tag
Punch - Martha Stewart snowflake
Embellishment - K and Co Glad Tidings Floral
Bling - pearls from my stash
Jute - snippet from my stash
Sentiment - rubon from my stash
I am entering this card in the following challenges:
1. Pixies Crafty Workshop - must use snippets
2. CHNC Extra - must be Christmas
3. CHNC - Challenge 142, Must be cut out (my poinsettia blossom is fussy cut and layered)
My image has been coloured for quite some time. Stamped twice and the wee flower fussy cut for some added double layer dimension. I stickled the leaves and the petals as it seemed too plain. Into the binder it went and has been launguishing in there for several months. Just could not decide how to make it look less plain.
Finally dragged it out and since I had one last acrylic whitewashed painted diecut left over from the butterfly cards, I popped it on there to add the look of a frame.
Here is a bit of a close up...
I have mentioned before that I do not like poinsettias in my house. I always manage to kill them off in no time flat. I have quite a green thumb with other plants...but it is only a matter of time before they start dropping their leaves like mad!
So I have decided the best poinsettia is one that I am giving away! Whether it be a plant, on a card, or even on giftwrap...I like to be giving it away...lol
I chose the sentiment Rejoice as a bit of a pun...Rejoice that this bloom is still alive!
Recipe
Card base - from my stash, Michaels Recollections brand, square corrugated cardboard
DP - My Minds Eye ( I think), snippet from my stash
Card Stock - snippets of green and kraft, from my stash
Dies - Spellbinders oval circle; Spellbinders floral Ovals; Quickcutz corner die;
tag
Punch - Martha Stewart snowflake
Embellishment - K and Co Glad Tidings Floral
Bling - pearls from my stash
Jute - snippet from my stash
Sentiment - rubon from my stash
I am entering this card in the following challenges:
1. Pixies Crafty Workshop - must use snippets
2. CHNC Extra - must be Christmas
3. CHNC - Challenge 142, Must be cut out (my poinsettia blossom is fussy cut and layered)
Sunday, 15 September 2013
Last of the butterflies
This is the last card from the series of inspirational cards I made up at the lake this summer. These cards were made from a single, small box of supplies. It was fun to see what I could create with those supplies and just how many cards I could make!
I did not have a fine copic liner pen with me ...or any pen for that matter. Not that we are home, I can not decide whether to draw on some antennae on the butterfly, or leave it as is...
I have left the sentiment blank. Once I know what I will use this card for (birthday, get well, hello, etc) then I will add an appropriate sentiment inside. I may even draw some antennae on at that time!
Here is a close up of the focal point. I kept it very simple...just a few diamonds scattered here and there on the DP and of course a row down the center of the chipboard butterfly.
I did not have a fine copic liner pen with me ...or any pen for that matter. Not that we are home, I can not decide whether to draw on some antennae on the butterfly, or leave it as is...
I have left the sentiment blank. Once I know what I will use this card for (birthday, get well, hello, etc) then I will add an appropriate sentiment inside. I may even draw some antennae on at that time!
Here is a close up of the focal point. I kept it very simple...just a few diamonds scattered here and there on the DP and of course a row down the center of the chipboard butterfly.
Recipe
Card Base - from my stash, Michaels Recollections brand square white textured card & envelope
DP - Prima Lyric
Cardstock - Kraft snippet from my stash
Chipboard - butterfly from my stash, bargain bins at Michaels
Bling - from my stash
Paint - ivory acrylic paint
I am entering this card in the following challenges
1. Pixies Crafty Workshop - must use snippets
2. Sparkles - Fairies or butterflies
Thursday, 12 September 2013
Another Chocolate Bar Card
Finished up another Kids Christmas Card. The corrugated card base is folded twice at the top, creating a bit of extra depth...just right for sliding a chocolate bar or an envelope of Hot Chocolate inside.
This will go to a little boy, maybe even the little boy next door. I made his sister's already...it was the blue mug of hot chocolate card I posted in August. This one has a decidedly masculine feel so should be just right for this little guy.
I know you all must be surprised to see ribbon on this card. I rarely use ribbon myself although I do love it on others cards. Mostly because I never remember to put it on until it is too late! I like to wrap the edges under something to anchor them. That takes planning...lol
So my new thing is to try and include a piece of of ribbon when I choose the bits and bobs to create my card. Hopefully this new process will help me to remember to use it! I do have a lot of ribbon and brought even more back from England. So expect to see ribbon in use here!
This card went together easily. It uses up more dollar store chipboard elements that I have had for a few years. I am trying to use up some of those items that perhaps a cardmaker would not love to see on her card...but a kid would love! The bigger the better...right? I even managed to use up another of the teensy kraft flowers...Bonus!
I also roughed up the edges of the DP on this card, to give it a bit of a rugged look. Kind of in keeping for a masculine card.
Recipe
Card base - square corrugated card and envelope, from my stash (Michael's Recollections)
Cardstock - snippets of dark green and kraft from my stash
DP - MME
Dies - Quickcuts corner die
Punch - Martha Stewart snowflake and Martha branch
Poinsettia - from my stash, Scrapbook Sally poinsettias
Ribbon - from my stash (eons old) maker unknown
Bling - red pearls from my stash
Brad - red brad from my stash
I am entering this card in the following challenges
1. Pixies Crafty Workshop - must use snippets
2. CHNC Extra - must be Christmas
3. MFP Speedy TV Christmas Card Club - must be Christmas
4. Sister Act - always anything goes
5. CHNC - Challenge 141, Layer it up
6. The Glory Of Christmas - Anything Goes # 15
This will go to a little boy, maybe even the little boy next door. I made his sister's already...it was the blue mug of hot chocolate card I posted in August. This one has a decidedly masculine feel so should be just right for this little guy.
I know you all must be surprised to see ribbon on this card. I rarely use ribbon myself although I do love it on others cards. Mostly because I never remember to put it on until it is too late! I like to wrap the edges under something to anchor them. That takes planning...lol
So my new thing is to try and include a piece of of ribbon when I choose the bits and bobs to create my card. Hopefully this new process will help me to remember to use it! I do have a lot of ribbon and brought even more back from England. So expect to see ribbon in use here!
This card went together easily. It uses up more dollar store chipboard elements that I have had for a few years. I am trying to use up some of those items that perhaps a cardmaker would not love to see on her card...but a kid would love! The bigger the better...right? I even managed to use up another of the teensy kraft flowers...Bonus!
I also roughed up the edges of the DP on this card, to give it a bit of a rugged look. Kind of in keeping for a masculine card.
Recipe
Card base - square corrugated card and envelope, from my stash (Michael's Recollections)
Cardstock - snippets of dark green and kraft from my stash
DP - MME
Dies - Quickcuts corner die
Punch - Martha Stewart snowflake and Martha branch
Poinsettia - from my stash, Scrapbook Sally poinsettias
Ribbon - from my stash (eons old) maker unknown
Bling - red pearls from my stash
Brad - red brad from my stash
I am entering this card in the following challenges
1. Pixies Crafty Workshop - must use snippets
2. CHNC Extra - must be Christmas
3. MFP Speedy TV Christmas Card Club - must be Christmas
4. Sister Act - always anything goes
5. CHNC - Challenge 141, Layer it up
6. The Glory Of Christmas - Anything Goes # 15
Thursday, 29 August 2013
Fly
I think I saved the best for last...and gave it an appropriate name.
We fly home from our month in England today. By the time you are reading this we will be sitting in our recliners, trying to keep our eyes open as we cope with the jetlag from the flight back home.
This is the last and my personal favourite of all the cards I made in July, up at the lake. I really managed to use up quite a few of the teensy Prima flowers... only 7 zillion left to go...lol
I made a little mistake on this card...I over generously dabbed the cream paint on the Spellbinders fancy label. It was so whitish that the butterfly did not stand out. I had one die cut left so I repeated the process and tried to be a bit more stingy with the paint. Rather than throw out the extra whitewashed die cut, I layered it under the correct version, giving the look of a bit of a shadow. I pop dotted the correct one forward and I am really happy with how it looks now. I have included a couple of closeup so you can see the layers up close.
Recipe
Card base - From my stash; Michaels Recollections brand square textured card set
DP - Prima Lyric
Card Stock - Kraft snippets from my stash
Dies - Spellbinders Fancy Tags 2, Impression Obsession flag dies
Chipboard - from my stash; Michaels dollar bins
Bling - from my stash
Flowers - from my stash; Prima and and dollar store teensy kraft flowers
Sentiment letters - from my stash; Bo Bunny card stock sticker letters
Paint - Acrylic Cream paint
I am entering this card in the following challenges
Pixies Crafty Workshop - must use snippets (my die cuts were made with snippets)
We fly home from our month in England today. By the time you are reading this we will be sitting in our recliners, trying to keep our eyes open as we cope with the jetlag from the flight back home.
This is the last and my personal favourite of all the cards I made in July, up at the lake. I really managed to use up quite a few of the teensy Prima flowers... only 7 zillion left to go...lol
I made a little mistake on this card...I over generously dabbed the cream paint on the Spellbinders fancy label. It was so whitish that the butterfly did not stand out. I had one die cut left so I repeated the process and tried to be a bit more stingy with the paint. Rather than throw out the extra whitewashed die cut, I layered it under the correct version, giving the look of a bit of a shadow. I pop dotted the correct one forward and I am really happy with how it looks now. I have included a couple of closeup so you can see the layers up close.
Recipe
Card base - From my stash; Michaels Recollections brand square textured card set
DP - Prima Lyric
Card Stock - Kraft snippets from my stash
Dies - Spellbinders Fancy Tags 2, Impression Obsession flag dies
Chipboard - from my stash; Michaels dollar bins
Bling - from my stash
Flowers - from my stash; Prima and and dollar store teensy kraft flowers
Sentiment letters - from my stash; Bo Bunny card stock sticker letters
Paint - Acrylic Cream paint
Pixies Crafty Workshop - must use snippets (my die cuts were made with snippets)
Saturday, 24 August 2013
Hot Chocolate for August Rudolph Day
This is a scheduled post as I am still on holidays.
I am still in Filey and having a wonderful time. On Thursday I took the train into Scarborough and was met by Sue P of Planet Suzie and her lovely husband Graham as well as Sue J of Olliesmam and her lovely husband Paul.
It waqs so much fun! Both these ladies are just a fun IRL as they appear to be on their blogs. We chatted and had a hoot! After a cold drink to cool off from the beautiful sunny weather, we headed down to the harbour area to have some fish and chips. As we walked, I kept saying that I wished I could remember the name of the place my cousin took me to on my last visit.That was 6 years ago and I just could not recall the name. Suddenly I saw it. Oh...how did I ever forget! It is called Winking Willy's!!!
We three girls exploded with laughter! The meal was lovely. We all chatted and laughed and had a grand visit. We walked up to the ice cream place afterwards and had a cone...delicious! Just a perfect day at the seaside.
It is the 25th of the month, so it is time to join in over at the Stamping for Pleasure blog and take part in Rudolph Days. Sarn runs this challenge on the 25th of each month...just make a Christmas card between the 25th and the last day of the month and drop by her blog and link it up!
This card is also for my Christmas Card Club where Sue C's theme is Anything goes.
Taking part in these two challenges ensures a good number of my Christmas are made up ahead and reduces the stress of trying to create cards in the busy Christmas season.
This one is another NBUS and snippets Christmas card. I kept the design simple as this will be a kid's card! It is a good feeling to get this "schtuff" (as Darnell would say), used up!
This is just really a quick and easy card. Added 2 sheets of DP to a corrugated card base. Added 2 chipboard elements from the dollar store that I have had ferreted away for so long that it is embarassing...and it was almost done.
Just needed a little something extra...I noticed that there was a touch of pale purple on the chipboard...so pulled out a snippet of pale purple card stock and die cut the corner pieces... a little bling on the die cuts and voila...a cute kiddie card to tuck an envelope of gourmet Hot Chocolate in...perfect for my crafty neighbour's little girl! These corrugated card have a double fold for the spine...they actually will hold a chocolate bar or a packet of fancy Hot Chocolate for a child...or a pretty snowflake ornament for an adult...perfect for a hostess gift inside!
Best of all I used up some of the dreaded purple scraps...as you all know by now, it is just not one of my fave colours!
Recipe
Card base - from my stash; Michaels corrugated square card and envelope
DP - 2 snippets of MME
Card stock - 2 snippets of purple card stock pressed into service as corners
Chipboard - Dollar Store chipboard Sticker sheet (still have a couple more pieces to use up)
Bling - from my stash
Twine - from my stash
I am entering this card intot he following challenge
1. Pixies Crafty Workshop - must use snippets
2. CHNC Extra - must be Christmas and Anything Goes
3. MFP Speedy TV Christmas Card Challenge- Must be Christmas and Anything goes
4 Stamping for Pleasure- Rudolph Days - must be Christmaqs
5. Christmas Card Club - Anything Goes
Wednesday, 21 August 2013
Robin Red Breast
This is a scheduled post as I am still on holidays. I am in Filey, North Yorkshire enjoying a beach chalet style of life with Dh's cousin and his lovely wife. They keep a beach chalet year round and have decorated it in a British Flag theme. I will post pictures once home as it is truly fabulous!
We have a great routine of beach mornings with the dog and then home for lunch and on to other plans for the day. The days seem to unfold with a relaxed, idyllic style and it is wonderful.
I do have a card to share, another from my cardmaking blitz this summer up at the lake.
The card is a little too plain for my liking but I was really getting to the bottom of the bit and bobs I brought up to the lake. It was getting hard to be as creative when I was running out of supplies! I was chanting Less Is More, over and over as I made it...but it did not help!
I do love the robin though...and I have come to the realization that I must love K & Co too! I have noticed that more often than not, when I go to write my card recipe, there it is, K & CO, listed over and over...shame they are not sponsoring me!
I just seem to pick up their 3D sheets whenever they go on sale...that way I have some pretty elements ready when my mojo goes walkabout.
This Less is More card has 5 elements...a piece of DP, a kraft card stock die cut, a piece of chipboard from you know where, a K & Co 3D robin and some diamond bling. That is it! I even managed to keep the lid on the cream paint this time!
Here is a close up of the detail of the K & Co 3D bird.
This is another one that will go into the inspirational cards box...I may use it to write a letter or I may stamp a sentiment inside later...it just depends on the individual circumstance when it is called into play!
No recipe today as this card is so easy and I have already basically listed everything in the narrative above.
Since I did manage to employ one measly snippet of kraft card stock for the die cut, I will take this card over to Di @ Pixies Crafty Workshop - must use snippets, and join in the fun.
I will appologize to the others who have joined in there, this week. While on holidays I am not getting round to my usual visiting and comments. Usually, I try to visit everyone who drops by Di's Pixies Crafty Workshop...Will return to visiting you all again, when we are back home.
We have a great routine of beach mornings with the dog and then home for lunch and on to other plans for the day. The days seem to unfold with a relaxed, idyllic style and it is wonderful.
I do have a card to share, another from my cardmaking blitz this summer up at the lake.
The card is a little too plain for my liking but I was really getting to the bottom of the bit and bobs I brought up to the lake. It was getting hard to be as creative when I was running out of supplies! I was chanting Less Is More, over and over as I made it...but it did not help!
I do love the robin though...and I have come to the realization that I must love K & Co too! I have noticed that more often than not, when I go to write my card recipe, there it is, K & CO, listed over and over...shame they are not sponsoring me!
I just seem to pick up their 3D sheets whenever they go on sale...that way I have some pretty elements ready when my mojo goes walkabout.
This Less is More card has 5 elements...a piece of DP, a kraft card stock die cut, a piece of chipboard from you know where, a K & Co 3D robin and some diamond bling. That is it! I even managed to keep the lid on the cream paint this time!
Here is a close up of the detail of the K & Co 3D bird.
This is another one that will go into the inspirational cards box...I may use it to write a letter or I may stamp a sentiment inside later...it just depends on the individual circumstance when it is called into play!
No recipe today as this card is so easy and I have already basically listed everything in the narrative above.
Since I did manage to employ one measly snippet of kraft card stock for the die cut, I will take this card over to Di @ Pixies Crafty Workshop - must use snippets, and join in the fun.
I will appologize to the others who have joined in there, this week. While on holidays I am not getting round to my usual visiting and comments. Usually, I try to visit everyone who drops by Di's Pixies Crafty Workshop...Will return to visiting you all again, when we are back home.
Thursday, 15 August 2013
A Day To Remember
This is a scheduled post as I am on holidays! I have written these posts up at the lake before we headed home to do a little much needed watering and weeding in the garden. After a few days of hard work we were rewarded with the start of our holiday in England.
We are around the half way mark now and so far have been to the London area to see my cousin.She and her friend took us to Oxford for the day. We read about the history, enjoyed the architecture and also got a kick out of seeing the spots where one of our favourite TV shows, Lewis, was filmed. Lewis just ended on Canadian TV so it was such great fun that they chose Oxford for our outing that day!.
They also took us to the Imperial War Museum where DH says he could have stayed for 2 days! He just loved it. Next up was a trip to Dunstable to see the kite fliers and the paragliders, the views there are spectacular. It was hard to say goodbye to them...they are such lovley people and always knock themselves out to ensure we have a memorable stay!
Next stop on the itinerary was Hampshire. I had a day of fun meeting up with Di of Pixies Crafty Workshop and Sam of Hettiecraft. We went to a wonderful craft store called Flutterby's where I loaded up on Wild Rose Studio stamps and a good many other treasures. We picked up Mr Scrappymo and headed off to see Highclere Castle. It was wonderful. I really enjoyed our day out and will never forget how much they went out of their way to welcome me. Sam drove hours to meet me as she lives in Wales!!!
They were both very gracious about Mr Scrappymo tagging along as he is very reserved and nearly jumped out of his skin to have to meet up with "strangers"...Oh my, little does he know about bloggy friends! He seemed to be permanantly attached to my hip and strode through that castle with what seemed like a determination to be done! Then announced that he loved the castle! Thank goodness he managed to walk about the grounds on his own and then we could have a good chat and catch up, and sadly the day soon ended...
Here is a picture Di took of the three of us...We did not bring a laptop and as my camera has about 2000 photos on it I do not want to download them onto my cousins poor laptop in order to show you any of mine! Will do a picutre heavy post when I am home!
Left is Di, I am in the center and Sam (Hettie) is on the right. I am a big lady and struggled a bit with the weather as it was quite muggythat day, so I think I am looking a little overheated!
After Highclere, we left for Whitehaven, the seaport town beside the wee village of Cleator where my Gran was from. We took day trips into the Lake District and toured Windermere, Grasmere, Amberside, Ullswater, Keswick and many more. We took different routes home each day so have traveled over various narrow, mountain passes and have seen so many of the gorgeous views of Cumbria.
We had a great day out with my cousin and his wife at the Lowther Show. DH climbed up a hill and called us over and we just managed to see the horse and wagons riding round. The funniest thing there that day was a dog race where 3 dogs were suposed to chase a cloth baited with scent around a circular track.
Well the 2 larger dogs were off like a flash, chasing the scent like crazy and then out came a wee little dog who lagged behind for a few steps and then it noticed that the bait was half way round the circle...so it just cut across the track and grabbed the bait and won! It was so funny!
We stayed with my cousin and his wife, two of the most wonderful people and they went out of their way to ensure our time with them was memorable. We had outings with my other cousin and my Aunt and we toured about Cumbria, we ate fabulously, we laughed and we laughed some more. This other cousin is a ace at directions and map reading, he soon had DH sorted about the best roads to take. My aunt is still spry and very nimble on her feet, she lept into the SUV with no problems at all! I took 3 times as long to get in and out...lol
It was so hard to bid them goodbye! Family ties across an ocean are wonderful but leaving is so hard.
We arrived in Filey today and plan to be down on the beach in the morning for coffee and a bacon butty!
I will soon meet with Sue J from Ollismam and Sue P from Planet Susie and hopefully Jo from A little Piece of Me and her lovely daughter Bex from Rebecca's Craft Corner.
So on with my scheduled post...
Perhaps the title almost fooled you ...bet you thought it was going to be another one of my local area posts...nope...finally have a card to share with you!
This is for my finished birthday card box. I wanted something feminine and girly but still keeping with the shabby chic look I have been making up here at the lake . I only have that one small box of supplies with me this time, so many of my cards are going to look a bit similar...DP, Kraft die cuts, bit of paint, some chipboard, bling and maybe the odd flower...do you see a pattern here... lol
I know it is quite similar to my Silhouettes post but C'est la vie!
I had a little chuckle when I posted this photo...it has an escaped little diamond attached where it does not belong. When I was placing the diamonds on the corner die, I kept dropping them...I found all but one of them. I looked high and low on the table , on my clothes and on the floor...of course I did not find it as it had attached itself to the oval fancy die edge, just above the middle left edge. lol
It has since been plucked off and is currently banished to the naughty chair!!!
I was so happy that I managed to pull the errant diamond off without tearing the kraft paper (as I usually do in these situations). I was so happy about it that I redid the photo... lol
Here is a little closeup of the blinged up corner die. Did you notice that I managed to use up a couple more of the tiny flowers...Yay! I think this one will make a pretty birthday card.
Recipe:
Card base - From my stash; Michaels Recollections brand square textured card set
DP - First Edition Spring Feast 6x6 paper pad
Card Stock - Kraft snippets from my stash
Dies - Spellbinders Floral Ovals and Spellbinders Fancy Ribbons Die and
Spellbinders Fantastic Florals Two corner
Chipboard - from my stash; Michaels dollar bins
Bling - from my stash
Sentiment- from my stash; 7 Gypsies, Trousseau
We are around the half way mark now and so far have been to the London area to see my cousin.She and her friend took us to Oxford for the day. We read about the history, enjoyed the architecture and also got a kick out of seeing the spots where one of our favourite TV shows, Lewis, was filmed. Lewis just ended on Canadian TV so it was such great fun that they chose Oxford for our outing that day!.
They also took us to the Imperial War Museum where DH says he could have stayed for 2 days! He just loved it. Next up was a trip to Dunstable to see the kite fliers and the paragliders, the views there are spectacular. It was hard to say goodbye to them...they are such lovley people and always knock themselves out to ensure we have a memorable stay!
Next stop on the itinerary was Hampshire. I had a day of fun meeting up with Di of Pixies Crafty Workshop and Sam of Hettiecraft. We went to a wonderful craft store called Flutterby's where I loaded up on Wild Rose Studio stamps and a good many other treasures. We picked up Mr Scrappymo and headed off to see Highclere Castle. It was wonderful. I really enjoyed our day out and will never forget how much they went out of their way to welcome me. Sam drove hours to meet me as she lives in Wales!!!
They were both very gracious about Mr Scrappymo tagging along as he is very reserved and nearly jumped out of his skin to have to meet up with "strangers"...Oh my, little does he know about bloggy friends! He seemed to be permanantly attached to my hip and strode through that castle with what seemed like a determination to be done! Then announced that he loved the castle! Thank goodness he managed to walk about the grounds on his own and then we could have a good chat and catch up, and sadly the day soon ended...
Here is a picture Di took of the three of us...We did not bring a laptop and as my camera has about 2000 photos on it I do not want to download them onto my cousins poor laptop in order to show you any of mine! Will do a picutre heavy post when I am home!
Left is Di, I am in the center and Sam (Hettie) is on the right. I am a big lady and struggled a bit with the weather as it was quite muggythat day, so I think I am looking a little overheated!
After Highclere, we left for Whitehaven, the seaport town beside the wee village of Cleator where my Gran was from. We took day trips into the Lake District and toured Windermere, Grasmere, Amberside, Ullswater, Keswick and many more. We took different routes home each day so have traveled over various narrow, mountain passes and have seen so many of the gorgeous views of Cumbria.
We had a great day out with my cousin and his wife at the Lowther Show. DH climbed up a hill and called us over and we just managed to see the horse and wagons riding round. The funniest thing there that day was a dog race where 3 dogs were suposed to chase a cloth baited with scent around a circular track.
Well the 2 larger dogs were off like a flash, chasing the scent like crazy and then out came a wee little dog who lagged behind for a few steps and then it noticed that the bait was half way round the circle...so it just cut across the track and grabbed the bait and won! It was so funny!
We stayed with my cousin and his wife, two of the most wonderful people and they went out of their way to ensure our time with them was memorable. We had outings with my other cousin and my Aunt and we toured about Cumbria, we ate fabulously, we laughed and we laughed some more. This other cousin is a ace at directions and map reading, he soon had DH sorted about the best roads to take. My aunt is still spry and very nimble on her feet, she lept into the SUV with no problems at all! I took 3 times as long to get in and out...lol
It was so hard to bid them goodbye! Family ties across an ocean are wonderful but leaving is so hard.
We arrived in Filey today and plan to be down on the beach in the morning for coffee and a bacon butty!
I will soon meet with Sue J from Ollismam and Sue P from Planet Susie and hopefully Jo from A little Piece of Me and her lovely daughter Bex from Rebecca's Craft Corner.
So on with my scheduled post...
Perhaps the title almost fooled you ...bet you thought it was going to be another one of my local area posts...nope...finally have a card to share with you!
This is for my finished birthday card box. I wanted something feminine and girly but still keeping with the shabby chic look I have been making up here at the lake . I only have that one small box of supplies with me this time, so many of my cards are going to look a bit similar...DP, Kraft die cuts, bit of paint, some chipboard, bling and maybe the odd flower...do you see a pattern here... lol
I know it is quite similar to my Silhouettes post but C'est la vie!
I had a little chuckle when I posted this photo...it has an escaped little diamond attached where it does not belong. When I was placing the diamonds on the corner die, I kept dropping them...I found all but one of them. I looked high and low on the table , on my clothes and on the floor...of course I did not find it as it had attached itself to the oval fancy die edge, just above the middle left edge. lol
It has since been plucked off and is currently banished to the naughty chair!!!
I was so happy that I managed to pull the errant diamond off without tearing the kraft paper (as I usually do in these situations). I was so happy about it that I redid the photo... lol
Here is a little closeup of the blinged up corner die. Did you notice that I managed to use up a couple more of the tiny flowers...Yay! I think this one will make a pretty birthday card.
Recipe:
Card base - From my stash; Michaels Recollections brand square textured card set
DP - First Edition Spring Feast 6x6 paper pad
Card Stock - Kraft snippets from my stash
Dies - Spellbinders Floral Ovals and Spellbinders Fancy Ribbons Die and
Spellbinders Fantastic Florals Two corner
Chipboard - from my stash; Michaels dollar bins
Bling - from my stash
Sentiment- from my stash; 7 Gypsies, Trousseau
I am entering this card in the following challenges
Pixies Crafty Workshop - must use snippets
Sunday, 4 August 2013
Blooms and butterflies do sparkle
Here is another from the series of inspirational cards I made while up at the lake in July. Remember, I had a minimum of supplies, so made up a dozen cards sans stamped images!
I thought this snippet of patterned design paper had enough strength to carry off the butterfly and die. After adding the corner die, I fet it looked a little bare in the top left so I made a flag strip and added a sentiment. I had to search for a word that was appropriate...after making so many cards, that page of pre-printed words was getting low on inspirational words...I added some bling to the flag to help balance the card and then found Sparkle!
Seemed appropriate....
I only brought a bunch of snippets of Kraft cardstock and barely had any left. After painting it and then rubbing off some paint, this flag piece got extra shabby...I hand cut another sliver and tucked it behind to make it match the other elements...much better now. Wish that die came with the option of cutting a shadowed, backing piece as my hand cutting is not always the best.
Here is a close up
This yet another card that will need antennae added once I return home...can not remember to pack everything it seems...I left my fine copic marker back at home...once added I will pop a diamond at the end of each and it will be done
Recipe
Card Base and Envelope - from my stashl Michaels Recollections brand square textured card
DP - unknown scrap from my snippets box
Card Stock - kraft snippets
Bling - frommy stash
Cream paint - from my stash
Die - flag banner is Impression Obsession; corner die is Spellbinders Fantastic Florals Two and Oval die is Spellbinders floral ovals
Chipboard - from my stash; Michaels dollar bins
I am entering this card in the following challenges
Pixies Crafty Workshop - must use snippets
I thought this snippet of patterned design paper had enough strength to carry off the butterfly and die. After adding the corner die, I fet it looked a little bare in the top left so I made a flag strip and added a sentiment. I had to search for a word that was appropriate...after making so many cards, that page of pre-printed words was getting low on inspirational words...I added some bling to the flag to help balance the card and then found Sparkle!
Seemed appropriate....
I only brought a bunch of snippets of Kraft cardstock and barely had any left. After painting it and then rubbing off some paint, this flag piece got extra shabby...I hand cut another sliver and tucked it behind to make it match the other elements...much better now. Wish that die came with the option of cutting a shadowed, backing piece as my hand cutting is not always the best.
Here is a close up
This yet another card that will need antennae added once I return home...can not remember to pack everything it seems...I left my fine copic marker back at home...once added I will pop a diamond at the end of each and it will be done
Recipe
Card Base and Envelope - from my stashl Michaels Recollections brand square textured card
DP - unknown scrap from my snippets box
Card Stock - kraft snippets
Bling - frommy stash
Cream paint - from my stash
Die - flag banner is Impression Obsession; corner die is Spellbinders Fantastic Florals Two and Oval die is Spellbinders floral ovals
Chipboard - from my stash; Michaels dollar bins
I am entering this card in the following challenges
Pixies Crafty Workshop - must use snippets
Subscribe to:
Posts (Atom)