Pages

Tuesday, 25 April 2017

April Rudolph Days Challenge

Once again it is time for the Rudolph Days Challenge.

Here are the rules for your perusal:

 1. The Rudolph Days Challenge will start each month on the 25th, and will close at midnight PST, on the last day of that month.
2. The theme is always Anything Goes, as long as it is Christmas.
3. One entry per person and you just need to enter one Christmas card or Christmas project.
4. You may combine your entry with other challenges (maximum of 10 in total).
5. Your card (or Christmas project) should not have been previously posted to your blog. It should be posted to your blog during the current months Rudolph Days Challenge, (between the 25th and last day of the current month)
6. Please link back to or at least mention, the Rudolph Days Challenge.
7. Please leave a comment on the challenge post.
8.   The winner will be selected by random draw and announced on the first day of the following month. Prizes will be mailed anywhere in the world.

Our designers have been busy this month. They have some beautiful Christmas Creations to inspire you!

First up is Linda of Snails Space with this adorable reindeer card. The image is a sweetie and I like the soft blues sky and the crisp white snow! 

Linda is amazing in her commitment to her design team duties. She battles arthritis and just had a knee replacement at Christmas. She has been busy with physio and walking for her recovery, 

She is now having a hip replacement as well! If she does not get round to visit you, I sure that means she is busy with her recovery duties!

Hope you will share my good wishes for a successful surgery and a path to a new life, less burdened by joint pain.  


Dr. Sonia at  Cards, Crafts, Kid's Projects   has been very busy creating this amazing Christmas project. She always has fabulous directions on her blog, so I suggest you pop right on over to learn how to make one too! I know I am looking forward to giving this a go.

I can not wait to show this treasure to my grandkids. They love to create arty projects too...especially at Christmas time!


Liz at Crafty Sunflower is our guest designer this month. She has made this beautiful illuminated angel card. This is such a stunning diecut. I love this cut image. The embossed panel accented by the white bling, sets off the die cut angel so well. 

I have this die and have never opened the package. It is in my NBUS Christmas box. Hopefully Liz has inspired me to crack that package open!


Here is my card for April. This is another funny, quirky card. Not my usual style at all, but I must say that I had a lot of fun making it. My NBUS item is the Stampendous Changito Santa. This stamp was in a box full of stamps that I picked up quite some time ago on our local Bidding Wars site, for the princely sum of six dollars. I think there were about a dozen stamps in that box. At 50 cents a stamp, that was good value for money!


Red card mat and the holly DP were snippets. Red striped DP is a snippet from a 12x12 scrapbook sheet. The white card was embossed with a Stampin' Up Softly Falling EF. 

Coloured with copics and then did the white fur trim with a Wink Of  Stella Clear pen. So liked the look of it, that I outlined all the black outlines of the image and went over all the copic colouring as well! I think you can see it better in this close up shot.


This card is a little late (due last Sunday), but also stands as my Christmas Card Club entry.  Mrs A at Valery Anne Designs chose the theme of Humorous! If you want to check out the other ladies cards, their names and hyperlinks are over on my right sidebar.

The prize this month is a choice of this Inkadinkado Evergreen Holiday Stamp stamp


Or this Lawn Fawn, Scripty Merry die


Monday, 17 April 2017

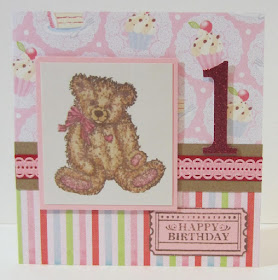
Little Girls Birthday

I have been trying to use up any stamped and coloured images I have on hand. Frankly, I am a bit tired of most of them and want to get them used up so I can get on with stamping and colouring up some new ones. lol

This wee bear is a Stampin' Up stamp that I have made several cards with, over the years. This is the last of my stamped and coloured bears, so that is a good feeling! My NBUS item on this card is the Wild Rose Birthday DP. I won the 6x6 paper pad from Kate at Wild Rose Studio. Thanks so much Kate!


The image mat is from my snippets pile. The ribbon on this card is one of those that never unravel. I wish all ribbon was like this. I backed it with a snippet of kraft card just to tie in the bears fur colour.

The number one diecut is actually cut from red glitter card. It is the same shade of red as the red strip of ribbon behind the glittery pink lace part of the ribbon. This red glitter card is very hard to photograph and seems to like to photograph very dark...but I promise you that is is red!!!

I have a second NBUS item on this card. It is the sentiment stamp. It is one of those Studio G $1.50 stamp sets that are commonly sold at Michaels.  I stamped it in Brown Momento ink to match the image ink and then I fussy cut it out.

I have so many of these studio G stamps and almost all are still NBUS. I am going to make an effort to use a couple of these stamps each month. Perhaps some of you have a hidden stash of these wee stamps too and would like to join me in a campaign to let them meet ink.
For me, I managed to use one today, and only have 500 or so to go!!

Two NBUS down and 999,999 to go!

Friday, 14 April 2017

Hear Me Roar!

This card started out from a desire to use up the three stacking mats you see here. I often precut mats from my snippets and place them in tiny photo albums from the dollar store. Each book holds one particular colour. They are very handy for taking to the lake or to crops. Once I realised that these three stacked nicely, I was determined to make a card with them.

The DP is from snippets of 12x12 DP left over from a scrapbooked Zoo outing. I used a snippet of reddish brown woodgrain DP to back the word border. Sorry, but I do not know the manufacturer of the original papers.

This card has a couple of NBUS items.  The 3D giraffe was purchased quite some time ago from the Dollar store, and never used till today.
The red number 1 is cut from a brand new sheet of 12 x 12 red glittered card. I used the free large number dies at my local papercraft store. As long as you buy the paper from them, you can use their dies for free.

I had a hard time getting a photograph of this card. I needed two lamps to illuminate the red glitter paper on the right hand side. Sadly, I only have one!  Both corners, the number one and the Happy Birthday are all cut from the same red glitter paper that photographed correctly on the bottom left corner.


Future Project ideas...

I am going to make an effort to feature some Studio G stamps in my card totals each month. I have a couple to post at the moment, so watch this blog if you too have stockpiled these teensy stamps!

I have been having fun lately, looking through my stash of Studio G stamps. They were so popular a few years ago and I fell into the craze, collecting two or three every time I went to Michaels. I stashed them into baseball card plastic sleeves and promptly forgot about them. Out of sight, out of mind!  I am going to select a coupleof these stamps to use each month. They are great for adding a sentiment when you have forgotten to leave room. Usually I can find a teensy sentiment in my Studio G stamps!

Sunday, 2 April 2017

Christmas Card Club - Christmas Flowers

This fortnights theme for the Christmas Card Club was chosen by Carol of CM Designs.

 I am in the midst of a kitchen reno, as well as replacing the laminate on our main floor with hardwood.. Everything from the main floor of my house is tucked into every room on the floors above and below,  It was a bit of a flurry of activity to get this card finished for today. I was very silly not to remember to make this card ahead of tine!

I have used a topper made in a class a couple of years ago (NBUS). I did not notate the stamp manufacturer, but we wet embossed with a glossy black embossing powder and coloured the image with Twinkling H2O's. There is a beautiful glimmer on the painted parts of the image.


I matted a sheet of NBUS Kaiser Christmas Wishes font DP onto a purple mat and then placed that at the bottom of a glimmery silver card.  I triple matted the image with various snippets of purple card and set that onto a Christmas Wishes floral DP. I picked up that Kaiser 6x6 Christmas pad a short while ago and I'm very pleased with the non-traditional colours and designs.

I went around the edges of that floral piece of DP with Purple Stickles. It gave it a lovely bit of sparkle.


If you wish to look at any of the other ladies contributions, their names and hyperlinks are on my right hand sideboard.

I am entering this card in the following challenges.
1. Christmas Card Club - Christmas Flowers

Saturday, 1 April 2017

Pocket Full Of Posies

My card today features my NBUS Spellbinders Jeans Pocket die. I am ashamed to tell you just how long I have owned this die and had not even opened the package yet!

I have  thrown caution to the wind and made quite a colourful card today. As much as I love colourful cards, choosing vivid shades does not come naturally to me. Once I get started, I am always happy with the colour though!

I cut the jeans pocket out of some lightly embossed (with a sort of striped pattern) denim coloured card. The card has a sort of sateen sheen and is quite pretty. Because it a bit delicate, I cut the die again from heavy weight black card and glued the sateen card to it.

I used some leafy cluster dies and layered a bunch of paper flowers with them. Luckily I had some blue brads, as well as some teensy, orange button brads, so I was able to alternate the colours of the layers. I need to make an awful lot of flower cards as I have so many paper flowers stockpiled from when they were in style, many, many years ago!


The DP is all from the My Minds Eye, My Girl 6x6 paper pad. I also used a second NBUS item, the ombre peach coloured, Recollections canvas die cut. (just behind the flowers). It was actually too tall for my card, so I cut it in half and then trimmed about 1/2 inch or so from each middle edge

Most of the flowers and the butterflies were from Michaels many years ago. I tore the diamond off the turquoise one and layered the white butterfly overtop.

The leaves were all cut from snippets. I cut up the entire green snippet and have two leafy branches leftover for another project. This was a fun card to make, no stress at all and very relaxing. I am looking forward to making a couple more for my card box.

Recipe:

Base Card and Envelope - premade orange card from my stash
Card Stock - snippets of green for the leafy branches
DP - My Minds Eye - My Girl
Canvas - Recollections canvas banner
Flowers - from my stash  (Michaels\)
Butterflies - from my stash (Michaels)
Brads - Colorbok aqua teensy brads from my very old stash( VOS) , orange button teensy brads from my very old stash (VOS)
Dies - Memory Box Small Leafy Twig die and Sue Wilson Pine Twig die

I am entering this card in the following challenge:
Pixies Crafty Workshop - must use snippets.
2. Darnells NBUS #11 - must have NBUS and or a boo boo

March Rudolph Days Winner

I used Random Org to chose the winner. Here is a photo of the winning number...#36 Christine Smith.

Christine, could you please email me at maureenkane@telus.net to let me know if you want the
Echo Park Holly Jolly stamp set


or the Memory Box Pinpoint Snowflake die set.