Wednesday 26 February 2014

Rudolph Day February 2014

On the 25th of each month, Sarn at Stamping  for Pleasure has a Christmas Card Challenge. Two cards, anything goes as long as it is Christmas! This is a great way to get some cards made ahead so they will be finished and waiting for that special time of year. Making two card a month for Sarn's challenge is a fun way to add to my finished Christmas card totals!

Here are my two February Rudolph Day cards.  Card One...

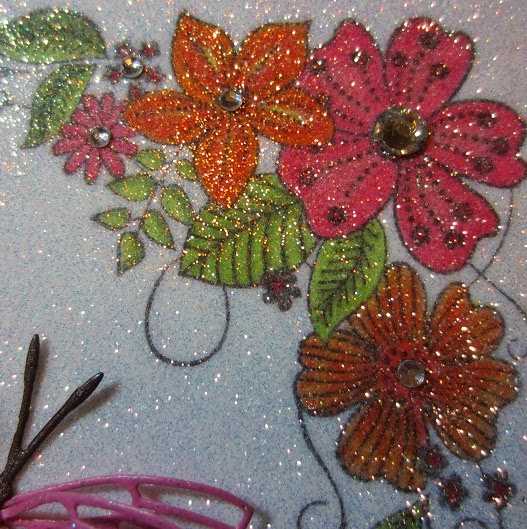
The poinsettia images were coloured this summer up at the lake and then stored in my coloured images binder. How I love this little book!  When I need a card in a hurry for a challenge or for a giveaway, I check out my binder to see if I have anything that would work. Here is a close up...

Today is Craft day with my neighbour and my turn to design a card for us. I kitted up one of poinsettia coloured images and papers, for her too. Each card was the same basic design but I used various random snippets from my scrap drawers. We made up three of the poinsettia image cards.
Here is the inside of my card.
Don't know what I am doing wrong lately but I can't seem to get a crisp, clear, in focus image...Perhaps this one is a bit clearer...


Card 2 - I made one last card using some Anna Griffin Christmas Kitsch vellum quote stickers. I have the silver and gold book of these quotes as well...so expect to see a lot of these this year. Again I used some of my really tiny snippets to make the flags. I promise that it is centered on the card...I had to play with how I held the camera to avoid the glare off the glittered card.


The inside...

Card 1 - Recipe
Card Base - glittered 5x7 cards and envelopes from my stash (originally fromMichael's)
DP - Flag snippets: pink and white Basic Grey 2011 Kissing booth; green damask Echo Park green damask; dark pink unknown snippit; Backing paper mats, I think the floral is a Basic Grey and the strip is unknown
Cardstock - snippets of white from my stash
Embossing folder - Holly leaves
Bling - clear diamond bling from my stash
Cord - extra fine silver cord from my stash
Stamp - unknown (this is the last of the ones that were part of a class at the scrapbook store last year)
Sentiment - Up-cycled from a Christmas card

I am entering this card into the following challenges
1. Stamping for Pleasure Rudolph Day - must be Christmas
2. Pixies Crafty Workshop - must be snippets
3. MFP Speedy TV Christmas Card Challenge - must be Christmas

Card 2 - Recipe
Card Base - glittered 5x7 cards and envelopes from my stash (originally fromMichael's)
DP - Flag snippets; Recollections small black dots; bright pink stripe Echo Park Watermelon
aqua snowflake is MME; dotted mat is also MME
Sentiments - Anna Griffin Christmas Kitsch Vellum Quotes

I am entering this card in the following challenges
1. Stamping for Pleasure Rudolph Day - must be Christmas
2. MFP Speedy TV Christmas Card Challenge - must be Christmas
3. Pixies Crafty Workshop - must use snippets

Saturday 22 February 2014

Mrs.A's Inaugural Butterfly Challenge

Finally have a card to post for Mrs. A's Inaugural Butterfly Challenge. This is a fortnightly challenge in which your card must contain a butterfly or butterflies. Each fortnight there is a theme and this time it is Butterflies and Flowers. You must have at least one of each on your card.

I have had this image coloured up for quite some time but was never sure how to use it. A couple of weeks ago, I was at our local Korean dollar store just a mile or so away from my house. I love to peek in there when I post a letter or pick up a prescription, as it is in the same plaza.  They have many different items than the big Dollar Stores here, and the lady has a good eye for choosing craft supplies.

The aqua cutwork border is from there...it was a very heavy weight, sateen cardstock cupcake wrapper in another life. The had packets of 8 or so for a dollar. I remembered this image and had to have it.


I managed to use up some more of my Michael's dollar packets of flowers. I try to pick these up whenever they have their clear out after each change of season. I have combined 3 sizes and changed out the bling on the larger layered one. I wrestled with the idea of adding a die cut butterfly, thinking it would be too big. Then I remembered my Stampin' Up Sizzlets set, Beautiful wings. I had a snippet of the teal card left so I cut out some of the smaller ones and set them aflight! I added a touch of Stardust Stickles to bits of the stamped image, to gussy it up just a tad.

Kept the inside fairly simple...

Recipe:
Card Base - 5 1/2 inch square textured card and Envelope, from my stash
Patterned paper -Authentique, Shine
Cards Stock - snippets of grey textured sateen card and teal card from my stash
Dies - Spellbinder ovals and scalloped ovals; Memory Box Madeira Corner and Stampin' Up Sizzlets Beautiful Wings
Embellishments - cupcake wrapper from the $ store
  - various size flowers from Michael's dollar bins (from my stash)
Bling - clear diamonds from my stash and a wee blue glittered chipboard center for the largest flower (from my stash)
Stamp - will update soon as I find it!!! lol
Sentiment Stamp - My Sentiments Exactly, S126-IO

I am entering this card in the following challenges:
1. Pixies Crafty Workshop - must use snippets
2. Butterfly Challenge - must use atleast one flower and at least one butterfly
3. Crafty Hazelnut's Patterned Paper Challenge - must cover card with paper
4. Allsorts Challenge Blog - Ladies Day

Wednesday 19 February 2014

Speech Bubbles

I think I must lead a bit of a sheltered life.
The challenge I am trying to do requires the use of a speech bubble. Now, I know they have been popular for quite a while...but I do not have one! I have just never had the need for one...until today.

I looked through all my stamps and almost decided that I would have to give this challenge a pass...and then I saw it. I saw this little frog and mason jar...and I had to find a way to make this work. I picked up this stamp set at a Garage Sale last summer at my local scrapbook store. They sponsor four of these sales a summer and I am lucky if I am in town for one of them! Bargains abound as the store does not take a cut of the profits...just opens up their parking lot and rents you a table for $10 I am so looking forward to this years sales.

I knew right away the words I wanted to put in the speech bubble, so I just had to find a way for this to work. I printed out my sentiment for the bubble on the computer, and then printed it onto kraft card stock.

I  cut out this sentiment using a circle die and then punched some smaller circles to be the bubbles leading to the speech...My speech bubble was born!

Phew,,,thank goodness that was sorted. Then it was just the fun part of fussy cutting the lid and popping it up and colouring in my image. I didn't do a very good job on the dirt...the frog was positioned kind of funny on the jar (stamping operator error)  so the dirt had to come up quite high. Not too fond of that part!
I did pull out my Gelly Roll pen and went over the lid, to make it look metallic. It has a lovely shimmer now!

Here's the arty view...

and the inside view...

Recipe:
Card base - made from my stash
Design paper -  MME, Notable Wonder; from my stash
                      - Basic Grey, Origins Hot Stone; from my stash
                       - snippets of blue background paper is from my snippet stash
Card stock - snippets of white from my stash
Dies - Memory Box, Small Alder Tree and Spellbinders Deckle Rectangles and Petite Circles
Brads - ivory glitter brads from my stash
Twine - snippet from my stash
Ink - Cats Eye Chalk Ink , Chestnut Roan from my stash
Copic Markers
Stamp - Stampin' Up, All wrapped up (mason jar and frog)
Sentiment Stamp - Stampin' Up

I am entering this card in the following challenges
1. Pixies Crafty Workshop - must use snippets
2. Crafty Hazelnut's Patterned Paper Challenge - must cover base with paper

Sunday 16 February 2014

Christmas Card Club Snowflakes or White on White

Hazel chose the theme this fortnight for the Christmas Card Club. I knew I would use the snowflake theme as I wanted to use my Impression Obsession dies. I have their large and small snowflake dies and I just love them. They cut like a dream and release from the die very easily.

I have seen this Merry Christmas Memory Box die on many Christmas cards posts this year. I always manage to find it sold out when I check in my local scrapbook stores. When I was out shopping a couple of weeks ago, I found it at a store I don't visit that often. So between christening my new die and the snowflake collection, my card design was done.


I added lashings of stickles to make up for the lack of patterned paper...Somehow it seemed bare till I painted each snowflake layer with Stardust stickles. Here is a close up to help you see the sparkle. The red shade on this closeup is the true red of my card. For some reason ,every shot I took of the total card showed the red incorrectly.


I have a funny confession to make. I hope you will think it is a giggle...I can't show you the inside of my card because I glued the card upside down!!! Yep, the fold is at the bottom of the card I have propped up.  I need to find a larger card to mount this one onto...My 12x12 card stock is not a heavy enough weight and the local shops do not sell this size. I think the shop I found the die at has a larger selection of card sizes, so will check there...when I get over that way.

Recipe:

Upside down card base - 5 1/2 textured square card and envelope from my stash
Dies - Memory Box Merry Christmas (first time used)
Dies - Impression Obsession Die 100F, small snowflakes; and Die 024X. large snowflakes
Bling - large and small diamonds from my stash
Stickles - Stardust
Card stock - snippets of red and white card, from my stash

I am entering this card in the following challenges;
1. Pixies Crafty Workshop - must use snippets
2. MFP Speedy TV Christmas Card Challenge - must be Christmas
3. Christams Card Club - must be snowflakes or white on white

Saturday 15 February 2014

Winterfest 2014 - Colour Me This Challenge

I made another card for the  Winterfest celebrations over at Two Peas in a Bucket. One of the challenges is "Colour Me This". You stamp an image two times and colour them in two different ways.

I coloured my first image with copics and did not care for how it turned out. I do not have enough pale and medium brown shades. Those that I do have, seem to need refilling. I just couldn't get the shading right...

I coloured my second image with Stampin' Up Chalks. I used an eye makeup sponge for the large areas and a fiber stick for the detailed areas. I wet the chalk for the bow and edges of the feet and paws. I really like the finished look of it...so soft and pretty.

Before I bought my copics, I used to use chalk and sometimes even pencil crayons with gamsol blending. I think I may try these methods again, as I had fogotten how subtle the colours look.


I used all VOS (very old stash) to create this card. The design papers are at least 8 years old as I used them for Little Miss C's newborn album. I am pretty sure that I already had them in my stash at that time as well!  I made four  6x6 books for my daughter to give all the Grandmothers and Great Grandmothers and I had a lot of supplies left over. Everything I used here was still in the 12x12 plastic storage envelope that I stored her baby album supplies in. Although they were all originally 12x12 papers, they seemed to cut down OK as the pattern was fairly small. I also found a plastic drawer full of matching baby and little girl embellishments that I had forgotten all about. They were in a tall narrow cupboard that usually is blocked by the chair my neighbour uses when she comes to papercraft with me. It makes me tend not to go into that cupboard and it also did not help that the drawer was labelled Wedding!!! lol   Obviously some organizing that went astray!!!

Here is a little close up that hopefully shows the texture and pretty shimmer of the snippets of pink card.

To fit the requirements of the challenge, here is a shot of the finished card and the second image I coloured with copics.


I used another of the self adhesive Carolee's creations Scrap A Card pieces for the sentiment.


I decided this card could also fit into the "Embellish This" challenge. My Embellishments are
1. Pink organza ribbon for the bow
2. Pink flower
3. Yellow heart Buttons
4. Green twine tied in the buttons
5. Green brads with a pink filigree metal disk that I slid under the brad...not sure if this counts as one of two embellishments...


Recipe:
Card and base - 5 1/2 inch square textured card and envelope from my stash
DP - the pink, green, white and mauve patterned paper is Flare Designs, Baby of Mine; from my stash
      - the pink words paper and the flowers paper are unknown from my stash
Card stock - snippets of dark pink shimmery textured card from my stash
Embellishments - pink checked flower, green brad. pink metal filigree piece, green twine, pink chiffon            ribbon, and yellow heart buttons are all from my stash
Sentiment and Border - Carolees Creations Scrap a Card

I am entering this card in the following challenges:
1. Pixies Crafty Workshop - must use snippets
2. Crafty Hazelnut's Patterned Paper Challenge. - must cover card with paper
3. Two Peas In A Bucket Winterfest - Embellish This and Colour Me This
4. MFP Speedy TV  Speedy Fox and Friends - Chalk

Friday 14 February 2014

Little Miss C's Valentine

I changed things up a bit from my last Valentines card and decided to go with matching papers from the Colorbok Bright Ideas line. I really liked that the words on this were about cherishing friends and family. Little Miss C treasures both and I knew she would like these words too.
I picked up this Paper Pad quite some time ago at a shop that specializes in closeout stock. Think I paid $3.00 for the 12x12 Pad and then I promptly cut one of each pattern in four to make 6x6 stacks. I must remember to use it again as the paper weight was quite nice to work with.


The brightly flowered ribbon is very old. It was used for a scrapbook layout I made for Little Miss C when she was about a year old...6 long years ago! It has been languishing about ever since and I unearthed it when I organized my room. Luckily for me, I had a package of self adhesived felt hearts that matched the colour fairly closely.

Here is a shot of the inside...

Recipe:
Base card and envelops - 5 1/2 inch square textured card from my stash
DP - Colorbok Bright Ideas Paper Pad
Card Stock - skinny snippet of textured pink from my stash
Ribbon - from my stash
Bling - pearls from my stash
Embellishments - self adhesived felt heart and white glittery resin heart from my stash
Sentiment - Authentique Lovely Elements words; the inside sentiment is from the same sticker page

I am entering this card in the following challenges:
1. Crafty Hazelnut's Patterned Paper Challenge - must cover card front with paper

Tuesday 11 February 2014

Kicking Up My Heels

I am still busy playing at Winterfest 2014, at Two Peas In A Bucket.

When I noticed the "In the Round" challenge, I knew which stamp I wanted to use. I have been itching to get these stamps inky since I received them from my lovely blog buddy Redanne. I am always a bit timid to use my lovely gifts... as I don't want to disappoint the giver if I mess it up. I knew I wanted to use the Sakura Gelly Roll Silver pen to hilight the heel, buckle. strap and flowers...so I was a bit worried I would not be able to carry it off.

After I stamped and coloured the image with copics, I did that Gelly Roll outlining and it was easier than I thought! Funny how you can get yourself worked up about nothing...lol

The challenge requires the image to be cut in a circle and also requires the use of at least two embellishments. As my card developed, I realized that it would also fit the 4 embellishment brief for the "Embellish This" challenge as well. What luck...
I kept my design paper to just one sheet as the image circle is quite large and I wanted to use those fairly large Marianne corner dies as well. I backed the ribbon with a piece of the silver glimmer card stock and tried out a small rhinestone belt buckle as well. Well, to be honest, it isn't really a belt buckle. I spied it in a packet of a dozen hair bows at the dollar store. I cut the "buckles" off  to Upcycle on cards.
Here is another photo that shows the Gelly Roll outline...sorry about the glare...it was impossible to avoid it tonight. All my photos tonight seem a bit paler and softer than IRL.


I did not finish the inside of this one as I have not yet decided if it will be a birthday card or perhaps even a Mothers day card.

Recipe
Card Base and envelope - from my stash
Design Paper - First Edition, Bird Song
Card Stock -  snippets of Silver and Charcoal, Somewhere In Time Fantasy Shimmer Paper
Embellishments
1. Ribbon - snippet of pink chiffon ribbon, from my stash
2. Bling - charcoal diamonds, from my stash
3. Charm - from a friend in England
4. Twine - snippet of fine silver cord, from my stash
5. Belt Buckle - from the Upcycled Dollar store bows
Dies- Spellbinders petite circles and scalloped circles; Marianne corner dies from Shaz in OZ
Stamp - The Crafthouse Press, Fabulous Kling On K006 Shoes

I am entering this card in the following challenges:
1. Pixies Crafty Workshop - must use snippets
2. Crafty Hazelnut's Patterned Paper Challenge - must cover card with patterned paper
3. Two Peas In A Bucket - In The Round and Embellish This
4. Die Cutting Divas Challenge - Girls Night Out ,Use Pink, Girly,

Monday 10 February 2014

Get Gitzy

I am joining in on the stamping fun this week.   It is Winterfest 2014 at Two Peas In a Bucket, and there are all sorts of fun challenges to encourage you to get some cards or projects finished. They just might even tempt you  to try out some fun techniques.
My card is for the Get Glitzy Challenge. The challenges is to use glitter on your card. Now those of you that know me, probably remember that I don't use loose glitter and barely even emboss. The stray pieces of glitter seem to get everywhere and make me itch for days!

Thanks to Stampwilly, who sponsored this challenge, I am going out on a limb and cracking open a vial of glitter. Yep, I had to break the plastic seal as it was never opened. I think I have owned my glitter for about ten years but most still have the plastic seals intact!  lol

As soon as I read the brief, I knew what I wanted to do. This floral stamp was a gift from Jo at A Little Piece of Me . I stamped and coloured it last summer. I was up at the RV and it was about 40 degree Celcius at the time, so I used very hot, bright shades of copics. Seemed a good idea at the time but I have been stumped for design ideas to use...once the heat wave was over, the colours always looked too bright.


I cut a piece of Sookwang about the same size as the Spellbinders Fancy Ribbon Threader die. I peeled off one side of the Sookwang and laid that over the image. The image was now just barely visible through the top layer of peel off tape. Peering at it very carefully, I lined up my Ribbon Threader die so the image sat up in the right hand corner. I had to run it through the Big Shot with a metal shim and also added a piece of cardstock over the bottom of the die. It took 2 or 3 passes through the rollers till everything was cut through.

I then removed all the design pieces that were now cut, but still sort of inlaid in the design. The Sookwang is so sticky that the pieces did not just fall out. I had to use my pokey tool and give them a hard nudge each! Once I had the design clear of detris, I pulled out a large piece of paper that had the side edge sharply creased and folded forward. I laid the diecut image down on that paper, peeled off the top layer of protective tape, and poured about a third of the vial of glitter over it. I just used white crystal glitter but it actually looks more ivory than white.  Once I had enough glitter over it, I dumped off the extra onto that piece of paper. I burnished the diecut with my finger till all the glitter was firmly stuck down, and tapped it a couple more times to ensure all strays were caught on the blotter paper.

I lifted the blotter paper and tilted it so the folded up edge of the paper collected all the glitter and then just tilted it further till it dumped right back into the vial. I like using the folded up edge better than picking it up with both hands and sort of curving the paper to dump it back. The sharply creased edge really lets you manouver back into the tiniest of vials!

Once the glitter was affixed, I could see that my image colours were nicely muted. The layer of ivory looking glitter just seemed to tone the hot colours down a notch. I added a bit of diamond bling to the flower centers, threaded some pink ribbon through the bottom of the die and then ran a fine hot orange sheer ribbon ove rtop. I even managed to fit a bow on again. I can hardly believe it...two bows in one week...woozers!

I triple matted the diecut and added a Memory box Kalaidoscope butterfly just above the tiny bow. I did try to add a butterfly charm but it looked like overkill to me, so I left it off.

 Once again, I did get the inside done. I did not have any large snippets left so had to go with a floating framed sentiment. I thought the words suited the bold colours of the front.


Recipe:
Image - I think it was a freebie from Cardmaking Magazine...it was sent from a friend in England. The Label says Floral Collection, Cardmaking Magazine
DP - First Edition 6x6 Paper Pack Blank Canvas, from my stash
Bling - clear diamonds from my stash
Glitter white crystal glitter from my stash
Ribbon - snippets of pink and orange ribbon, from my stash
Dies - Spellbinders Fancy Ribbon Threader; Memory Box Kaleidoscope Butterfly
Adhesive - Sookwang paper and Sookwang tape
Sentiment - Michael's dollar bins

I am entering this card in the following challenges:
1. Pixies Crafty Workshop - must use snippets
2. Two Peas in a Bucket Winterfest  - Get Glitzy
3. MFP Speedy TV Inspirational Challenge - used a bit from each...took the pink and orange from the first and last photo. I chose my Spellbinders die from the middle photo...the design of the support beams made me think of the fancy bottom edge of this die.
4. Floral Fantasies Blog Candy  - share your favourite things

Sunday 9 February 2014

Happy Valentine's Day , Little Mr. P

Here is the second Valentine that I made at last weeks paper crafting night.

This one is for Little Mr P. I tried to keep it as masculine as I could...or at least as masculine as the papers I had. The word paper is American Crafts, Babushka.
I tried to balance this card towards the masculine side, by choosing some plain, kraft coloured, dotted paper for the bottom half of the card base. The shimmery rickrack braid is from my stash. I have no idea when or where I bought it!

I used another of the Wild Rose Studio toppers and cut it down as much as possible. It was matted onto a snippet of  kraft card and then matted again with a snippet of shimmery, textured brown card. The bling heart I used for embellishment is from the dollar store I think...it is another item from my stash that has faded in my memory. The ivory, glittered heart is from Michael's. It was picked up at a post Valentine's clearance sale last year or the year before. I always keep a careful eye out at Michael's, as they tend to blow out holiday themed merchandise just after any holiday, at 80 %  or even better. Now that is a good time to stockpile a few choice items!

The sentiment strip is Authentique,  Lovely Elements, sentiment words. There are various single, teensy words and you can use them alone or string a few together. I quite liked using them. No fuss and no muss...perfect for my weekly quick card nights with my neighbour.

I finished up the inside of his card with a snippet of white card mounted on a snippet of  kraft.  I raided my precut dies and found this shimmery brown Marianne doily die. A couple of Spellbinders dies were layered up so I could use another of the Authentique, Lovely Elements pieces...this sweet little Valentines Sentiment.

All in all, a quick card to assemble...but no stamping at all. I feel a titch guilty about that. Oh well, I suppose I should just delight in the fact that another card got finished so I could move on to the next one!

No recipe tonight, as I have basically given you the recipe already in the descriptions above.

I am entering this card in the following challenges:
1. Pixies Crafty Workshop - - must use snippets
2. Crafty Hazelnut's Patterned Paper Challenge - must cover card base with patterned paper.
3. Winter Wonderland Challenge - No stamping allowed

Friday 7 February 2014

Share The Love

Finally made some Valentines. I was starting to worry that I would not get them done, but then I had a brainwave. It was my turn to make up the card kit for my weekly craft night with Lisa, my next door neighbour. I decided that I would make up 3 kits, for a total of 6 cards between us. All would have a Valentines theme.

These solved my necessary Valentines quota. Now any others I manage to make will be for extended family. Luckily, Lisa was game for that idea, so over I trudged to her place, card kits in hand and we really had fun getting into the Valentines theme! Normally, we do one quick and easy card...the sort you start and finish in 20  minuets...30 minutes tops. After that is done, we just get on with whatever we each brought to work on.

This time, I laid out all the supplies on her dining room table and we just worked on those all night. We had lots of giggles and fun, and we seemed to be full of creativity and inspiration.  Good thing, cuz we both needed to finish up those cards.

Here is my first Valentine made this year. It has snippets of Very Old Stash (VOS), and even has some Never Before Used Stash (NBUS). All the papers are left over from scrapbooking and in a former life, they were 12x12  paper.

Did you notice that I managed to add a bow...and that I even managed to work in a hanging charm. This little beauty was given to me by a pal in England (thank you again, you now who you are). I never seem to know how to work bows and charms onto my cards, but for once it seemed to work! It is hard to part with them though...they are so pretty and I like the look of them housed in the little jars on my embellishment shelf. lol


I had a momentary lapse of  brain cell activity while creating this card. I got so involved in measuring and marking out the straight line to add my glitter paper ribbon to, that I didn't notice I had put it on sideways!!! If I changed the orientation of the card to a vertical fold, then the word paper read sideways. Of course the glitter paper ribbon has an abundance of really sticky glue that could not be coaxed off! So I decided to make it look like a package tied up with ribbon and went ahead and added my new strip the correct way. Whew! Not a perfect solution by any means as I still think it looks silly...but not as silly as sideways words!

I even managed to finish up the inside too. I had already signed it when I realized that I had not taken a photo of the inside...so I have had to cover up DH's name. He likes his privacy on the internet.
The top edge of the letter "d" did not stamp evenly. I am contemplating touching it up with a copic fine liner but am so worried I will make it worse. What do you all do when this happens?

Recipe
Card Base and Envelope - from my stash
Design Paper - snippets of 12x12 Colorbok Bright Ideas pink word background (VOS); and snippets of 12x12 Echo Park Style Essentials Grey Damask
Card Stock - snippets of pink textured card
Ribbon - striped ribbon from my LSS (new); snippet of black glitter ribbon from my stash, manufacturer unknown
Cord - fine silver cord from my stash
Embellishments - Flower from my stash; charm from my friend in England (NBUS)
Image - Wild Rose Studio topper

I am entering this card in the following challenges
1. Pixies Crafty Workshop - must use snippets
2. Crafty Hazelnut's Patterned Paper Challenge - must cover the front of card base with paper
3. Two Peas In a Bucket - February Mood Board challenge - use Mood Board for inspiration
4. Stamping with the Dragon Challenge - Love is in the air

Sunday 2 February 2014

Christmas Card Club - Add a heart or use the colour red

It always amazes me how quickly the fortnight flies by in between our Christmas Card Club challenges.
I am a couple hours late posting this as I have had the grand children for a sleepover and a drop by visit from my younger sister (who lives 4 hours away).

We took the kids to the matinee yesterday and then back to ours for a visit and a sleepover. What fun!
They have just left for church and thought I had better get this posted before they are back to pick up their things and have a yummy piece of chocolate cake and a nice cuppa. Little Mr. P was in tears as they left for church. He wanted to stay and have the cake now! lol

Onto hearts and red...the great theme that Mary H. at Carolina Cards, chose for this fortnight. I decided to colour up the same Bugaboo stamp that I used for my guest design post at Craftyhazelnut's Christmas Challenge Extra. You can get it here at Bugaboo Stamps 

Hazel was nice to send me some Bugaboo images and I coloured this one up again in red. Although I used the same design papers, I think there is enough red in the lats, flowers and velvet rickrack to qualify. Did you spy my heart? It is the center of the larger poinsettia.

I used the Sakura Jelly Roll pen again to hilight the stars and the halo. The cloud and Wings have had wee bit of stickles added.


And here is the inside...all ready for Christmas. I made up a couple of these matted sentiments, as I plan to make a few more of this card.


I had fun making this one as these bright patterned papers have grown on me and seem to cast a cheery feeling. The velvet rickrack was a snippet that I found when I was cleaning my room in January. I really like it as the fabric is flocked like velvet and does not fray easily...in other words it does not need to be wrapped around the card to hide the edges. Yay!

It is amazing what little bits of things get "mislaid" after working on a project. I found some lovely mislaid treasures and I even found a cling stamp that has been missing forever...it was stick onto the back of another cling. Good thing I had that sort out as I was sure glad to find these things!

Recipe
Card base and envelope - from my stash
Design Paper - BoBunny Mistletoe Collection, snippets leftover from my last card
Card stock - snippets of red and white,  from my stash
Flowers - Micheal's Nouveau Noel Poinsettia
Bling - clear diamonds, from my stash
Ribbon - snippet of velvet rickrack, from my stash
Dies - Spellbinders Deckled rectangles
Brad - silver heart, from my stash
Image - Christmas Words Angel, Bugaboo Stamps

I am entering this card in the following challenges:
1. Pixies Crafty Workshop - must use snippets
2. Craftyhazelnut's Christmas Challenge Extra - Always anything goes but must be Christmas
3. Craftyhazelnut's Patterned Paper Challenge - Anything goes but must cover your base with paper
4. Craftyhazelnut's Christmas Challenge - #162 Strips or dots (white tops on the top patterned paper