Monday 31 December 2012

Favourite Five of 2012

Happy New Year everyone...Just relaxing waiting for our guests to arrive in about an hour. Wanted to take this chance to say happy New Year to you all. May 2013 bring us all that we need.

I'm joining in on Debby's Favourite Five Cards of 2012.  If you want to play along, you can link up your favourite five too.  Link them up here at Debby's blog  A Scrap Journey  


I found it hard to pick mine. Sometimes I like a card simply because of the way it turns out, but sometimes I like it because something about it suits the individual I made it for. Keeping that in mind, here are my favourite five.

I just enjoyed the combination of  the feminine elements on this first one. You can find the original post here: http://scrapsoflifebyscrappymo.blogspot.ca/2012/01/couple-of-cards-i-made.html
I enjoyed making the series of gardening cards...this one was my fave of that bunch. You can find the original post here:
I was pleased with the masculine feel of this next one...It was a gift for DH and quite fitting for a man making his living associated with the sea.. You can find the original post here:
http://scrapsoflifebyscrappymo.blogspot.ca/2012/09/another-guy-card-for-stash.html
My journey into kraft papers and recycling coffee sleeves started with these bird cards. This one reminded me of my Dad who passed away at 92 years old. He raised  horses, was a great lover of nature and had wild geese follow him around on the farm and then return to him, yyear after year. He could spot a deer in the woods, a bird on a branch, an animal in trouble, or anything related to nature, before any man half his age. This ones for you Dad.
You can find the original post here: 

I enjoyed making this series so much I made a rosy coloured one for my Mum...that led to making a matching rose coloured bird tag and placing her gift in a rose coloured box. Pretty appropriate for a 
Mum named Rose. My Mum had a beautiful singing voice and gave me voice lessons as a child...I added a bit of musical note paper to her card.you can find the original post here:


Santa came early!

I had a lovely surprise on Christams Eve when we checked the mail. There was a blog candy parcel from  the lovely Sharon, all the way from Australia!  I won her blog candy and can't believe my luck that it arrived before Christmas.

Here is a shot of my candy loot....I am delighted with everything!


 There is a gorgeous Marrianne corner die...I can hardly wait to try it out. The pretty pearls will go on the Christmas layout of Little Miss C in her gorgeous Christmas finery. The little boy brads will be perfect on a layout of Little Mr P. He was looking mighty handsome in his dress up clothes as well.
The adorable snowman stamp set is going to be one of those "go to" sets. That snowman is so darned cute! I know 2 grands who are going to be begging to borrow it. teeehee

Thanks so much Shaz. Your kindness in hosting this candy is greatly appreciated. Here is a link to Shaz's blog
http://calligraphycards-shazinoz.blogspot.ca/

She does some amazing work...you will enjoy your visit.!!!

Sunday 30 December 2012

The Lavender Saga Continues

I think I have mentioned before how I am not much of a fan of purple, lavender, mauve etc. While I love those shades in the garden...especially the deep almost black colour of purple, I really can't say I like those colours in any other venue...card making included!

A few weeks ago saw me finishing up the dreaded purple Xmas card...It only took 5 or 6 years to get it done. The card is now finished and I survived. Time to tackle another purple one. lol

I was working on my gardening themed cards and thought why not use up some of the lavender that comes in the 6x6 cardstock paper pads. As the cards are being donated, it is a good way to use up the paper and there are after all, some lovely bits of what looks like lavender liatris in the wheelbarrow full of blooms.

So here is my latest gardening card. Another one "done and dusted" as they say on our favourite British TV show.

Luckily, I have not cello'd up the card packets to donate. The garden shop we pass enroute to DD's, sent an email  for 10 free daffodil bulbs.  I stopped in and picked them up and I am  going to put 3 daffodil bulbs in with each card and tie them up in a cello bag. I can do up 3 packages this way.  DD gets those emails from my nursery as well...hmmm...perhaps she is too busy with the kids to be planting daffodils..Ii would be able to make up more packets if I helped her out and took hers off her hands!!!

In the meantime, here is the lavender card.Another one "done and dusted" as they say on our favourite British TV show.Wow, I'm  softening...I didn't even flinch when I typed lavender!!!.


Recipe
Base card - Michaels Recollections kraft corrugated card and envelope
Cardstock -  kraft, and pink from my snippets stash, lavender and green  from my precut diecuts stash     
Dies - Spellbinders circles; Spellbinders lacey circles; Memory Box Macarena Corner;  Memory Box breezy wearth; Spellbinders Nested Pennants for the sentiment tag
        - the corners are a Martha Stewart border cut up into corner shape
DP - snippets from my stash
Ink - Chestnut Roan Chalk ink for shading the edges
Punch - teensy butterfly punch from the dollar store
Sentiment - Stampin' Up

I am entering this card in the following challenges:
1. Pixies Crafty Workshop - lots of snippets on this card!
2. Pause, Dream, Enjoy - Anything goes
3. Simon Says Stamp - Anything goes
4. Marks Finest Papers Simple Salutations - #25 Use a sentiment, anything goes
5. Divas by Design -  Anything goes
6. Stampotique  - # 80 Out with the old In with the new - most iems used are from my snippets stash
7. Lady Anne's Challenges - Vicky's Challenge - Anything goes.

Saturday 29 December 2012

Girlfriends bearing gifts

My next door neighbour and I have become lovely friends. We get together to scrapbook and make cards and attend crops together.
At Christmas we get each other scrappy gifts. It is fun to shop for things the other person would like. I try to watch what lines she buys when we visit the scrapbook stores. I pick up a few things and then get her a gift card to a local huge scrapbook store to add some goodies that she has been secretly craving.

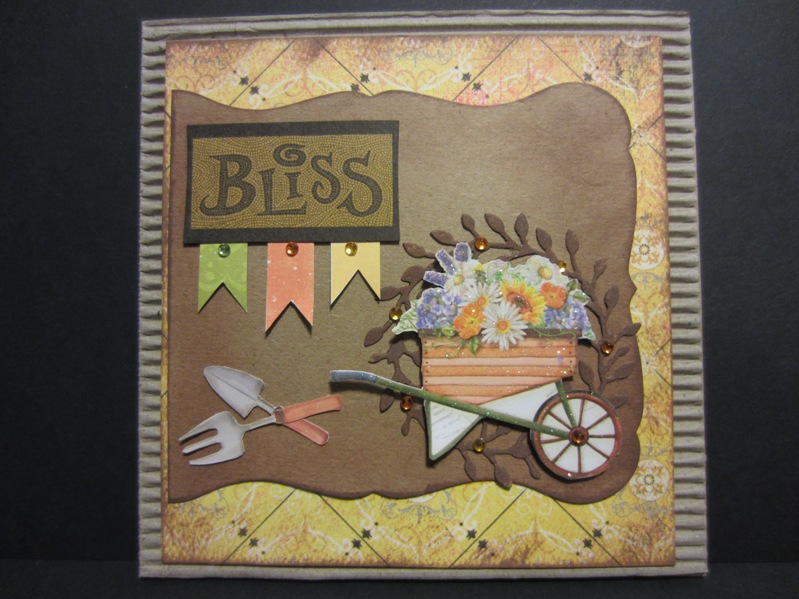
Here is a peek at the lovely bag of goodies she gave me.
2 sets of Tim Holtz texture fades embossing folders.The Collage and Notebook set and the Bingo and Patchwork set.
Some gorgeous doily diecuts...a girl can never have too many of those.
2 Spellbinders Impressabilities  "Snowflake" and "Fleur de Lis"
A gorgeous stamp that says "Family" and a Cosmos Cricket Holiday Type sticker set. This last one is so funny cuz I bought her the exact same sticker set. It has some gorgeous sentiments with no sheen at all, sort of like heavy cardstock stickers and some Type font letters.  And it stinks!!! Really stinks!!! And I gave her the exact same one and now her room will stink too!!! They were a local bargoon and so I bought 4! I have aired them out of the stinky acrylic envelopes and currently have them sealed in a container with a brick of  odor absorbing crystals! We had a good giggle about it!
I have emailed the company and so far no response...perhaps they are closed for the Holiday season.

The finishing touch was a Michaels gift card. I can't wait to spend it.
Thanks so much Lisa!

One of my favourite things to do in the Xmas season is to go and look at the Christmas light displays. The newspaper always publishes the addresses of the fabulous houses and we go for a drive and take in the sights. Usually there are collection boxes for various charities.
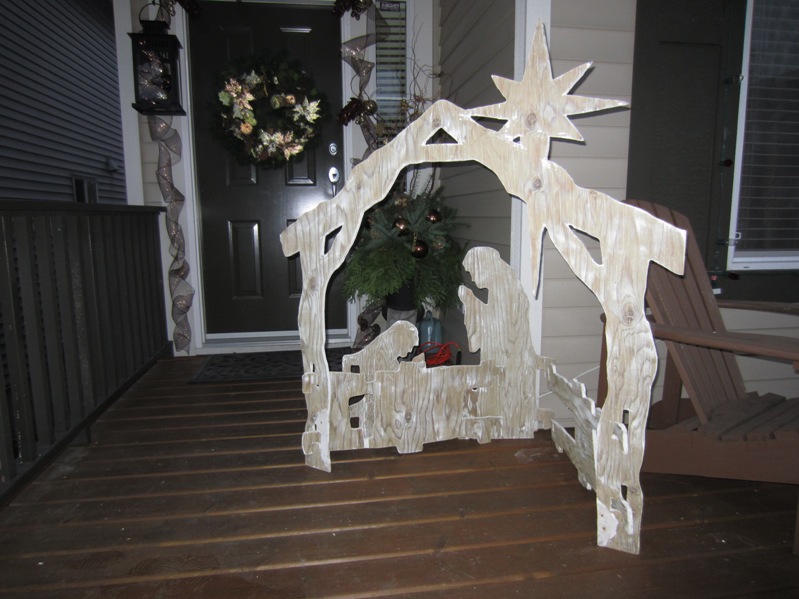
This year we celebrated the fact that we could get out and walk through our own neighbourhood. We set out with my poles firmly in use and here is a peek of my neighbourhood. Certainly not one that will make the newspaper, but well loved by us anyway!
Here is the front of my house, taken from the sidewalk. It wasn't quite dark enough yet! We don't have a front lawn...just shrubs and trees and ornamental grasses. it is hard to get a clear shot as the trees block the shot. I walked along the sidewalk and a took a few shots.


Here's one of the front porch...DH got me the branches I was hoping for and I ran the leftover strand of red 
lights from the door all through them. I usually run some garland around the door frame but this was as much stretching and bending as my back could take! 
Here it is a bit closer up...teehee...looks like that large red bauble at the front left rolled out and got tossed back in randomly...teeehee  If you look really closely, you will see some varying sized cardinals clipped to the branches.  There is a wooden birdhouse at the back of the branches with a large cardinal sitting on top as well.

Here is the other side of the door...I like to sit with a coffee out here in the mornings. Lots of neighbours walk by with their dogs on a leash...heading up to the park just a few doors down. I had to lean the swoden Santa's up against the house to hide the power cord connections. The people who built the house had the only power plug in installed on the ceiling. Good idea for lights along the roof line but at pushing 60 we don't climb ladders anymore!


The gaudy plastic Santa below is DH's fave Christmas decoration....teeheee...apparently it looks just the one his Mum had when he was a kid.  Now he has added a plastic snowman too!!! Hopefully  he is through adding any more as I prefer to just have the lights!


Here is my next door neighbour, Lisa's house.The urns at her front door are just gorgeous this year!
Here's the neighbour on the other side.
A couple more lovely ones


Wish I was more talented with my camera as my photos are pretty awful... ...

Saturday 22 December 2012

Dashing Through The Snow - The return of Little Miss C


Not to be outdone by her brother, Little Miss C is my guest designer today. Yes, I know she has her own blog but she is looking to drum up some comments over there and so is featured here today!

They were both over yesterday afternoon, munching shortbreads, sipping hot chocolates and checking out the tree. I have words on my tree and she was sounding them out and reading them. She did pretty good but got a little shaken by BELIEVE.  Boy oh boy, that word breaks all the learning to read rules!

You can expect many more cards on her blog over Christmas as her little face lit up when she informed me  yesterday that Christmas vacation has started and she could come over every day and make lots of cards during school break!!

Here is a peek at her card and check out her blog for the details and recipe


Merry Christmas to everyone! This has been such a wonderful year following all your blogs, and getting to know you all better! I have learned so much about inks, stains, mists, folds and a thousand more tidbits. I  appreciate so much the sharing of ideas and cheery guidance offered when needed. I am so glad I started this blog and appreciate each and every one of you!

Tuesday 18 December 2012

Little Mr P's card debut

Every now and again, Little Mr P shows a decided interest in joining in on the card making fun.  It seems to depend on which stamps I bring over with me. He saw this cute little reindeer stamp sitting on the table and announced that he would like to make a card too! Little Miss C wasn't too pleased as she didn't want him horning in on her hobby! She quickly told him that Grandma was already helping her and that he would have to wait his turn to borrow her tools.
Fair enough! He went off to play with his Lego and I though "out of sight, out of mind". But not Little Mr P! As soon as he noticed she was finished, he came over and reminded me it was his turn now.

He was very interested in the mechanics of stamping the stamp. He pressed so hard and so even...he got a nice image. He then asked which colours to use and we carefully chose 2 reindeer browns. He then looked all through my meager red collection for just the right shade to turn his reindeer into Rudolph!

I was delighted to see what a wonderful job he did staying mostly inside the lines. He is only 4  1/2 years old and so he  was concentrating very hard on his task. Once the colouring was finished, he knew exactly what he wanted for trim as he had looked through the card bits and bobs bins while he was waiting.  He wanted brown for the mat "cuz brown is for boys"! The brown string was chosen "cuz all the other string in that box is for girls"! I had to help him tie the bow but the science of wrapping the string around the card was greatly enjoyed! His sister loves to chalk or ink her edges. It is her second favourite part after the colouring...not Little  Mr P! Oh no! No chalking for him AT ALL. "No chalk Grandma, cuz it feels funny on my fingers! 

When we were done, I asked who he was going to give it to. Little Miss C always has a Grandparent or a Great Grandparent or her Mom or Dad as the recipient...he proudly announced that his card was for his best friend James!  James is a little boy who is a lot like Little Mr P. James loves to build and play trains and understands the joy of  building an elaborate track and then  playing with it all day. James would never  kick the tracks apart like some other playdates have done!!!

He then asked for an envelope and proudly wrote James on it. He had to have me spell out the letters for him but wrote them quite proudly!


I helped him stamp the inside...when I tried to get him to chose a sentiment for the front he looked quite perplexed and then said "No, Grandma, that would be silly...James can't read!
I'm not quite sure why the verse was allowed inside but ...there you go...that's life with kids!

Little Mr P is entering his card in the following challenges.
1. Pixies Crafty Workshop - use snippets; the string, brown mat and the copic paper for the reindeer are all from Grandma's snippet bin.
2. Simon Says Stamp - favourite tool. die or product; My favourtie product is my sisters copic pens cuz they are very special and I hardly ever get to use them cuz I am only 4 & 1/2 years old!

Monday 17 December 2012

Tried and true

When my mojo goes walking, I can usually create a card with Stampin' Up. Their cards seem to go together easily...Think it is because you can count on everything to fit etc.

The last of my in town cards were mailed today and here is one I haven't shown yet. I really like the way the colours fit together and the way the Stampin Up sentiment fit their word punch perfectly. I quickly grabbed a photo to share with you.
After it was finished, I felt maybe it lacked a little Wow factor...but once I ran the glue pen around the flourish stamp on the red ornament and sprinkled ultra fine glitter over it, I was happy.  It then had enough sparkle!
Here a better shot of the glimmer.

No recipe tonight. Sorry. I have a touch of the flu and I am heading up to snuggle under a warm knitted throw and watch a little TV with my husband.  I have felt off for about a week now but it finally hit me last night and I haven't had much sleep.

Friday 14 December 2012

Another ladies night card.

Here is another card from my ladies night out last Friday. It was such fun making cards with my girlfriends!
I did two corrugated cards that evening, but I mailed the second one already and forgot to take a picture!!!

I have been trying for what seems like forever, to use up these blue chipboard pieces. Every time I tried to make something with them, I ended up placing them back in the Xmas bin and starting over. For once my thoughts  just seemed to come together and I glued that card before I changed my mind. I think it has been hard to use as out of a package of maybe 12 pieces, there are 3 different shades of blue and the different shades don't really go together.

This time it didn't seem to bother me as much...maybe I am getting less picky in my old age! I stickled the heck out of them and that seemed to tone the difference down a bit. I even stickled the scalloped Spellbinder die. Here is a close up of the shimmer.
Another card crossed off the list and will be delivered on Saturday.
Recipe
Card base - Michaels, Recollections corrugated cards and envelopes
Design paper - MME Noel
Dies - Spellbinder scalloped circle and  Memory Box Bianca Snowflakefrom my stash  (precut from scraps and in my snippets binder
Chipboard - Snowflake and SNOW sentiment -  from my stash (originally from the Dollar Store)
Bling - from my Stash
Stickles - Star Dust from my stash
Image - not sure of the name...I used a friends stamp
Cardstock - kraft,  from my stash

I am entering this card in the following challenges:
1. Fab and Funky Challenge Vintage Christmas - I have a vintage image of children frolicking with Santa
2. Christmas at Sweet Stampin' - Anything Goes #1
3. Papercraft Star - A Christmas tree # 124
4. Pixies Crafty Workshop -  use snippets, cardstock, bling, chipboard were all stash/snippets
5. Simon Says Stamp - What's your favouite - My favourite is my FiskarsProcision trimmer and Kraft paper
6. Penny Black and more at Allsorts - It's your choice
7. Flourishes -  Non traditional festive colours   #199
8. Loves Rubber Stamps - Let it snow week 30
9. Joanna Sheen Challenge  - With love at Christmas
10. No matter which Challenge - Christmas

Monday 10 December 2012

A night out with the girls

NO...not that kind of night out..... but a fun, creative evening for sure. My neighbour and another friend and I went to the Friday night free crop at one of our local scrapbook stores. They have 2 rooms set up with several 6 foot tables. Sometimes it can be a full house and then you have to share a table, but tonight I think there were only 8 of us. Luxury!
 Oh, how I love going to crops! I find it so inspiring to see what everyone is working on, to run ideas past your friends and just have a giggle and a good catch up.

For once, I got quite a bit finished. I made several flat cards...very flat cards indeed. Cards that I'm almost positive will fit through the infamous tester slot! I resisted popping elements  forward on the first few I made and only brought out the pop dots after I had finished several flat cards. teehee
Here are the flat ones. I need to add something at the top of the ornament. I was going to tie a small shimmery metalic cord into a bow. I have a silver and also a red.  Or I could handcut the Memory box bow that is supposed to go with these...that would be flatter...but I couldn't decide! What do you think?


And now a few with a bit of  3 dimensional elements.


In real life, the contrast between the snowflake red and the poinsettia red is not as stark as it looks here. The poinsettias have a lot of burgundy red glitter and beads on them.
This shot shows those poinsettias in all their sparkly beauty!
I think I was really struggling to take all these pictures tonight without the benefit of natural light. The card is metallic silver so is giving off a lot of glare on some of them and the others look too dark!

I got a few more cards done too but have ferreted them away for another post.

I even managed to hand deliver 3 Christmas cards today. DH went out with his pals for lunch and the guys stopped by here to pick him up We had a little visit before they set out and I was able to hand them their cards as they left. The first of my in town cards delivered...that is a good feeling.

Today I plan to set out the Xmas decorations on the main floor. Time to break out the Xmas tablecloth and mats, the Xmas towels and do up the centerpiece on the dining room table. I am hoping we get out to find a few branches for the plant pot at my front door. I have filled it with red and silver Xmas balls and a couple of red feather cardinals...a few well placed branches should finish it off.

Perhaps I can even get DD to throw some lights on the shrubs in the front flower beds.   We don't put up lights on the house eves or around the garage door anymore since DH had a nasty fall off the ladder a couple of years ago. Bit of garland and some lights around the front door,  lights on the shrubs out front, and we call it good. How could he manage all the cooking with a bum shoulder?  Not taking any chances! teehee

No challenges for these...too many things still on my "to do list"...must get cracking on with it!

Sunday 9 December 2012

Oh Cristmas tree...

Got the tree up...and I mean just up. It is a fake tree so I spent almost  two hours fiddling with the lights,  fluffing all the branches and setting on the garland. I had to sit on a chair to do it and get DH to do the top. That slightly leaning forward position is murder on my back.  Finally it is up and ready for decorations.

Had to leave that aside for the rest of the afternoon as DD,  Little Miss C and I set off to a Xmas card  mini class in Langley. We made 2 cards each and took home a full package of 12x12 double sided paper and 2 sticker sheets. They sold it as a 30 minute mini class...Best of all it was only 6 bucks including the paper pack! It was a fun way to spend some time with my girls! It was Miss C's first card class...she was so excited. Here is what we made...

We went back to my daughters house as my husband was there getting my SIL's help with some woodworking...very special woodworking indeed. Now that he is retired, he is busy turning the office into a TV den.  He has given me his 2 drawer filing cabinet and oak worktop.. He has fashioned an "end" piece of wood  in lieu of legs for the right hand side. The worktop will balance on the filing cabinet (which is exactly my counter top height) and needs some sort of "legs" on the right hand side.  Sadly I also inherited several of the household filing folders but  managed to gain 1 1/2 drawers of empty hanging legal sized files...perfect for large card stock scraps!

Here is a picture of my daughters front porch and door...all done up for Christmas! There are some lovely large glittered, shimmery  pine cones and lots of glittery mesh ribbon.
Just in front of that is the nativity scene she found on craigslist. They have just wirebrushed it this year and want to repaint it next year...I kind of like it just like this.
Off to start unwrapping the tree decorations!


Friday 7 December 2012

Thank you to Jennifer Jumbles

Each year Jennifer @ Jennifer Jumbles sponsors the  Frosty Festivities blog hop. She and a bevy of her talented friends offer tutorials, and showcase cards, layouts, Christmas decor, challenges, and more. There are many fun prizes along the way and 3 mega prizes.  She has some wonderful sponsors so the prizes are fab.

She perhaps explains it better than I, so here is a snippet of her announcement:.

On Friday 16th November – Sunday 18th November I will be holding a Blog Event called ‘Frosty Festivities’. Over that weekend there will be posts every hour from 4pm-10pm Friday, and 10am-10pm Saturday and Sunday (GMT), all on the theme of 'Winter' including tips, tutorials, challenges, crafts, a blog hop, and lots of giveaways. The photo above shows you a mere snippet of  the projects and prizes!

I really hope you'll be able to join me for the weekend. The giveaways will stay open until Monday (19th November 2012) at 10.59pm GMT, so if you're away for the weekend you'll have Monday to try and catch up! The challenges will be open until the following Sunday (25th November 2012) too!

It caught my eye as I really liked that it was back in mid November...I am often just too busy in December to play along with all the wonderful festivities on line. Jennifer's dates worked for me and got me in the Xmas spirit. Best of all, this lucky bunny won one of the draws and here is my lovely haul.

My Minds Eye  All Is Bright paper pack 9 double sided sheets of 12 x 12 card stock and a sticker sheet to boot! There is also a sweet little card of chipboard banner with some pretty crocheted ribbon. Three glimmery pens in purple, silver and gold will keep my cards looking pretty.
The crowning touch is just such a great idea. Jennifer has rolled me off some different types of washi tape onto an old fashioned  peg clothespin and then finished it off with some beautifully coloured twine! I am treasuring this as I only own one roll of washi tape. Now I have 4 to play with!  My parcel arrived in a 12x12 pizza type box and Jennifer nicely set everything in a cloud of red tissue paper which was lightly closed with some bits of that Christmas patterned washi. That Christmas one is so wonderful...I love it so much, I carefully peeled it off of that very nice wrapping and transferred it onto the peg as well. teehee
 Waste not want not!!!
I notice that Jennifer has now prepared a pdf of all the project instructions. Check it out here: http://jennifersjumbles.blogspot.ca/2012/11/the-frosty-festivities-pdf-and.html
It is definitely  worth a peek!

Almost forgot, here is Jennifer's Christmas card that came in the bundle of goodies!


Wednesday 5 December 2012

It's a blue, blue, blue, blue Christmas...

Well,  a blue snippets Christmas, that's for sure.

I am getting tired of creating Christmas cards...I don't know how you ladies that colour every image, do it. I follow a few ladies who produce a breathtakingly beautiful, hand coloured image on a card, every day!
I  am now taking a bit of a break and fishing bits of old cards out of the snippets bin and rebuilding them into new ones. I had forgotten I had even torn the backs off and thrown them in there. They have been carefully redesigned into something new and different but some elements are recycled.  The blue snowflake designer paper here, along with the teal scalloped border are recycled off an old card front. I trimmed it down and added it to some silver scalloped flat card front. I have a few of those silver flat fronts in the bin and some have been previously trimmed down and the pretty edge used for borders.
Luckily there was one trimmed up strip left, with one side still intact. Not for long...slice...and it was gone! I placed it  vertically down my card and added a row of snowflake ribbon. You will so proud of my recycling skills...the teal stars that I added to the center of the snowflakes are the star shapes that fall away when you cut the Spellbinders star circle. I always save all the die cut  fall away bits...they always seem to come in handy!

Adding the wee stars to the snowflake ribbon seemed to balance the larger  teal snowflakes over on the right. If you look carefully you will notice that one snowflake is smaller than the other cuz I gave it a haircut!   I added a white Memory Box snowflake corner under the larges teal snowflake...again just to tie it all together.
Recipe
Card Base and envelops - cut from card stock in my stash.
Designer Paper - cut from a finished card front from previous years...stored in my  Xma stash snippets. Originally Stampin Up, I think
Cardstock- White, teal , from my stash
Bling - from my stash (originally from Dollarama)
Ribbon - White snowflake ribbon from my stash
Punches - Threading Water for the teal border, Stampin' Up curly label punch for the Santa stamp, Martha Stewart for the teal snowflake (smaller one  has had a hair cut)
Dies - Memory Box , Snowflake Corner Die
Stamp - I think it is an older Stampin Up

I am entering this card in the following challenges:
1. Pixies Crafty Workshop - use snippets - All of this card is made from snippets, one type or another!
2. Addicted to stamps #44 - must use stamped image-  Xmas time
3. Dream Valley Challenges - Non Traditional Christmas - Blue is my non traditional colour
4. Eclectic Ellapu - Santa paws or Snowflakes
5. Sentimental Sunday - non traditional Christmas - Blue is my non traditional colour My sentiment is the Christmas Cheer on the Santa stamp
6. 2 Sisters Challenge - Sparkle - the snowflakes is heavily sparkled
7. Challenge up your life - First Snow
8. Hiding in my Craftroom - Blue and White
9. Little Claire's Challenge - Christmas
10. My Sheri Crafts - Christmas
11.MFP  Speedy Fox and Friends - No red or green
12. Crafts4 Eternity - Christmas Chaos, Any Xmas Themed Project
13. Jingle Belles - Anything Holiday goes
14. Winter Wonderland - Santa Claus is coming to town
15. Wags and Wiskers - Christmas
16. Fussy and Fancy - I love Christmas
17. Pause, Dream, Enjoy -  Forgotten Stash
18. Allsorts - Advent
19. Penny Black and More at Allsorts - It's your choice
20. Cards Galore - Christmas
21. Go Fish - All about the holidays


22. Simon says Stamp - Anything goes

Tuesday 4 December 2012

WOYWW 183

Seems hard to believe it's that time again. The time to peek into all the crafty worlds. Yep, it's time to head over to Julia's blog, Stamping Ground, and check out what the others crafters  are up to!

Thought I would show you that sea of cards I keep talking about. My work desk is so full of supplies that I couldn't take a photo on it...there is just not enough room. I carried the cards into the guest suite we built for our visitors from England. We have it furnished and keep it all set up for company. It adjoins my scrapbook room...well, actually the laundry room divides my room from the suite...so I can tell DH that I am heading down to do the laundry when I want to blog surf...teehee
I digress...now...back on track...here they are in all their glory.

 There are a couple you have not seen before...I purchased them at the Christmas craft fair. One lady was selling 6 cards and envelopes in a gift box for $2.  I could not resist as I can't buy the paper and supplies for that price and she was anxious to sell something to help pay for her table. They are actually quite nicely made!  The red 6x6 square with the white ornament on the front right and the 2  lying down at the front left with a modern Santa and a red ribbon make up the set of 6. The pretty brown and cream one beside them is from a friend who was also selling at that fair. The rest are mine. I have not included any duplicates of the same card (assembly line cards)...just a sample of each style that I have made.

Thank goodness I bought that set of 6 as I had a bit of a problem at the post office. My overseas cards that made it through the slot, failed to slide through when I took them up to post. Thank goodness I had not put stamps on them yet. Luckily,  I had  those purchased cards...I did not have enough really thin cards left to substitute and they made up the shortfall! I was just out of time to remake anything again. Whew...problem solved! Luckily, I only sign my overseas cards as I do up a Xmas newsletter for our English family members. I think I neglected to account for the width of the folded over newsletter and that was what failed them this time.I have signed and addressed the thinner ones and will be back up there to post them tomorrow. I will be busy tonight tearing the envelopes off the rejected ones and searching for my extra envelopes in my mess of a craft room!

Re the"tester slot".  To those that suggested cutting my own...I have done that before...But cardboard "gives" when acrylic doesn't  Also the little pearls and knots in ribbon dent the cardboard, making a new one necessary when the denting prevents a true measure.   To those Canadians who left messages that the "real post office sells them" I have some bad news...nope, not any more! They used to sell the old blue ones years ago, sadly, they stopped. Wish someone would go to the the Dragons Den and get the $ to create one...they would get rich as they would have no competition!

I still have a few more cards to make (and a few that I have tucked away for future blog posts) but the pressure is off creating for now. So that's it for this week!


Monday 3 December 2012

Finally a stamped image!

Finally got a stamped image made up into a card.  This is the last one from the 3 cards I made last Thursday evening when my neighbour came over to make cards. It is another card made with lots of snippets.

The image is from a "stamping do" they had at my local scrapbook store. It was a lot of fun and I got this image and many more done. I have tried to shade the petals but it seems it is harder than one would think. I have liberally covered the edges in stickles and then "roughened" up the edges with the edge of the scissors.  I popped it onto a Kraft card stock mat and then those edges were "roughened" as well I meant to cut more off the bottom edge as I overcoloured the bottom petal, but I forgot! Only noticed it when I looked at the computer just now!  Note to self...another card for a non cardmaker!!!

I placed the matted image onto a background mat that is actually a journaling spot. I picked up a whole package of assorted journaling spots, embellishments,  plus some designer paper to match, for 25 cents at the scrapbook garage sale last summer. Oh,  how I love a bargain!

With all the glitter from the stickles on the poinsettia, that journaling spot seemed boring, so I used some Star Dust stickles on the dots in between the plaid trim and added some Xmas Red stickles to the berries on the wee wreath. A trio of red bling finished off the right side but now the left side seemed a bit boring. I grabbed the Star Dust stickles and touched up the fur trim on Santa's hat and coat. Then I grabbed the Xmas Red for his hat top and the bow on the present. Here is a close up to see the glimmer.


That border is a snippet of K and Co border leftover from a scrapbook page. The elements are all sitting on a snippet of MME  designer paper left over from other Xmas cards made back in Novermber.
Finally, I was  happy with my card!

No recipe today as it is all in the long version above. It is after all, Sunday, and I still have to find the Nativity scene and get it set up...It was my task yesterday but got set aside as my back was too sore to be digging through the Xmas decorations.

***Update***
Finished setting up the Nativity on the dining room hutch and the doorbell rang. It was Little Miss C and Little Mr P. They were enroute to their other Grandma's and stopped by to show me their dressed up little faces. Perhaps you remember this dress...she looks so grown up in her black tights but walked about shivering as she took off the velvet jacket and left it at home! She had on a nice little black Scottie dog hair pretty. Carrying on the dog theme, Mr P had a boxer dog knit into the front of his sweater. He does not like his picture taken so I could not get a photo of that! Here they are admiring the baby Jesus in the creche.


I didn't have time to hide the electrical cord or tidy under the hutch where I had to slide things that normally sit out on top.  Thank goodness for tomorrow!

I am submitting this card to the following challenges.
1. Pixies Crafty Workshop - use snippets. Othere than the image, everything else on this card is a snippet.
2. Pause Dream Enjoy - #48 Forgotten Stash The journaling spot is from the summer garage sales and I forgot I bought them till I pulled out the Xmas snippets  drawer.
3. Little Claire's Ideas and Inspiration - Christmas
4. My Sheri Crafts - Tis the Season
5. Crafts For Eternity - Christmas Chaos, Any Christmas Project
6. Jingle Belles - Anything Holiday goes
7. Wags n Wiskers - #93 Christmas
8. Fussy and Fancy - I love Christmas
9. 2 Sisters - Sparkle
10. Allsorts - Advent
11. Go Fish - ALl about the Holidays
12. Pixie Dust Studio - Winter Holidays
13. Simon Says Stamp - Anything Goes.
14. Cards Galore - Christmas
15. Winter Wonderland - Santa Claus is coming to town

Sunday 2 December 2012

Another paper crafting with friends card

Here's another card from my crafting evening with my next door neighbour. I am blessed to have a neighbour who scrapbooks and makes cards. She is my daughters age but we are good friends. She is very kind and patient with this old lady...well old enough to be her mother, anyways!

This card is quite similar to yesterdays with a few variations. I follow quite a few blogs and there are several ladies who always use a corner punch on their cards. I love that look, so tried that lattice accents on yesterday's card. I thought it was a bit "heavy looking" so for this card I die cut a Spellbinders Fleur de Lis Square and then took my fussy cut scissor and cut in half diagonally. I thought that looked too wide so one by one I ran then through the big shot again, recutting the smooth edge I had just made and turning it into the match for the other sides. A little stickles and it was done.
I now had 2 teensy slivers that I had just cut off so I stickled them as well and glued them on the top and bottom of the stripey piece that sits on the doily. Waste not want not!!! I like the look of those slivers!.
I stapled the doilies again and then stickled the center of the candy on the design paper. I got a little carried away with my distressing and actually tore that paper here and there. I kind of like the finished look. Another of those chipboard ornament sentiments and I called it a day.
Recipe
Card Base - Michaels Reflections, Kraft Corrugated cards and envelopes
Designer paper - MME Merry
Cardstock - Kraft from my stash
Doily - Dollar Store, from my stash of about 10 packages  that I bought on clearance...I staple 3 together
Punch - Martha Stewart Snowflake, from my stash of already punched elements
Die - Spellbinders Fleur de Lis Squares, the tiniest size cut in half
Bling - Dollarama, from my stash
Twine - from my stash
Sentiment - Dollars and Sense (2nd card from this sheet)

I am submitting my card to the following:
1. Pixies Crafty Workshop- use snippets.